Showing posts with label essie. Show all posts

Wednesday, January 15, 2014

Let's watch paint dry!

Hey guys! 

Yesterday I got a brand new set of nail stamping plates, so I got inspired to make a little video of me stamping my nails.  I've been meaning to do this for quite a while, because every time I post a stamped mani I get questions about how it works.  I do have a page up top called "Nail Stamping Info" that I add and remove and then add back occasionally.  But it's always better to see it in action.

I mentioned before that I prefer to do stamping on a well-cured mani, so I painted my nails last night in preparation for stamping this morning.  But honestly, a lot of the time I do stamping to get an extra day or two of wear out of a mani that's starting to look a bit rugged.  Win!

Before I started I took a picture of all my supplies.  It looks like a lot, but I keep it all in a little kit so it's easy for me to get out when I want to do my nails.


Starting from the top left and working down and to the right, I've got:  pure acetone polish remover; a food carton lid with two cotton balls (the triple size ones); some scrap paper with my stamping plate on top; a small bottle of regular polish remover; nail polish for stamping - this one is Wet n' Wild Black Crème; my stamper; an old "credit" card; two pointy Q-tips; and a brush I use for clean up, but didn't use this time.

All of this is on a mat to protect my table, however,  I usually just do this by the bathroom sink.  My sinks are granite, so if any polish spills happen it's easy to quickly wipe them off.

Here's a picture of my stamping plate:


The plates are so shiny, you can see my camera and hand reflected on the surface!

For this mani, I stamped with black, but you don't have to use black.  Any strongly pigmented polish will work, and chrome-finish polishes work well also.  I used black in hopes it would show up better on camera.


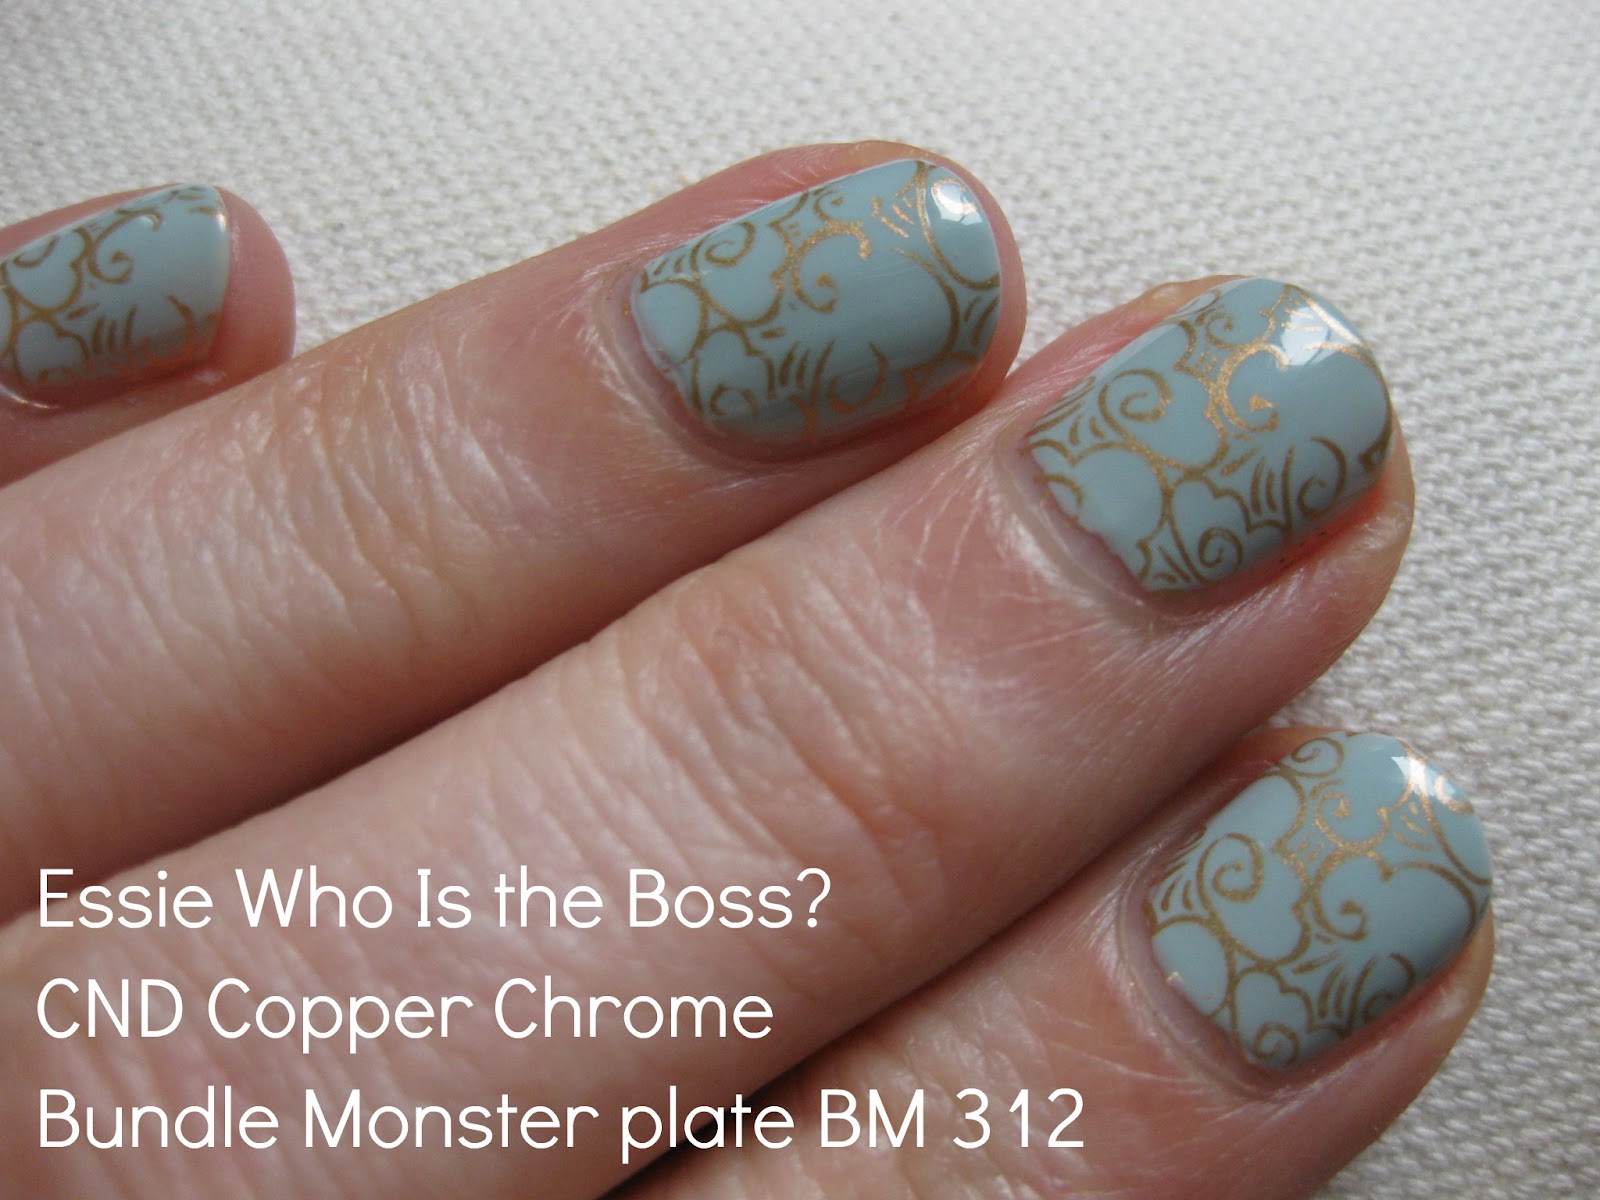
And here's the finished mani:


For this one I used Essie Chinchilly (two coats) topped with CND Copper Shimmer (one coat).  Stamping was done with Wet n' Wild Black Crème, then topped with INM Out the Door.

You can see how quickly you can stamp your nails.  If I take out the explaining bits, I did five fingers in about 2 minutes.  Start to finish - and that includes cleaning up around the cuticles and adding top coat - I spend barely 10 minutes each time I stamp my nails.  The hardest part, for realz, is deciding which stamp I want to use!!  I've got over a hundred plates now . . .

Monday, July 1, 2013

Feast or Famine

It's a little weird that I've been posting every day for the last several days, after posting only intermittently for a few months.   What can I say?  My blogging philosophy is that if I don't feel like posting, I don't!  It's a hobby - I try not to get stressed out about it!

I stamped my nails for the first time in a long while the other night, and I liked it so much I decided to share.  I really like this "tribal print" motif on Bundle Monster plate 315 - I've been seeing a lot of fabrics with a similar look lately.  My base polish is Misa Great Grape from the summer 2013 "Fresh and Fruity" collection.  This is the same polish I was wearing in the video I posted a few days ago.  On top of that I stamped with Essie No More Film, a very deep blue-violet from last summer's resort collection.  It's dark, but less stark than black would be and so pigmented that it's great for stamping.


I love this stamp!  I think it would look fantastic over a gradient nail - kind of like all the ikat fabrics that are all over the place lately!

Thursday, February 7, 2013

More feathers.

This time on my nails!

The other day I decided to try out Zoya Minka - an opaque nude - with the Mentality Holo topcoat I bought a few months ago.  The holo topcoat shows up much better on darker colors, but I still like it on the nude:


It was nice and sunny yesterday, so I took lots of pictures:


This morning I was getting ready to take it off and try something different, but decided instead to use a new stamp I got in December.  This is made by a small, indie stamp designer in Israel.  She calls her line (and blog) Nailz Craze, and this is plate NC01.  (Which looks like it may be out of stock at the moment, of course!  Isn't that always the way?)  It includes butterfly wings in large and small for both right and left hands, a peacock feather and a dandelion, along with some assorted heart motifs. 


I found the quality to be excellent on this stamp, and the price was reasonable.  The shipping took a while from Israel, but the designs are so unique I felt it was worth it.  The images are nice and big, and the plate itself is larger than the Konad and Bundle Monster plates I have.  In fact, the peacock feather is so large that it doesn't fit completely on my large stamper!  I tried to use varying parts of the design and mix it up, but I could stand some practice!  I stamped with Essie No More Film:


Looks nice with the new sock I'm knitting, tease tease!

Friday, August 24, 2012

Copper Clouds

A few days ago, I rediscovered CND Copper Chrome in my polish stash, and decided I wanted to use it for a stamping.  I looked around to see what color and image would go well with it, and settled on Essie Who Is the Boss and this stylized cloud pattern:


After I finished, I felt that the CND wasn't as great a stamping polish as I'd thought it would be, but couldn't remember if I'd used it before.  So I did a little search on the blog, and it turns out I have used it before - with this very same blue polish!  (Although not with a stamp.)  So I guess these two colors are made for each other!

Monday, August 13, 2012

Subtle Stamping

Here's a recent stamping I really like.  I love how the copper mesh pattern adds subtle texture to the pale pink polish:


We're having a nice respite of cooler weather here the last few days, and it's making my mind turn toward fall polishes.  But I'm pretty sure this isn't the end of summer yet!

Friday, August 3, 2012

Sponging for Dummies

Here's another stamping from the new Bundle Monster set.  This one reminded me a lot of the sponging technique, which I still haven't been able to master.


I had a really hard time lining this one up at the bottom edge of my nails, so some of the dark areas are abruptly straight near my cuticles.  Also, clean-up was a bear with this very dark blue-violet polish.  Next time I'll prepare my skin with a little something slippery beforehand!

Here's what the image looks like on the plate, for comparison's sake:


I used the image at 3:00.  I guess you can tell I had a hard time getting it centered too!  I'm looking forward to trying this one with a metallic color over a creme.

Tuesday, July 31, 2012

Kablam!

I got the third Bundle Monster stamping plate set the other day, and I decided to do my first stamping from it with Niecey-poo's favorite image from this set!


Monday, July 2, 2012

Achooo!

Somehow I ended up with a cold, so I'm laying low today.  But I did have enough energy to do a little stamping on my nails:


I've been wanting to try out this stamp for a long time - not really sure why I haven't used it before.  I really like it!  I just picked up two of the colors from Essie's new Mirror Metallics collection (Penny Talk and Nothing Else Metals, a lilac chrome), and like most chrome finish polishes, they're great for stamping.

Against this red-violet, Penny Talk isn't showing up as copper as it really is, but I do like this combination.

You guys will probably be seeing a lot more stamping around here soon.  In a couple weeks, my niece will be arriving to spend the summer with us again!  Since I'm not likely to get a whole lot of sewing or knitting done during that time, I think stamping will be my art form of choice!

Thursday, June 14, 2012

Long time, no stamp.

Let's fix that, shall we?


I wanted to get another day or two of wear from the polish I put on the other day, Zoya Farah.  So this morning I stamped it with Essie No More Film and Bundle Monster plate BM204.  I really like the brocade look of this image, and I think the blue-violet of the Essie looks great against the yellow-beige of the Zoya.

It's been quite a while since I stamped my nails, but I might just have to start it up again!

Friday, April 13, 2012

Deckle

The other day I happened to be in Ulta (OK, I went there on purpose.  I had a coupon.) and I spied the Essie Wedding Collection for this spring.  I hadn't seen a lot of hype for these online, so I was surprised to find them.  And I was completely intrigued by the blue shade, Who is the Boss?


I put it on last night, and fell in love with it straight away.  But this morning I felt I wanted to add a little more to it, so I did a CND Behnaz Sarafpour-inspired "halo" mani.


It's probably not for everybody, but I really love this look.

I used a natural sponge to sponge on CND Copper Chrome just around the edge of each nail.  I like to put one drop of my sponging polish into one of the little vials I save from my contact lenses, then tamp the sponge into it several times before taking it to my nail.

To soften it up, I topped it with CND Ivory Coast, a very sheer cream shade.  It really doesn't change the color much, it just makes it a little softer.

The only downside with this mani is that there's quite a bit of clean-up involved.  I used Qtips dipped in remover to get most of the polish off my skin, and then went back with my fine brush to get what was left.

What say you?  Yea or nay on the halo mani?

Sunday, March 4, 2012

Hallmark Card

Last night I decided to do a little stamping on my current mani, and then I jazzed it up a little with some silver glitter.  The end result reminded me of those greeting cards that have little bits of glitter highlights!


The base color is Essie Nice is Nice from last spring, and the stamp is Bundle Monster BM210 using Essie Jamaica Me Crazy.  And the glitter is Milani Art of Silver Nail Art.

I wan't too crazy about it last night when I did it, but now in the daylight, I'm kind of digging it!

Monday, January 9, 2012

(Polish) Change is Good

It took me about five minutes to get tired of the blue nails.  I'm not really sure that periwinkle shade works for me.  So last night I took it off and tried out something that's been in my mind for a little while.  I started out with two coats of Zoya Christina, a sheer frosty white, and then topped that with two coats of Essie Luxeffects As Gold as it Gets:


LOVE!!  In addition to loving how it looks, I love that I've found a way to wear Christina that I like.  It was one of the first Zoya polishes I ever got, and I was pretty disappointed with it when I put it on.  It's supposed to have some silver shimmer, but it really just comes across as frosty white - very '70s.  It doesn't apply evenly either.  But I'm absolutely loving it with the gold on top.

This morning I decided to up the ante and add on some gold chrome tips:


Double love!  This is my favorite mani of 2012 (hahaha)!  On my right hand, I made some tip guides with tape and craft scissors (the "cloud" shape from Fiskars), but on my left hand (shown) I just did the tips freehand, and they actually look better than the ones I did with tape.  I'm pretty proud of myself to tell the truth - these are the first freehand tips I've done in at least 10 years.  I used to give myself French manis all the time back in the '90s when I had long nails, but it does take some practice.  Not sure I could do it on my right hand though!

One of the things I love about this is that the texture of the glitter shows through the gold tips on close inspection, so it almost gives it a hammered metal look:


Triple love!  Now I feel like I don't want to do anything because I don't want to mess up my pretty, pretty nails!  But I think I'll see if I can get Hubby's shirt finished, so I can clean up my dining room!

Monday, December 5, 2011

Emergency!

Hubby's ears are cold!  So I'm planning to suspend work on all other knitting until I've finished this hat for him:


No pattern, just a general idea of how I want it to be.  I'm hoping it works out. Often things look a lot better in my head than they do in real life.

And here are the pretty nails I've been sporting for the last few days:

Essie Topless and Barefoot
topped with Essie Luxeffects A Cut Above

Me likey.

Saturday, November 19, 2011

Revised


So, the day after my first post about my 1958 sweater, I decided I wasn't happy with the way things were going and ripped it all out and started again.  I had only done 4" on the back, so it wasn't too heartbreaking.

While I was getting gauge with the 3.25 mm needle, that gauge was based on the rib fabric being opened out a little.  As I was working, I decided that I really liked the look of the fabric better when it's allowed to pull in.  So I restarted with a 3.5 mm needle (US 4) and, because I wanted the fit to be slouchy, went up from the size 12 (34" bust) to the size 14 (36" bust).  And now things are moving along nicely.


Yesterday I completed the armhole shaping, which is a really interesting one - done almost like a raglan, but just for a couple inches, after which the rest of the armhole depth is knit straight.  The number of decreases and the way in which they're done leave a line of rib almost like a full-fashioning.  At first I wasn't sure if I liked it and was thinking about doing the armhole in a way that would avoid this, but then I decided it would be more of an authentic vintage adventure to knit the pattern as written.  Here's how the shaping looks up close:


I'm really having fun with this stitch pattern.  One of the things I like about it is that two repeats equals one vertical inch, so it's really easy to count your length without getting out the measuring tape!

It would seem that the designer really loved this texture too - I've found a few other sweaters in two different magazines that use it.  I'm especially in love with these two patterns:

From Bernat no. 65, the same book I'm using.
Note the funnel neck, skinny belt, pencil skirt
and jewelry.
To die.


from Bernat no. 84


The cardigan is from a magazine I acquired recently - Bernat no. 84 from 1960 - like the Bernat no. 65, patterns designed by "Mirsa of Italy."  I just love how the texture of the pattern stitch interplays with the stripe pattern.  Not to mention the wide collar and inset pockets!  This one may be in my future!

Here's the cover of this magazine:


And finally, here's a gratuitous nail shot:


Essie Cocktail Bling - which is so similar to Bangle Jangle that I'm wishing I hadn't bought both.

Thursday, October 27, 2011

NOTDx2

Last night I put on Bangle Jangle from the Essie Cocktail Bling winter collection:


It's a really lovely color, similar to Zoya Caitlin, but somewhat lighter.  I did have a little trouble with application; my brush was wonky and it applied like a pastel.  Still, I managed it in two coats.

This morning I decided to do a little stamping on top of it.  We're going to a concert again tonight, and I'm planning on wearing my blue and white Sencha, so I added white mesh topped with blue flowers:


Both these images are from Konad plate m57.  I did the white mesh with Konad Special White and the blue flowers with CND Midnight Sapphire.  The CND polish is great for stamping because it's so deeply pigmented.

I'm really happy with how this one turned out - it actually looks so much better in real life!

Wednesday, October 5, 2011

In for a penny, in for a pound . . .

Last night I did up my nails with China Glaze Trendsetter from the fall Metro collection.  It's a nice color, but it doesn't look that great on me, unfortunately.  So this morning I decided to jazz it up with some stamping.

I started out with a gold chrome, China Glaze 2030, and an all-over design.  Big fail.  The gold was too close in color to the green, and it just looked terrible.  So I carefully removed just the gold, and tried it again, this time stamping with Essie Carry On and Bundle Monster plate BM 203.    Actually, Carry On was what I finally settled on - I first tried China Glaze Loft-y Ambitions and Brownstone, neither of which were really pigmented enough to stamp well for me.

Here are the disastrous results:


Ugh!  I really wish I had time to take it all off and start over, but I've got to go to the eye doctor this morning.  Luckily, I have some reading I have to do this afternoon, so when I get back I can put on something different and do my reading while it dries.

If you're thinking about using this design, you should know that this is one of those images that's kind of tricky to use.  Because the design is all wide, straight lines, I found it hard to get the image loaded onto my stamper consistently.  Too bad, because I think this design is really swell.

Saturday, October 1, 2011

Opal Nails

I've been pondering for a while how to make my nails look like opals using flakie nail polish.  The other day I made my first attempt.  I don't think I'm quite there yet, but I thought I'd share it anyway:


The top photo is the first version.  I used one coat of Essie Absolutely Shore, and didn't worry about it being streaky.  On top of that I put two coats of China Glaze Moonlight, a very sheer off white.  Then I topped the whole thing with three coats of Nubar 2010 and one coat of Essie Good to Go.  It was very shiny and I felt like it didn't look too much like opals.

The next morning I realized it might look a little better with some matte topcoat, so I applied that, and sure enough, it started looking more like opals!  Very hard to photograph though!  The second photo is a tiny ray of sunshine in which I tried to catch the opalescence, and in the third I finally captured a little of the pink.

I think next time I try this, I'll add in some pale pink blobs while the green is still wet, and then cover it with the sheer white and the flakie.  This was a good start though, and I'm glad I finally tried it - it's been in my mind for a couple months!

Friday, September 30, 2011

ssssssssssssssssssss

Take a look at my fabulous snakeskin nails!!


I followed this awesome tutorial to do it.  Thank you so much, Kari, for sharing it with the interwebz!

I love, love, love snakeskin, although I don't own anything made of it.  Somehow I feel sorry for the snakes and always shy away.  So this is a great compromise!  Mine don't look as fantastic as Kari's, but I'm pretty happy with it.

I followed her tutorial almost exactly.  I substituted Zoya Jana for China Glaze Below Deck, and Essie Playa del Platinum for OPI Skull and Glossbones.  I also added on one coat of China Glaze Moonlight, a very sheer off-white, over the top of my blobs of color, to smooth things out and make it look a little more translucent. Here's how it looked before stamping:


For stamping I used Zoya Pinta, a very dark purple, since I don't have China Glaze VIII.  The print showed up a little more purple than I was hoping it would, but I still like it.  The plate is Bundle Monster 215.  Here are all my materials:

one coat Qtica Natural Nail Growth Stimulator
one coat Essie Chinchilly
blobs of Zoya Jana
blobs of Essie Playa del Platinum
a few blobs of Essie Chinchilly
one coat of China Glaze Moonlight
stamping with Zoya Pinta
two coats of Essie Good to Go

the plate and the paper I scraped the extra
polish onto, with my clean-up brush


And here are my nails again, with one of my "good" balls of Eau de Nil, not the evil ball:


The evil ball has been banished to the guest room, well away from the others, and the ribbing on the front is complete.  At least I have super-cool nails to look at while I reknit the thing.

Sunday, September 25, 2011

Everything, all at once.

Whew!  Yesterday was a full day!

First thing in the morning, I stamped on top of Power Clutch.  I had it in my mind that I wanted to use a feather design in gold, so I got out my Konad plate m77 and China Glaze Passion:


Here's the picture I took in the morning, with
well-conditioned cuticles . . .

And here's one I took in the car in the early
evening after sitting in the sun all afternoon.
You can see the design better, but my cuticles are all
dried out, gah!

After that, Hubby and I got in the car and drove WAY out in the country to go to our first ever polo match!  We have a friend who plays and he invited us to come watch. It had been raining in the morning, but we got lucky and had a warm, sunny afternoon:


And I wore my new silk Sencha, which I finished on Thursday:

Here's the picture Hubby took.

And here's one my friend took.  She thought I should
have a picture with the horses in the background.

I am so in love with this top!  It is pretty and silky and comfy. AND it stayed pretty fresh all day long.  My cotton one wrinkled terribly, especially under the arms, but this one only got a few wrinkles on the back, due to sitting in the car for so long. There may be another one in my future, if I can find another print at Vogue that I like.

I originally thought that I wouldn't like this version as much as the first version I made - this one does not have tucks at the neck.  But I do like it, and having four fewer tucks to do made sewing it a little easier.  But boy, that silk was slippery!  I went really slowly, and did all the finishing by hand like I did on my first one.


When I got to the point of sewing the snaps on the back, I felt like it was a little plain, so I sewed the outer snaps all the way through the fabric to give it a little decoration:


I like how it looks, and it made the snaps more stable as well.  So, Sencha win!

After the polo, we drove back to the city to go to one of the concerts of the Hyde Park Jazz Festival, held on the beautiful University of Chicago campus.  Our friends drove down too and met us there, and afterwards, we all went to Medici for dinner. This is a recent find for us, and I'm happy to have found it.  This place has some of the best pizza I've found in Chicago.  In a city known for its pizza, I've had a hard time finding pies I like.  But then, I'm a pizza snob.

Whew!  Like I said, a full day!  We're thinking of maybe heading back to the Jazz Fest today . . .

Saturday, September 24, 2011

Power Clutch

Somehow this name strikes me as automotive.  Maybe because I've driven a stick shift for the last 25 years.  And the color looks like some fluid that would be drained from a car:

Essie Power Clutch

My internal jury is still out on this one, but it's not looking good . . .  It probably needs some stamping.

I thought I'd share a sneaky little trick I use.  I don't do this all the time, but sometimes when I'm using dark colors it helps with the clean-up.

My thumb nail on my right hand tends to stay pretty short, so that when I'm painting my nails, I get polish on the tip of my thumb.  That's not too difficult to clean up with a brush and remover when I use light colors.  But because that skin also tends to be rougher than on my other fingers, dark colors are harder to clean up - they often stain.  So I do this:


It's called a disposable nail form, and I have no idea how it's actually supposed to be used (never having had acrylic nails applied) but it allows me to just paint off the end of my nail and not worry about getting polish on the tip of my thumb.

I stick it on, kind of jamming it under my nail as far as I can:


And when I'm all done and my polish is dry, I just peel it off!  I got a roll of 500 of these at Sally years ago - needless to say, one roll lasts a long time.

There's just one caveat.  It's pretty sticky, so make sure it doesn't stick to your open bottle of nail polish and cause you to fling it, getting (dark) nail polish everywhere.

Ask me how I know.