Showing posts with label cnd. Show all posts

Wednesday, January 15, 2014

Let's watch paint dry!

Hey guys! 

Yesterday I got a brand new set of nail stamping plates, so I got inspired to make a little video of me stamping my nails.  I've been meaning to do this for quite a while, because every time I post a stamped mani I get questions about how it works.  I do have a page up top called "Nail Stamping Info" that I add and remove and then add back occasionally.  But it's always better to see it in action.

I mentioned before that I prefer to do stamping on a well-cured mani, so I painted my nails last night in preparation for stamping this morning.  But honestly, a lot of the time I do stamping to get an extra day or two of wear out of a mani that's starting to look a bit rugged.  Win!

Before I started I took a picture of all my supplies.  It looks like a lot, but I keep it all in a little kit so it's easy for me to get out when I want to do my nails.


Starting from the top left and working down and to the right, I've got:  pure acetone polish remover; a food carton lid with two cotton balls (the triple size ones); some scrap paper with my stamping plate on top; a small bottle of regular polish remover; nail polish for stamping - this one is Wet n' Wild Black Crème; my stamper; an old "credit" card; two pointy Q-tips; and a brush I use for clean up, but didn't use this time.

All of this is on a mat to protect my table, however,  I usually just do this by the bathroom sink.  My sinks are granite, so if any polish spills happen it's easy to quickly wipe them off.

Here's a picture of my stamping plate:


The plates are so shiny, you can see my camera and hand reflected on the surface!

For this mani, I stamped with black, but you don't have to use black.  Any strongly pigmented polish will work, and chrome-finish polishes work well also.  I used black in hopes it would show up better on camera.


And here's the finished mani:


For this one I used Essie Chinchilly (two coats) topped with CND Copper Shimmer (one coat).  Stamping was done with Wet n' Wild Black Crème, then topped with INM Out the Door.

You can see how quickly you can stamp your nails.  If I take out the explaining bits, I did five fingers in about 2 minutes.  Start to finish - and that includes cleaning up around the cuticles and adding top coat - I spend barely 10 minutes each time I stamp my nails.  The hardest part, for realz, is deciding which stamp I want to use!!  I've got over a hundred plates now . . .

Friday, August 24, 2012

Copper Clouds

A few days ago, I rediscovered CND Copper Chrome in my polish stash, and decided I wanted to use it for a stamping.  I looked around to see what color and image would go well with it, and settled on Essie Who Is the Boss and this stylized cloud pattern:


After I finished, I felt that the CND wasn't as great a stamping polish as I'd thought it would be, but couldn't remember if I'd used it before.  So I did a little search on the blog, and it turns out I have used it before - with this very same blue polish!  (Although not with a stamp.)  So I guess these two colors are made for each other!

Friday, April 13, 2012

Deckle

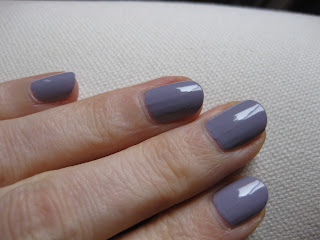
The other day I happened to be in Ulta (OK, I went there on purpose.  I had a coupon.) and I spied the Essie Wedding Collection for this spring.  I hadn't seen a lot of hype for these online, so I was surprised to find them.  And I was completely intrigued by the blue shade, Who is the Boss?


I put it on last night, and fell in love with it straight away.  But this morning I felt I wanted to add a little more to it, so I did a CND Behnaz Sarafpour-inspired "halo" mani.


It's probably not for everybody, but I really love this look.

I used a natural sponge to sponge on CND Copper Chrome just around the edge of each nail.  I like to put one drop of my sponging polish into one of the little vials I save from my contact lenses, then tamp the sponge into it several times before taking it to my nail.

To soften it up, I topped it with CND Ivory Coast, a very sheer cream shade.  It really doesn't change the color much, it just makes it a little softer.

The only downside with this mani is that there's quite a bit of clean-up involved.  I used Qtips dipped in remover to get most of the polish off my skin, and then went back with my fine brush to get what was left.

What say you?  Yea or nay on the halo mani?

Wednesday, March 14, 2012

This is taking FOREVER!


This is still the first side of the collar!  I've still got another one to do, plus the belt and sewing the whole thing together!    Gah!

Let's distract ourselves with some pretty nails:


This is Zoya Cho, from the spring 2012 True collection.  It's a very pretty French vanilla with just  a hint of shimmer.  Not quite enough shimmer - so I added CND Jade Sparkle.


When I put this on last night I really had trouble with the application.  It went on streaky and patchy.  I wasn't sure the second coat evened it out, but this morning everything looked OK, so maybe it was the light.

I added the Jade Sparkle this morning, as I've found that I can get away with adding other polishes and quick-dry topcoats to Zoya on the second day without getting shrinkage.  I was surprised that it doesn't flash as green against this color as it does against darker colors - it's flashing more yellow.  Still pretty though!

Sunday, February 19, 2012

Is this anything?

Yes, it is.  It's CND Ivory Coast - three coats of it, in fact.

You can also see the trauma to my index finger cuticle.
That was some mean slaw.

I had a run-in last night with my 8" chef, and the knife won.  I mangled two nails on my left hand, so they all had to get cut down.  Turns out making Alabama Hot Slaw on almost no sleep can be a dangerous undertaking.  When my nails are super short like this, I prefer to wear very sheer polishes like this one.

Because I was so tired yesterday I couldn't think straight, I decided not to work on my skirt; I'm at the stage of installing the zipper.  I was even too tired to do any knitting!

But what I wasn't too tired for was researching sergers.  I spent some time figuring out what I want, and Hubby ordered it for me!  Should be here on Wednesday - happy birthday to ME!

I'm planning on installing the zipper and waistband of the skirt today, but I've decided to wait on the hem until I've got the serger.  Because the fabric is so thick (denim weight) I'd like to serge the edge and then fold it back only once rather than twice.

I'm so excited - I've wanted a serger for many years but always held off because I wasn't sure I would stick with sewing.  But over the last 9 months, there have been so many times I've wished I had one, I decided to just go for it.

Friday, November 18, 2011

Thievery

I totally lifted this mani idea from something I saw on Pinterest:


I had put on Zoya Neeka from the fall 2011 Mirrors collection a couple nights ago, but I got a fair amount of tip wear yesterday when I was doing some cooking (and thus, hand washing of pots and knives).  So last night I applied Zoya Karina just at the tips, topped it with China Glaze Matte Magic, and then used my dotting tool and CND Super Shiney topcoat to make the dots.

I'm really liking this gradient effect, and it's a great way to deal with tip wear.  I did this the same way I did my glitter tips.  I dotted the upper color just along the tips after wiping most of the polish off the brush, and then stroked it downward toward my cuticle, lifting my brush up at about halfway down the nail.  I have to admit though, it does look better with the matte topcoat.  The color transition is a little abrupt when it's shiny.  I'd like to figure out a way to make the transition more subtle.  Any ideas?

Monday, November 7, 2011

Crocodile Fail

This has been in my mind for a while and I finally got around to doing it today:


It's a little too subtle though.  This is Zoya Codie from the Smoke and Mirrors collection, topped with China Glaze Matte Magic and then stamped with the crocodile image from the BM224 plate using CND Super Shiney topcoat.  You can see it a little better here:


But I was really hoping it would be more dramatic.  Oh well, can't win 'em all!

Thursday, October 27, 2011

NOTDx2

Last night I put on Bangle Jangle from the Essie Cocktail Bling winter collection:


It's a really lovely color, similar to Zoya Caitlin, but somewhat lighter.  I did have a little trouble with application; my brush was wonky and it applied like a pastel.  Still, I managed it in two coats.

This morning I decided to do a little stamping on top of it.  We're going to a concert again tonight, and I'm planning on wearing my blue and white Sencha, so I added white mesh topped with blue flowers:


Both these images are from Konad plate m57.  I did the white mesh with Konad Special White and the blue flowers with CND Midnight Sapphire.  The CND polish is great for stamping because it's so deeply pigmented.

I'm really happy with how this one turned out - it actually looks so much better in real life!

Tuesday, October 25, 2011

Laying it on thick.

Nail polish! 

I haven't been posting nails lately because either 1) I didn't find the polish I was wearing very inspiring; 2) my nails looked great but there wasn't enough light to photograph them, or 3) I wasn't wearing any polish at all(gasp!).

But yesterday I lucked out:  put on a great combo and had good light to take a picture!


This two of the polishes from CND "The Look for Fall 2011" - Midnight Sapphire and Sheer 24K  Sparkle.  Wearing "The Look" makes me feel like one of the cool kids.

You've seen the gold before, but this is the first time I'm using one of the darker polishes from this set.  The formula was really incredible:  this is just one thickish coat each of the color and the effect, topped by CND  Speedey topcoat.


I have to say though, I just don't "get" the CND brush.  The bristles don't fan out like they do with other brands, so it has taken me some practice to be able to apply CND polishes evenly.  Worth it though, I guess, because these are intensely pigmented.

Now I can't wait to try out the Dark Amethyst!

Monday, September 26, 2011

Gilt-y Pleasures

Good:

Sally Hansen Set the Stage

Better:

CND Sheer 24K Sparkle

Best:

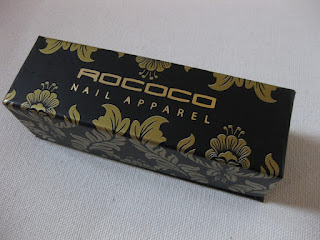
Rococo Nail Apparel
Gold Leaf Lacquer

Over the last several months, every time I got a gold glitter or gold effect top coat, I liked it, but wished it was more like the gold leaf lacquer.  So I finally decided to just get the darned thing.  I blame Karen D.

Look:  even the packaging is sensational:


Pure, 24K gold leaf suspended in a quick dry top coat, beautifully boxed and presented.  What could be better?

How about some Tiffany Blue?

China Glaze For Audrey
with Rococo Gold Leaf Lacquer

If that doesn't spell luxury, I just don't know what does.

Friday, September 23, 2011

Torn

Between wanting to show all six of the new fall Essie colors, and not really wanting to wear either of the remaining two at the moment.

Resolved by topping Glamour Purse with CND Crimson Sparkle:


It was a little too brown for my current mood, but the crimson livened it up.  Quite hard to capture though:


Trust me when I say it really does add a crimson sparkliness to any color you layer it on, without changing the color too much.

Sunday, September 18, 2011

Lady Like

Polish number four from the Essie fall collection:

Essie Lady Like

This one surprised me.  Based on swatches I'd seen online and how it looked in the bottle, I thought it would much more pink, but it looks more mauve on me.  I really like it.  This was two coats.

Later, I added on one of my recent acquisitions, CND Sheer 24K Sparkle:

close

This is the effect that is part of CND's The Look Fall/Winter 2011.  I really love it - it is quite different from the Gold Sparkle.  The flecks are all golden and are different shapes and sizes:

closer

closest!

So pretty, even against a light color!  Can't wait to see it against something dark.

Thursday, May 26, 2011

Stars in the daytime.

There have been far too few pictures of nails around here lately!  I haven't been changing my polish as often because I've been so focused on sewing and finishing up Mandarine.  For the last several days, I was wearing this:

Zoya Reva, Sunshine Collection, summer 2011

It is a super sparkly color with a ton of golden glow - much too overwhelming for my humble little camera!  But boy, did it stain my nails!  I can never figure out how it does that through the base coat . . .

Oh, and see my little boo-boo?  I nicked myself with the rotary cutter when I was cutting out my skirt pieces the other day.

Last night I switched it to this:

Zoya Breezi, Summertime Collection, summer 2011
topped with CND Sparkling Silver Effect (holiday 2010)

You can see that I'd been knitting if you look at my index finger!  See the dent from carrying the yarn?  I made it up to the armhole on The Jan Sweater last night.

I really liked this polish - it applied so nicely.  It was pretty on its own, but I decided to jazz it up with  the fine silver shimmer.  This morning, I had planned to stamp some little silver crowns on it, but as I was going through my image plates, the stars just jumped out at me:

Bundle Monster plates BM05 and BM14
Stamped with China Glaze Millennium

Isn't that pretty?  I just love it!


Thursday, May 5, 2011

By request

The other day, a reader left a comment asking me to share how I do my nails - specifically how I get the polish to be neat at the cuticle - and any tricks I may have.  Honestly, I don't think I always do such a great job - if you want to see gorgeous nails, take a look at Erika's or Scrangie's!!  These ladies have truly impressive skills!  But I promised, so here goes . . .

I think the way I paint on the polish is pretty much the same as everyone else, but there is a really lovely tutorial here if you care to see.  I was really sad when Lacquerized stopped posting on her blog - her nails always look so great - but happy that she left it up, because she has a lot of great tips.

I will say that I have pretty good fine motor skills (gross motor, not so much!) so it's not that hard for me to do an acceptable job most of the time.  But I do have one absolutely necessary tool, without which I can't do a mani:

Reading glasses - I think they work better
if they have sparkles on them.

This may be obvious to some of you, but it was a revelation to me!  Things got a whole lot easier when I could see what I was doing!

Another thing I learned from Lacquerized is how to fix mistakes after the fact, using a small stiff brush dipped in remover.  I use a concealer brush by e.l.f. that I get at Target for $1:

As you can see, it's been used
quite a bit.

Here's my thumb before using the brush and after.  The difference is small, but visible I think:


I always use basecoat to help prevent staining and chipping, and I also always use a quick-drying topcoat.  Even though I change my polish almost every day, I hate it when I get chips.  It's embarrassing how much chipped polish will distract me!  So I like to seal it.  I generally use Essie First Base and Good to Go, or China Glaze Strong Adhesion Basecoat and Fast Forward topcoat.  I will occasionally use Seche Vite topcoat if I know that I want to stamp my nails right away or if I will need to be using my hands five minutes after I've done my nails.  It really does cure the polish quicker than anything else, but I find the smell nauseating (thank you, menopause).

I try to be really good about cuticle care.  I apply Essie Apricot Cuticle Oil at least once a day - often several times - and Lush Lemony Flutter right before bed.  I think that no matter how great the polish looks, if the cuticles are ragged, the whole look is shot.


Another thing that's really great for cuticles is a moisturizing lotion with alpha hydroxy acid in it.  For years I used CND Cuticle Eraser, but then it became hard to find.  Sometime later, I bought this body lotion and realized it felt the same, so I've been using it on my cuticles ever since:


It is a fraction of the price - I think this tube cost me about $18.  I rub a tiny amount into each cuticle - about the size of half a grain of rice.  I don't do this every day, but when I find my cuticles are getting dried out, this cream will soften them back up in no time.  It's also great for heels and elbows.

SO . . .  here is the polish I put on today.  This is Zoya Blossom, one of the colors I got in the Polish Exchange.  It is quite sheer and took me 3 coats to get rid of the streakiness.  Over it I put CND Crimson Sparkle.  In the picture, my index finger doesn't have the sparkle yet.  I had a hard time getting a picture of the sparkle because once again, we have cloudy skies in Chicago.  You can see it better if you click on the picture to enlarge it.


Note that the cuticles aren't looking so nice yet.  After I put on all my polish and topcoat, I wait 5 - 10 minutes and then apply the Apricot Cuticle Oil.  This conditions the cuticles and also helps cure the polish quicker!

Whew!  Did anyone make it this far?  Hope that was helpful!  In case you hadn't noticed before, I'm sure you realize now that I'm an over-explainer!!

Sunday, April 24, 2011

Oddly Intriguing

I've been dying to try the Behnaz Sarafpour Halo manicure since I first saw it in the CND Spring/Summer 2011 Lookbook about a month ago.  I finally found some natural sponges to my liking at Whole Foods Market, and did this on Friday night:

My take on the Halo manicure


China Glaze Peachy Keen
China Glaze Millennium

The original used a nude base, but when I saw it, I thought it might be a good way to use the Peachy Keen I bought last year and never really wore.  I really like the color, but I don't think it looks great with my skin tone, so the metallic halo creates a kind of buffer.  My sponging skills are sub-par, so my halo is a little on the large side!

I'm really loving this, for a lot of reasons.  Mostly because I find it to be rather quirky.  I love things that are just a little skewed or off-center, or rough around the edges.  It's a design element I used to use a lot when I made jewelry.  This mani also reminds me of bezel set cabochons, glass beads with silver inclusions, or gilt-edged paper - or even gilded calligraphy - all things I used to do.

glass beads with silver core
made by me circa 2008

sterling silver rings with bezel set glass cabochons
made by me circa 2008

In looking around for more info on the halo mani, I found two different techniques. The one shown in the Lookbook video starts with a nude painted nail, with the metallic color sponged around the edges afterward.  But I saw another promotional sheet from CND saying the mani started with one coat of metallic polish, followed by one coat of nude.  Then a Qtip dipped in remover was used to remove the edges of the nude polish, exposing the metallic underneath.  I used the first technique, and despite the large amount of cleanup required around my cuticles, I think for me there was less room for error than there would have been had I used the second technique.