I put the finishing touches on my
Hazel dress this morning, but before I model it, I wanted to post some notes about the construction. I did a lot of things on this dress that were new to me, so I want to keep a record of it! And maybe it will be useful information for some of you as well!
I spent five days working on this dress - for me, that's a lot. The construction is not difficult, but I had decided in advance that I would only work on it a little each day, to try to avoid the mistakes and sloppiness that come with fatigue. I've got to say, I really enjoyed taking my time on this and just savoring the work!
On Sunday, I finished tracing the pattern and then cut out the pieces. Since I'd chosen an eyelet fabric, I needed to underline it - which meant cutting out all the pieces twice.
On Monday, I began the process of attaching the underlining to the outer fabric. My outer fabric is a cotton/poly blend that I bought at Hancock Fabrics a few months ago specifically for this dress, and specifically to make myself try underlining something! This was my first time, and just like everyone says, it really isn't difficult. I used a lightweight cotton/poly shirting from my stash in very pale yellow. I probably would have been better off using something lighter since my outer fabric is on the heavy side, but it was nice to get this piece out of the stash, and I think the colors go together nicely.

I was able to get all the pieces except the skirt back and one of the fronts attached to their underlinings before my bobbin thread ran out. I decided that was a good place to stop for the day, so I picked it up again on Tuesday. Once all my pieces were underlined, I continued with the construction and put together the skirt, bodice and straps. I had cut out pockets, but in the end I decided against them since the dress was already kind of bulky.
On Wednesday, my first task was to do the gathering of the skirt. I really hate gathering, but I had decided in advance that I would try out Colette's method (outlined in the instructions) of sewing rows of stitching at 3/8", 5/8" and 7/8" - which of course means that once the piece is gathered and sewn to the bodice, the bottom 2 rows of stitching must be taken out. I was curious if this would help me get a more even gather, and I feel that it did.
As an aside - do you see my pins? I've been trying to convert myself from being a Parallel Pinner to being a Perpendicular Pinner! It's hard to change a habit like that after so many years!
Another thing I've started doing is machine basting my gathered piece to my flat piece before doing a smaller stitch. You know, like you're supposed to! I always used to skip the basting, but I've really come to believe that basting is my friend.
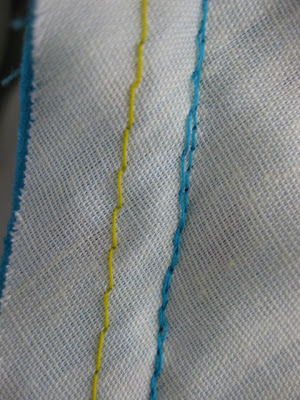
I was proud of myself that I did the gathering stitches in a contrasting color (red), which made them much easier to pick out afterwards. Here you can see the yellow I used to attach the underlining, the red gathering stitches, and the blue seam.
 |
| Two lines of blue stitching: one basting, and one shorter stitch. |
On Wednesday, I also attached the zipper. I used Sunni's method (from her Craftsy class) of basting in the zipper with fusible web - this method is really working well for me. I did find that the 22" zipper called for on the pattern envelope was way too long for the opening given on the actual pattern - next time I'll probably buy an 18" zipper. No problem though, I just sewed my own stop and cut off the rest.
As usual, I finished all the edges with my serger. I've been having a little trouble with Sergio lately, but I think it's sorted now, thank goodness! I can no longer imagine life without him!
Once I had the zipper in, I was able to try on the dress, and was surprised that the bodice was a tiny bit loose! I had been worried it would be a little tight because my fabrics were so bulky. I ended up shaving off 1/8" at the side seams, starting from the underarm and angling to nothing at the waist, since the bodice was already attached to the skirt and the zipper was in! I was a good girl and immediately noted the changes on my pattern as well, and made the same change to the facing pieces. Hard to believe that 1/8" at the side could make such a difference, but when you add it up, it's 1/2" overall - pretty significant!
I had the dickens of a time attaching the straps - I probably spent close to an hour yesterday positioning them with pins, trying the dress on, taking it off, basting the straps, trying it on again, picking out the stitches, repeating the process. Finally I decided to set it aside until today when I was fresh.
This morning, I had a brainstorm: part of the problem with trying to attach the straps was that I didn't have enough hands to hold the dress up while trying to position them! So I basted the straps onto the back, then put on the dress and pinned it right to my bra so it would stay up on its own. That left me free to pin the straps in place just where they needed to be. My right shoulder is about 1/2' lower than my left, so I really wanted to make sure I got them each the correct length.
I had also noticed when I was trying on my muslin that my bra straps lined up with the seam at the back of the bodice, so I attached them there rather than using the markings from the pattern. I think it's so great to have a strappy sundress like this that completely covers up my bra straps!
Placing those straps was probably the hardest part of making this dress! But once I had them basted on, I knew I was almost finished. I attached my facing with no trouble at all, and took
Lisa's recommendation to use pick stitch to do the understitching. It really felt nice to do the final bits of work by hand - meditative! And I always have a hard time with understitching by machine, so this was easier for me.
When I had the dress on for placing the straps, I also checked the length. As written, this dress is shorter than I'd usually choose - and that's with the added length of a size 8 skirt attached to my size 2 bodice. Next time I will add a couple inches on so I can do a proper hem. Since I hadn't thought of it this time though, I sewed some cream cotton voile binding left over from my
first quilt to the bottom edge, then folded that back and hand catch-stitched the hem to the underlining. This ended up being a good solution for this fabric: a double-folded hem would just have been too bulky with this embroidered fabric.
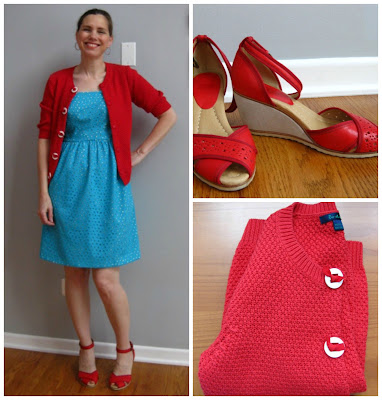
And here it is, inside and out:
It looks quite nice on, although I can't really say it's my most favorite thing I've ever made (my
floral coat takes that prize!) I chose the eyelet in part because I wanted to be in on the trend, but I don't really think it's the best choice for showing off the style lines of this design. And while there are imperfections here and there, both in fit and in construction, I'm pretty proud of the work I did and the time and care I put into this dress. And I feel really good for having tried a couple of things that were intimidating me: the SBA and underlining. So now I feel like I can move forward and continue honing these new skills on Hazel Dress #2, for which I've already purchased fabric.
With any luck, I'll have time and light enough in the next couple days to take some pictures. I've already been thinking of outfits and shoes to go with this dress!


