Showing posts with label blazer. Show all posts

Wednesday, February 18, 2015

Ways to wear a lavender blazer.

Once spring comes, that is.

Here are some looks I put together on Polyvore using items similar to (or in some cases, the same as) things in my closet.


Wow, that was SO much easier than putting it all on and taking pictures!!

ETA:  Since publishing this post, I've created even more sets!  You can see them on Pinterest here, or on Polyvore here.

Tuesday, February 17, 2015

A Tale of Two Blazers: A Comparison Between M6172 and S2446

Well, hello there!

Since my last post, I've been busy making 2 blazers.  My friend Shar jokingly told me that I'm on the "Blazer a Month" program after I shared my sewing plans with her, and she's not far wrong!  I've got several more planned.  Although I'm not quite sure I need a dozen in my closet - that's probably overkill for a housewife!  But they are just so darn fun to make - most of the time.


I started the new year with a second, and very successful, version of McCall's 6172.  This second blazer was hand-tailored.  Gosh, was that a blast!  (Obviously, you have to love hand stitching to find that fun, which I do.)  And the result was a jacket that is so perfectly molded to my body, it just feels like a dream every time I slip it on.  I posted several pictures in-progress on Instagram, as well as pictures of the finished jacket.  Alas, although I've worn it a few times, I have yet to remember to take a picture of myself wearing it!  One of these days . . .


This month, I moved on to Simplicity 2446, one of the Amazing Fit patterns.  Back in September, when I was getting ready for Bourbon and Blazers, I pulled out all my blazer patterns - I've accumulated quite a few thanks to those $1 pattern sales.  After perusing all of them, I narrowed my choices down to M6172 and S2446.  Style-wise, they're pretty similar.  I ended up starting with the McCall's pattern, mostly because it uses the Palmer-Pletsch fitting method with which I'm already very familiar. 

But I wanted to try them both, so I kept the Simplicity pattern out.  And in December, I ended up buying 2 kits for this blazer from Craftsy, for a whopping $25 each.  A pretty good deal, as the kit contains the pattern, the outer fabric and the lining.  I purchased the lavender kit still available here, and the navy blue shown in the pictures.  I resolved that these 2 would be my February and March blazers this year.

. . . (cue ominous music) . . .

I finished up my lavender blazer the other day, and while it's OK, it is nowhere near as fabulous nor as comfortable as my McCall's blazers.  This pattern just doesn't work for me, and I won't likely be making it again.  It confused me, honestly, because just about every review I've seen of this pattern has been overwhelmingly positive.  Maybe I'm just nitpicking?  But I figure:  I have a pattern that is perfect for me, so I really don't need to settle for second best.  I tried it; it's OK; I'll wear it.  But I won't love it like I do my McCall's blazers.


All the while I was making this blazer, I kept thinking that in my book the McCall's is a far superior pattern.  I decided to do a little comparison in case anyone was interested in the difference between the two.  I realize that my tailoring audience is probably pretty small, so if you have no interest in this sort of thing, you may stop reading now (if you haven't already).

Here's a table I made of the key aspects of each pattern:


Let's look at them in depth, shall we?

Fitting helps

If you've read any of the Palmer-Pletsch books and used those fitting methods, M6172 will be very familiar.  The first couple pages are a distilled version of all the adjustments you might need to make on this blazer.  You start with a tissue fitting, and then work your way through all the adjustments one by one; most of these are slash-and-spread adjustments.

The fitting method for S2446 is, for the most part, to take in or let out the princess seams.  There is a table to help you determine which cup size you need, and the side front piece comes in A, B, C and D cups.  All other adjustments are made to the 1" seam allowances on the vertical seams.

If your adjustments are mostly to the circumference of a garment, this is probably enough.  My personal adjustments are trickier though.  Because of my sway back and low round back, I ended up having to convert the center back from "cut on fold" to a seam.  I was able to adjust for my broad back along the back princess seam, but I felt that this doesn't give me as good a fit as the usual slash-and-spread I do. 

bust adjustment from M6172

I think that for anyone needing a small- or full bust adjustment, the McCall's pattern offers more precision, because it uses a slash-and-spread (or tuck) adjustment for the bust in addition to the princess seam.  I ended up using the B cup side front on the Simplicity pattern, but had to redraw the bust curve because it was too high for me.

Construction

If you think you might want to try out traditional tailoring, I'd recommend the McCall's pattern.  The instructions are for a traditionally inserted lining, which involves plenty of hand-stitching.  I didn't feel the instructions were enough though, either with the RTW version of my first blazer or the hand-tailoring of my second blazer - I spent a lot of time referring to my tailoring book and the Craftsy class on tailoring for both garments.  But I didn't feel the instructions for the bagged lining on the Simplicity pattern were clear at all.  And honestly, by the time I got to that point I was really ready to be done with this jacket so I didn't get out my book on lining to help figure it out - I just reverted to doing it by hand, which is default for me.

I was really surprised that although I'd made two blazers previously, I found the construction of the Simplicity blazer quite difficult.  Part of it was those 1" seam allowances.  After my tissue fitting, I went back and re-traced all my pieces so that everything had consistent 5/8" allowances.  But I also felt the instructions were hard to understand and follow; some of the terminology is different from what I'm used to, and the sewing instructions are interrupted with fitting instructions throughout.  On the McCall's pattern, all the fitting is on the first couple pages; after that, it's all construction.

The Simplicity jacket was rendered even more difficult by the fact that some of the notches didn't match up.  The most egregious error was the fact that the seam which attaches the under sleeve to the upper sleeve doesn't match up at all at the armhole - I ended up having to trim some away.


The markings on the Simplicity pattern are minimal - no roll lines for either collar or lapel.  If you wanted to hand tailor this jacket, you'd have to add those in yourself.  The lack of these markings left me unsure where to fold back my lapel when the jacket was done.


For me, probably the biggest strike against the Simplicity pattern is the sleeve caps.  The shape of the cap is tall and thin compared to the McCall's pattern; this gives the sleeve too much ease to go into the armscye nicely.  I'm pretty good at setting in sleeves, but this one was ridiculously hard.  I spent close to 3 hours just attaching the sleeves, and they're still not ideal.  Because of the extra ease, the sleeve sits up off the shoulder a bit - not a look I'm fond of.  And there was so much excess fabric in the seam allowance, I ended up having to notch it so my shoulder wouldn't look lumpy on the outside.


Sticky-uppy sleeve at shoulder.  Yuck.

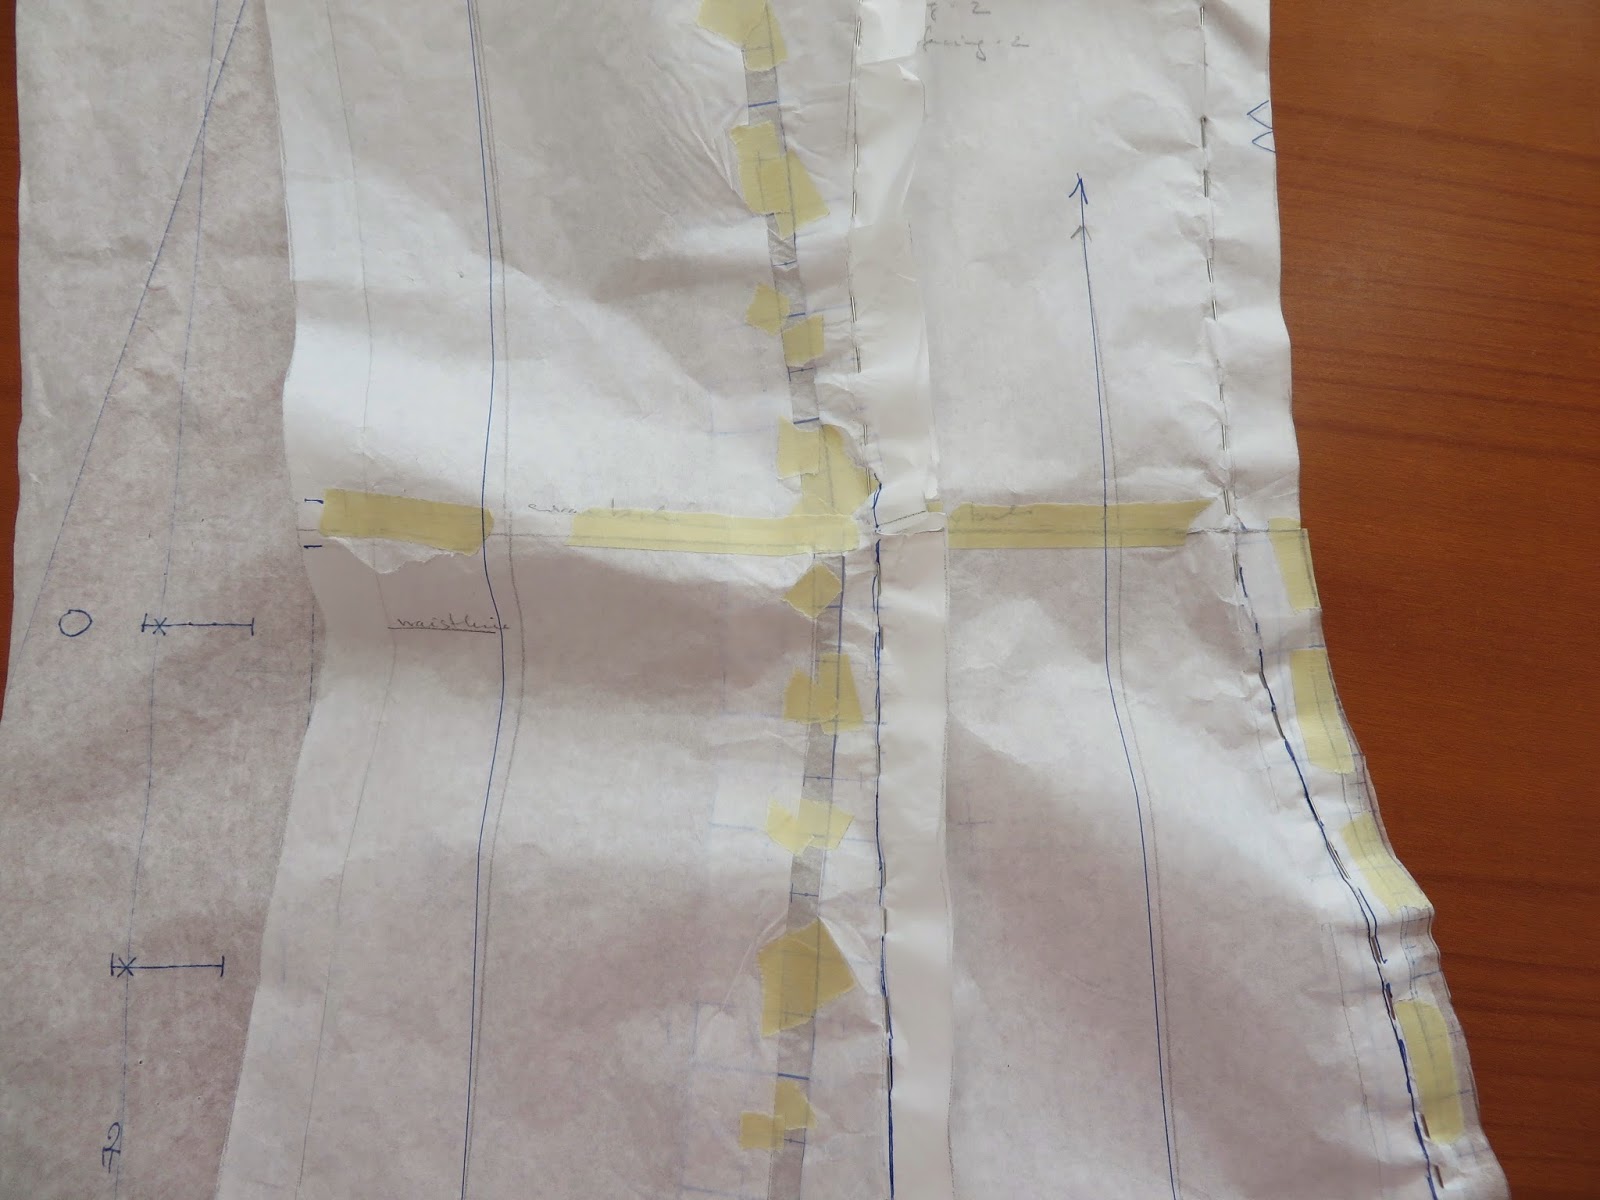
Here's a picture comparing the sleeve caps of M6172 (on bottom) and S2446 (on top).  The pattern pieces are not aligned, so that you can see how much more extreme the curve of the Simplicity piece is.


Details

The Simplicity pattern does include sleeve vents, although as written, they are not functional.  Neither are those cute flap pockets - they're not pockets at all, just flaps sewn to the front of the blazer!  Call me a stickler, but even though I don't use the welt pockets on my McCall's blazers (they're still tacked shut!), if I'm going to the trouble of making a blazer, it needs to have the proper finishes.  There are in-seam pockets on the longer version of the Simplicity pattern, and I think they're pretty cute; however, the reviews I read did say they are too small to be useful.  I made the short version of the jacket, and because I didn't want fake flaps, I left pockets off altogether.

I did make the sleeve vents on my Simplicity blazer, and although they cannot be opened, they are cute.  I chose not to add that detail to my McCall's blazers because I usually find the buttons to be bothersome when I'm sitting with my hands or arms on a table or when putting on my winter coat over the blazer.  But since they were already included on the Simplicity pattern and I'd never done it before, I gave it a go.  This part of the pattern is quite nicely drafted, I think - it includes an angled cut to make a miter which I think is pretty foolproof.


At first glance, these two blazers look almost identical, save for slightly different lapel shapes.  However, I think the difference between shoulder princess and armhole princess seams may be important to fitting.  I'm planning on researching that a bit, because I had much better luck with the latter.

Conclusion

Well, I think my preference is clear!  I know a lot of folks have had great success with S2446.  Alas, I am not one of those people.  I'll be using my McCall's pattern on the navy blue kit next month.

That said, I love the color of the Simplicity blazer.  I really bought it to use as a muslin for this pattern, but discovered that I can make lots of nice outfits with it!  Lavender goes with a lot of colors - who knew?   So I will be wearing this one this spring.

Have any of you used either (or both) of these patterns?  Do you have any information to add to this review?  I'd be very curious to hear others' experiences with these.

Sunday, December 21, 2014

The Blazer

The Blazer.  I don't actually have a whole lot to say about this!  I posted a lot of in-progress photos and comments on construction on Instagram as I was making it, so I'm not inclined to repeat it all here.  I will say that although this project took far longer than I expected it to, it was completely engrossing and enjoyable for me.  I learned so much, and had so much fun working alongside Shar and Lisa.

And I'm thrilled with the final result.  This is the best fitting blazer I've ever owned, thanks to all those fit adjustments I outlined in this post.  The tissue-fitting ended up being pretty much spot on - the only change I had to make in the fabric was to bring the low round back adjustment in about 1/8".  Now that I've got the fit where I want it, this pattern will become a TNT for me; I've already started gathering supplies for a second version, which will be hand-tailored.  For more information on the pattern, see Lisa's post here.

If the blazer looks a little rumpled in these photos, that's because it is!  It's already been worn a few times - sadly under a winter coat, so it got a bit smooshed.  For these pictures I went more formal than I did when I wore the blazer previously - once with jeans, a cream top and leopard belt and shoes, another time with jeans tucked into black tall boots and black sweater.


I admit that I had a little trouble setting in the sleeves - which is strange because I'm usually pretty good at that!  There are a few wrinkles at the shoulder that I just couldn't get out for the life of me, even after adding in sleeve heads.  There are no puckers in my sewing, and since both Shar and Lisa have no wrinkles at their shoulders, I suspect it has to do with my rather thin fabric.  I promise to do better next time.


Here's the (rumpled) back, which does not bind at all - bliss!


I can do this:


And those lovely pocket flaps aren't just for looks - these are real pockets!


Here's my blue-violet lining:


And finally, just for kicks, here it is with the collar popped.  I have a little side project going wherein I'm watching all the TV shows I missed in the '80s while I was busy studying in high school, college and graduate school.  So I sort of felt like I had to go there.


But I won't be staying there, because the wool is too itchy on the back of my neck!


Sunday, October 26, 2014

Bourbon and Blazers

As I said earlier in the month, October is all about blazers Chez Agenda.  Alongside my other projects, I've been slowly working on a pattern for a tailored blazer - an item which I'd love to own but which I rarely find to fit well in RTW.  You'll see why later in the post.

My friend Shar and I had been talking about doing a blazer sew-along in the fall, and so "Bourbon and Blazers" was born.  The name came from the title of an email I sent her referencing our plans and thanking her for the recipe for Salty Bourbon Squares she'd sent me.  Since we knew we'd be sharing a lot of our progress on Instagram, we decided to use it as our hashtag.  To our delight, a couple of our sewing friends have decided to join us:  Lisa and Andrea for sure, and maybe even a couple others are thinking about it.  We are all going at our own pace - there are really no rules or structure.  We're just having fun exploring the making of a tailored blazer together.  Please join us if you care to!  #bourbonandblazers

I had several blazer patterns in my stash from which to choose, and in the end I settled on McCall's 6172.  This is a Palmer/Pletsch pattern, which means it has lots of fitting advice, and fitting alteration lines are already included on the pattern.  Since I'm familiar with the Palmer/Pletsch method and fit is one of my biggest concerns in this project, I thought it would be a good place to start.  It turns out that all my sewing buddies have chosen this pattern as well!  I think it's great, because we will be able to compare apples to apples.

I started this project at the very beginning of October and just yesterday was able to trace off my final version of the pattern.  Between tracing, tissue-fitting and re-tracing, I've got about 10 hours into this project already!  I'm hoping all this work will pay off in a big way.

First I started by tracing my four main pieces:  the two fronts and the two backs.  I started with only these four because I wasn't sure if I should use the size 8 or size 10.  A quick tissue-fit of these main pieces verified that the 8 is the right size for me to start from.  It's interesting to me that my Palmer/Pletsch instructor also put me in a size 8, and all the adjustments I needed for this blazer were the ones I needed on the sheath dress we did in our class!

Once I had the correct size, I traced off all the other size 8 pieces, and then got started with my tissue-fitting.  I wish I hadn't done that though - I forgot that the shapes of the linings and facings would change to correspond with the new shapes of the front and back pieces.  So in the end, I ended up re-tracing those as well.

For my tissue-fitting, I was a little over-zealous at first, and had to back some of my adjustments out.  Once everything was done though (over the course of several fittings) I had made TEN adjustments!  No wonder the RTW blazers don't fit me well!  Here's my list as I kept track:


And here's what it says, but in the order of the adjustments:

* broad back adjustment of +1/4"
* shallow upper chest tuck of -1/4" 
* dart remains as it is - I shortened it a bit at first but decided I liked the original better
* forward shoulder adjustment -1/4"
* sway back adjustment -3/4"
* low round back adjustment +1/2"
* increase side seam from waist down +9/16"
* increase back side seam (between center back and side back) from waist down +3/16"
* make tuck corresponding to shallow upper chest tuck (-1/4") the length of the upper sleeve piece parallel to grain line, so that sleeve cap fits into new, smaller armscye
* full upper arm adjustment +1/2"
* shorten sleeve -3/4"

WHEW!  With all that tape, you can see why I wanted to re-trace my pattern pieces.  I have a bad habit of forgetting that I have tape on my pieces and then ironing over it and gunking up my iron!

Here are some pictures of my pieces in progress, in no particular order.

re-traced upper sleeve on left, adjusted sleeve on right

Paper Blazer, front

Paper Blazer, back

shallow upper chest tuck - extends all the way across the lapel; forward shoulder seam line

broad back adjustment and low round back adjustment

sway back adjustment


increased seams at hip area

final fit

I'm very happy with the fit I've achieved.  I only look unhappy in the photo because I've been suffering from sinusitis and a cold for the last several days and I had a massive headache!  Also, a pin was sticking me right in the armpit :-)

At this point, I was ready to re-trace my taped-up pieces and adjust my lining and facing pieces to match - the work of another couple hours.  But VOILA:


My pile of beautiful, fresh pattern pieces is ready to go!  I'm hoping to start on cutting out my fabric today!

Wednesday, October 8, 2014

October means blazers.

For months I've been planning to spend a fair amount of my fall sewing learning to make a tailored blazer.  I've gotten a small start on that, but to sort of ease into it - and because I wanted one - I decided to make an unstructured knit blazer first.

I've got plenty of blazer patterns in my stash, so I had a look through them and pulled out my favorites, then decided to go with Butterick 5926, which is made for "moderate stretch knit fabrics."  There are options for a shorter or longer length, and full or three-quarter sleeves.  I chose to make mine with long sleeves in the sorter length, which hits at my high hip.

My first version was a fit muslin but I was hoping (as one does) that it would be wearable.  Still, I didn't want to spend a ton of money on fabric, so I headed over to my local JoAnn's and picked up a couple yards of their Sew Classic Ponte Roma.  With a 50% off coupon, my fabric cost me $13; I spent another $3 or so on knit interfacing.  I'd never used this fabric before but for the (sale) price, I'd say it's fairly good quality - IF you check your yardage before purchasing.  I didn't, and after my fabric was washed I found a  large run.  Luckily, I was able to cut around it.  This fabric is 60% polyester and 40% rayon.  I was worried it might be too hot and polyester-y, but it's very soft and quite comfortable to wear.

I got a bit cocky and didn't take any flat pattern measurements or do a tissue fitting.  But I did look at the finished garment measurements, and decided to go with a size 10, which is where my bust measurement puts me.  I was surprised that the ease was pretty much perfect!

Before cutting, I made a bunch of flat pattern adjustments that are pretty common for me:

* Forward Shoulder Adjustment of 3/8" - less than my usual of 1/2" - 5/8"
* Broad Back Adjustment of 1/4" - again, less than my usual of 1/2"
* Sway Back Adjustment of 1"
* Shortened Sleeve by 1" and moved elbow dart up to correspond

I was pleased that the pattern had a center back seam and upper back shaping in the form of darts coming off the back neck.

So, how did it work out?  Well, I admit that I was a little underwhelmed when I first finished it.  I felt like I'd overdone it with the Forward Shoulder and Sway Back adjustments.  But I've worn it a couple times now and while I do think I can back off on those two adjustments just a bit, it's not too bad - not any worse than something I'd buy off the rack.  Here's me wearing it this morning, making my squinty face into the sun while Alicia took my picture:


I think this pattern is a keeper for me.  But there are a few things I will do differently the next time:

* reduce the Sway Back adjustment to 3/4" and
* narrow the shoulders by about 1/4" - this one is a surprise to me because my shoulders are on the broader side; it could be that I should really be in the size 8, but I like the ease I have here

The one thing I really don't like about this pattern is the placement of the buttonholes.  I worked them as written in the pattern and they are just too far in from the edge.  It looks a little ridiculous when buttoned.  It's not a huge problem because I'm not likely to button both buttons at once, but still . . .
these guys are about 1" from the edge.


There were a couple places I found the instructions a little lacking.  One was at the insertion of the collar, which wasn't too hard to figure out.  The other though was the hem.  The bottom hem is topstitched down, and while the pattern says to "trim" before hemming, it doesn't say how much.  I missed that part and fused the entire width of the hem back with double-sided fusible.  When I got to the point of topstitching, I realized that if I stitched at the edge of my turn-back, I'd be stitching through the pocket!  Of course, since it was fused down it was too late to trim it.  It won't show while I'm wearing the jacket, but it kind of bugs me knowing the excess fabric is there.

This ponte, while nice, is on the thin side.  I was a little disappointed when I tried the jacket on over some sleeveless dresses made from thicker ponte that the shoulder line became very lumpy. (P.S. this is my favorite dress, ever.  I have it in a gazillion colors, I love it that much.)  So next time, I may consider adding in some thin shoulder pads.  That said, it's pretty nice to have an unstructured, unlined jacket:  it feels like a cardigan but looks like a blazer.  I've been enjoying wearing this a few times in the week since I made it.

I did all my stitching on the regular sewing machine, using the "double stitch" as instructed in the pattern - really just two parallel rows of stitching before trimming the seam allowance.  I only dragged out my serger to finish the raw edge of the front facing.


I finished this last week, and tried a few times to get pictures of it.  As you no doubt know, trying to photograph a black garment indoors isn't the easiest thing to do.  This is the only picture from last week that came out half way decently - this is how I wore it to do some errands, with my white lace Renfrew, jeans, black flats and a sweet vintage leopard print scarf given to me by Andrea this spring.


And today I'm back at it with another Renfrew, jeans and a different pair of black flats!  Hey, if it works, it works!

Have any of you made this pattern?  Did you like it?  This one gets a thumbs up from me.  The great thing about an unstructured blazer is that even if the fit isn't stellar, I don't think it matters too much.  It's a pretty forgiving garment!  There's room for me to improve the fit here, but I'll enjoy wearing this one.  A black blazer was high on my list of holes to fill in my wardrobe.  I hope to do a more structured woven version someday, but this one will do for now!