Showing posts with label baby. Show all posts

Tuesday, September 3, 2013

And the last baby thing!

This was actually the first baby thing I made, but I wanted to wait to post it until my friend got it in the mail, so it would be a surprise for her.

The baby swaddler I made is another pattern from Mamma Can Do It, and was picked out by my friend.  But the fabrics were a surprise!  She told me that she likes orange and grey, so I went over to Hawthorne Threads to shop.   I love it that you can search by color on the site.  I started from orange, aiming to find an orange and grey that went together.  But then this happened*:


Both these fabrics are from Mo Bedell's Full Moon Lagoon line - up top is Coral Garden in Purple, and below is Bubbles in Orange (apparently no longer in stock).  I love purple, pink and orange together, and hoped my friend would too - and it turns out she does!  So here's the swaddler:

{front}

{back}

{open}

The "wings" of the swaddler open and close with velcro.  You slip the baby inside and then wrap it up nice and tight.  Sadly, I don't have anything around here even vaguely baby-shaped, so do visit the website to see it in action!

This was such a fun little pattern to make up.   Really the only thing I did differently was to notch my outside curves rather than clip them like the pattern says.


The velcro isn't sewn on until the swaddler is complete.  At first I wasn't sure why this was so - why the velcro wasn't sewn on first as you'd do with a bag.  But then I realized that it's going to get opened and closed a lot and needs the stability of both layers of fabric.  I did something a little new here - instead of pinning the velcro to the fabric, I used a product I'd recently read about and purchased:  Roxanne Glue Baste-It.  Six little dots on each piece of velcro held it nicely while I stitched.  I'm really glad I bought this stuff!


The top and bottom of the swaddler are sewn separately, and then sewn together right side out:


I considered changing it so the seam allowance would be on the inside, but then decided it tied in with the topstitching that goes all the way around the edges and did it as written.  See?  I can follow directions when I feel like it!

So that's it for the baby stuff!  I had a great time making all these baby gifts, but now I'm ready to get back to adult sewing for myself!  I've really had the knitting bug lately too - I've finished a sweater I never even blogged about, and have started two new ones! 

* I apologize for the fuzziness of a lot of these pictures.  It was extremely overcast when I was taking them and I just couldn't get my camera to take a good picture for the life of me!  Someday I'll get a new one . . .

Saturday, August 24, 2013

London Dress

Another tiny thing!

At the end of June, my cousin had her second baby girl and named her London.  So once I got on my baby kick, I couldn't resist making her a little dress with London-themed fabric!

I used a pattern from a website a friend introduced me to:  Mamma Can Do It.  There are SO many cute patterns on this site for baby things, it took me a while to decide which one I wanted to use, but I finally settled on the Reversible Baby Jumper.  This multi-size pattern includes sizes all the way from newborn to 36 months. 

This is actually the second pattern I've used from this site, but I can't show you my first make until my friend receives her present.  These downloadable patterns come with very clear photo tutorials.  I like to print out the pattern pieces only, then load the pattern and tutorial into iBooks on the iPad so I can easily take it to the table with me when I sew. 

The seam allowances on these patterns is 3/8", which I think is great - somehow it makes sewing easier to line the fabric up with the edge of my presser foot!  The only thing I changed from the pattern was to notch my curves instead of clipping only, as the pattern recommended:  it does make a difference when turning your work out.


I ordered 5 different London print fabrics from Fabric.com because I wasn't sure how the colors would be and which two fabrics would go together best - and you know I'll use the leftovers for bags and such!  I made the 3 - 6 month size, which requires 1/2 yard of each fabric, but I really don't think I used that much.  I have lots left over.  Here's a better look at the two prints I used:

Next Stop:  London Around Town Yellow (Robert Kaufmann)

London Crowns Light Blue (Andover)

And here's the little dress:


Squee!  I love this little thing, and it was so fun to make!  It's really clever how the reversible dress goes together - I doubt I could have figured it out on my own but the tutorial makes it really simple.

OK - I just realized that I did change one other thing.  The pattern recommends using snaps or velcro on the shoulder tabs, but I wanted the dress to be fully reversible, so I made buttonholes and then sewed two buttons to each tab, front and back, making sure to keep my threads loose:


This project was so quick and easy - I really recommend this pattern.  Also, if you buy a pattern from Mamma Can Do It, you get a coupon code for 30% off your next pattern!  But at $5, I think this was really reasonable to begin with.  I would definitely make this again!

Wednesday, August 21, 2013

Tiny Little Pants!

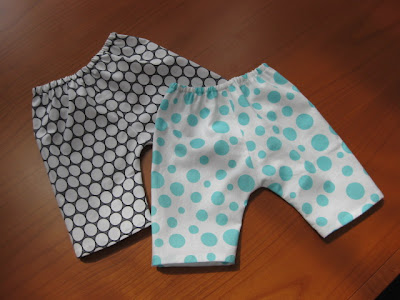
Here's one of the baby gifts in my current parade of baby gifts - Made by Rae's (free!) basic baby pants.  I made these today, and I can share them because Augie's mom and dad don't read my blog.  Neither does Augie, but he's only 2 weeks old, so that's to be expected.


Squee!  I was giggling the whole time I was making these - they're so tiny and cute!  I made these two pairs in about an hour, and that includes cutting out and going up and down the stairs to iron all the seams.  This pattern is so easy, even if you've never sewn anything before you could make these, thanks to the lovely tutorial Rae posted.  ONE pattern piece - two pages to print out!  If you need a baby gift in a hurry, I highly recommend these.


I did my center and leg seams on my serger to make things even quicker - sewn and finished in one go.  Honestly, the part that took the longest (aside from going through my stash and deciding which fabrics said "Augie") was turning back and pressing the hems and waistband.

Tomorrow I'll be sewing a dress for a new little girl . . .  babies are the funnest!