Showing posts with label jamie jeans. Show all posts

Thursday, February 20, 2014

Jamie Tidbits: Innards and Close-Ups

Told 'ya I'd get three posts out of this pair of jeans!

I know you guys like to see guts, so I took plenty of pictures for you, as well as some close-ups of construction.  I've got a bunch, and they're in no particular order, so I'll just caption each one.

back pockets

yoke and belt loop

front pocket, fly and belt loop

fly - not crazy about how my serging shows, but it's not visible when they're zipped

front - closed

shortened zipper and bar tacks from inside

full view to show shape - front

full view - back

pockets from inside

flowery pocket bags

front leg seaming


inside back

I had to take a chunk out of the waistband, so there's a seam under the belt loop at CB

waistband, belt loop and pocket

fly pinned closed to line up zipper for sewing

ready to sew zipper to inside of fly

topstitching marked on outside

I had to shorten a 7" zipper, so I had to fold it back while topstitching the fly

cake and coffee - an essential part of the jeans-sewing process

my first go at the fly was wonky, so I had to re-stitch

fly shield attached

double topstitched C-seam - wasn't as hard as I thought it would be!

So there you have it.  Next time I make these jeans, I doubt I'll have anything more to say except, "Hey, I made another pair of jeans!"

Wednesday, February 19, 2014

Jamie Jeans: My Fitting Experience

I'd originally thought I wouldn't write up a post about fitting, only because fitting is such a personal experience.  That is to say, the fixes my body needs are likely not the ones other bodies need, since we're all shaped differently.  But two things changed my mind:  firstly, there were several comments asking for this post.  And secondly, when I was looking back at my Pants for Real People book after I'd finished, it seemed that there really aren't that many different adjustments one can do to pants, which I think is good news:  it's not as hard as we all think it is.

Another reason I'd thought not to write a fitting post is that my method was very unscientific.  For all my talk about taking flat pattern measurements and comparing to my RTW jeans and TNT Clover pattern (all of which I did), in the end, what really got me to a fit I was happy with was making up the pants and pin-fitting them to my body.  Same as when I made the Clovers two years ago.

So I think from here on out, my process will be as follows for pants or jeans:
1) choose the size that corresponds to my biggest measurement
2) make the pants
3) pin fit
4) adjust the pattern to match garment

So, it's not really difficult or arcane.  It just requires a willingness to take the time to do it.  After sewing up my jeans, I tried them on and adjusted the seams four times before I felt I was happy with them.  It took me 3 - 4 hours on a Saturday morning.  Not a huge investment of time really, considering I shouldn't have to do such an intense fitting again.

I should also mention that except for having Hubby take pictures of the front and back after each alteration, I did the fitting on my own.  So I don't think you really need an extra pair of hands to accomplish this.  In fact, I think fitting a pair of pants is probably easier to do by oneself than a bodice, because you can reach all the areas!

I'm going to share those pictures I had Hubby take.  I really hadn't planned on sharing them - it was just easier for me to see in a photo what was going on than in the mirror.  So the pictures are heavily cropped because I was only wearing a bra on top!  But I think you can get the idea of how the fit transformed.  At each step, the changes don't look very dramatic, but the difference between #1 and #4 is pretty significant.

Also:  I say I "pin fit" but really, the only thing I pinned was to close the fly.  At each stage, I pinched out some fabric and eyeballed how much needed to be taken out, then went back to the sewing machine and sewed a new seam by that amount.  After the body photos, I'll show the seams so you can see the changes I made.

It's probably helpful to know that I started out with a size 42 to accomodate my hips, my biggest part.  My waist falls into a size 38; however, these don't come all the way up to the waist.  In the end, I found it was easiest to start from my bigger size and take away in the places where I needed it.

Here is how they looked straight out of the box, with no alterations:


Not too bad really!  I knew I'd have to lower the C-curve and take a wedge out of the center back, so I did that:


Then I refined the angle of that wedge at the center back, so I didn't have a piece sticking out over my coccyx.


And finally, I took in a bit at each side seam, and also took in a bit at the top of the inseam, which helped a little with those C-level whiskers.  They show up better here than in yesterday's photos, but adding the waistband and a belt helps lift everything up so that it's not as dramatic in the finished jeans as it is here.


Now, here is how the C-seam looked after all those refinements:


The stitching closest to the edge is the original (pattern) seam line.  You can see that the changes here were incremental.  In contrast, the amount I took out at the center back was significant:


Once I had the fit the way I wanted it, I did two things:  first, I used my marking pencil to draw in my new seam lines on the fabric.  It ended up being to my advantage that I forgot to baste my pants together with the seam allowances on the outside:  I think I got a better idea of the fit, and I was able to draw the new seam lines on the wrong side where I needed them to be.  Then, I placed my pattern tissue over the jeans and drew in where the new seam lines were.

I should back up a little here.  I sewed the jeans together at the inner leg seam and finished that seam.  Almost all the fitting changes happened at the center back, C-seam and side seams.  So those seams were basted with contrasting thread so that I could see and remove them easily.

So when I transferred my changes to the tissue, I transferred the side seams first.

back yoke
back side seam

upper front side seam - lower front was unaltered

Then I opened up the side seams so I could lay the leg pieces flat, and transferred the center back and C-curve changes to the tissue.

center back of yoke

center back and  C-curve

back C-curve and a bit removed from top inseam

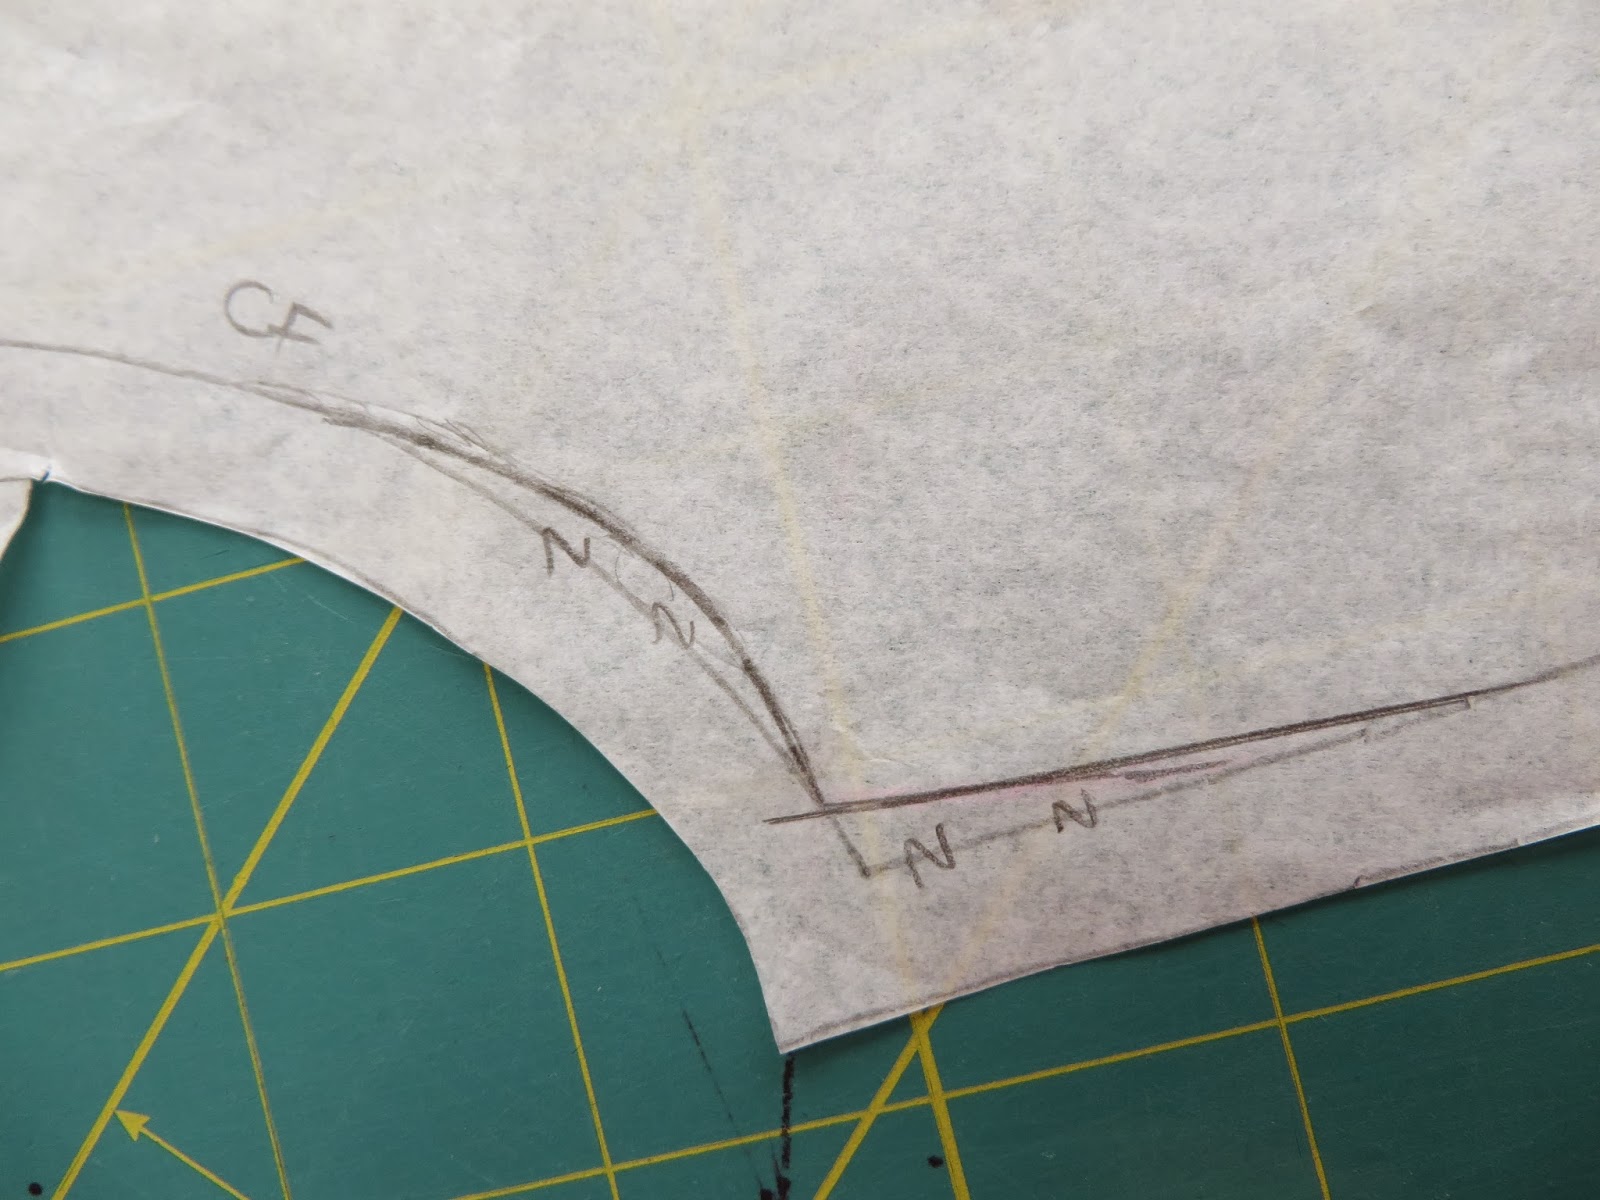
front C-curve and a bit removed from top inseam

Here's a picture of my penciled-in new seam lines.  I didn't trim away the extra until after I'd sewn the C-seam and tried the jeans on one more time.


I did make a couple of changes to the leg before even starting, and didn't adjust them at all during this fitting process.  From the get-go, I took 2" off the bottom of the leg.  I did it that way rather than shorten it mid-leg because the place where the knee hit was about right for me.  Because the jeans continue to taper a bit below the knee, cutting off the bottom meant that I already had a bit of extra width at the ankle.  Having received advice that the calves are snug on this pattern, I gave myself the extra room I mentioned yesterday by adding another 1/2" at the hem line before taking off the 2" on the bottom, and connecting that to the notch at the knee.  I did this at both side seams on the front and the back.

As I said, I spent 3 - 4 hours on Saturday doing all the fitting.  And then I put the project aside until the next day.  On Sunday, I spent about an hour unpicking all the basted seams, marking the seam lines and transferring them to my pattern.  Then I was ready to sew them together for real and continue on with the finishing.

So the whole process really wasn't so terrible.  And I found that I already had a lot of clues about what needed to be done from the way my RTW pants fit:  I always find myself wishing I could take a big wedge out of the center back, and a bit out of the sides.

After I made my first coat last spring, I felt a big boost in sewing confidence.  And after I made my third coat this fall, I started to feel like I can sew whatever I want.  Things like coats and jeans used to seam like far-distant goals to me.  But lately I've had the attitude that with RTW, somebody has to make those things.  And if they can do it, so can I. 

And if I can do it, so can you!  So if you are one of the people who think that sewing your own pants is beyond you, I encourage you to think again.  Pants aren't hard to sew.  If you can put a zipper into a skirt, you can put a zipper into pants.  If you can follow instructions to sew a dress, you can follow instructions to make pants.  Just give yourself time:  don't expect to get a good fit right from the beginning, and be willing to make as many adjustments as necessary.

And be willing to fail (although you likely won't).  Be willing to mess up a length of fabric in the name of experimentation.  If it doesn't work out, you can always cut the fabric up to make bags or other small projects!

Tuesday, February 18, 2014

Jamie: My New Jeans

Hey, I finished my jeans yesterday!  They're not 100% perfect, but I'm very happy with them.  They certainly fit me better than my best-fitting RTW jeans, so I'm on the right track.

I took gazillions of pictures of my fitting changes, in-progress sewing shots, and finished inside and outside shots of the jeans.  But I know you guys - I know that what you really want to see is how they look on a body (mine).  So for once, I won't tease you, and will show you the good stuff first.

Get ready for LOTS of pictures - I wore two outfits, and tried to show the jeans from as many angles as possible.  I will say that I used very dark denim, so some of the details aren't easy to see, but I think these will give you a good idea of the fit.  I'll address my fitting changes in a separate post, but the basic info is that I used a size 42 pattern to fit my low hip/high thigh, and refined from there.  My fabric is a 10.5 oz. "heavyweight" denim of 98% cotton and 2% lycra.

Here I'm trying to replicate an inspiration outfit I re-pinned from Ami.  Sadly, I can't get to the original pin.  But it's slim jeans, lace top, red pointy flats and leopard clutch - mine is a Stitch Parade Original :-)


Now on to fit:  here we are from the front:


From the side:


From the other side:


And from the back:


Those wrinkles on the back of the leg seem normal to me.  Should I worry about them and try to get rid of them?  They don't actually bother me - all my other jeans do the same.  Nor do the remaining tiny whiskers at C-level (which I'm exaggerating here):


I tried them rolled up too.  I'm not sure I love that look though, because of the seam in the center of the leg.


That top was pretty long, so I switched it out for my new Continental - a length of top I'm likely to wear more often with these jeans.  One of the things I really like about the Jamies is that they are "low rise" but not super low.  I was worried they'd be much lower, but they hit in a spot I really like - not too high up toward the waist, nor too low on the hip.


Also, I'm wearing the new shoes I bought myself for my birthday :-)  And please to excuse the hair - I'm getting it cut THIS AFTERNOON!


I can easily bend over to unroll my pant legs:


And when I stand back up, I don't have to yank up my pants, which is a very welcome change.


I haven't worn these yet except for these pictures, since today is a housework (and haircut) day, but so far they seem to be very comfortable.  The feeling of having a seam down the front of the leg takes a bit of getting used to, but it's not bothersome.  I'll be interested to see how these loosen up with wear.  Also, I'm not sure you can tell, but I didn't make the lower part of the leg super skinny.  I'd added on width per a couple of comments and reviews saying the calf was snug, with the thought I would skinny it down during fitting.  But I really liked the look of the less skinny calf on me - I think it helps balance out my leg, since my thighs are so much bigger than my calves.  I look a little less like a clothes pin, and more like a curvy lady :-)

I'm definitely going to be making more of these, however, I'm going to follow the suggestion of a couple other bloggers and wear them around for a while before deciding if I need any further fit fixes.

So that's two out of my three February goals done.  Next up:  the Lola dress!

Thursday, February 13, 2014

Some Jeans Notes

So, if you remember, one of my goals for this month was to make the Named Jamie Jeans.  And I've been working on it pretty consistently since the beginning of the month.  But today is the first day I actually sewed on them.

I had a couple set-backs.  I first traced out the size 38 pattern because I had some confusion about what size to make.  The confusion was actually more like denial I think.  I was measuring my "hip" - NOT the widest part of me.  After taking some flat pattern measurements, I realized that was never going to work.

So I retraced the pattern in a size 40, because I've purchased size 40 clothing before.  For that round, I even went so far as to pin it all together to do a tissue fitting.  Go ahead and laugh - I deserve it!  It didn't dawn on me until I was struggling to get my paper pants past my calf that stretch denim stretches - paper doesn't!  D'oh!!

I did a few more flat pattern measurements, and compared the pattern to my measurements and some jeans I have that fit me well in the hip.  I started watching the Pants Fitting Craftsy class.  I started reading Pants for Real People.

And then I got real, and traced out the size 42.  Some more measurements and comparisons confirmed that this size and shape is very close to my RTW jeans.  So I'm hopeful that the fit refinements I have to do will be to tweak the things I don't like about the jeans I have.

While all that size-choosing was going on, I had a fabric crisis as well.  I fell in love with the "muslin" denim I'd bought, and anticipating a fitting nightmare, decided to order some extra from Fabric.com.  I got 4 yards each of 2 different weights, thinking that I'd have enough to make 4 muslins if necessary and then the first fabric I bought could be the real thing.

Yesterday I went through the teeeeeedious process of prewashing that 8 yards of denim - twice (PFRP recommends thrice, but I just didn't have it in me), and then ironing it.    And when I went to cut out my pieces, I found that they didn't fit on the fabric as shown in the layout.  And I'm not really sure why - my fabric is 52" wide, more than enough to go around my hips.  I haven't measured it yet, but could I really have gotten that much shrinkage?  So, I had to alter my placement, which meant that I won't be getting 2 pair of jeans out of that 4 yards.  Good thing I bought extra! 

I also found that while the pattern says what length of fabric to get, it doesn't mention a width, although I suspect most denim comes in 52" - 54" widths.

Anyway, I cut out all my pieces yesterday, to get ready for sewing today.


I decided to sew this heavy weight denim on my Kenmore rather on my Janome - it's just a sturdier machine.  And I'm pretty sure that was the right choice.  I didn't really have any trouble, except when I was attaching the back pockets.  The denim needle went through everything nicely.  I'd heard that it's best to use a topstitching needle for the topstitching, and that's where I had trouble on the pocket.  On my first pocket, the needle kept getting hung up on the thick areas.  I couldn't even move it - I had to cut the top and bobbin threads, remove the bobbin and the race and pull the thread free before I could lift the needle.  I had to do that 4 times on the first pocket, and I'll have to go back and hand-sew those ends in.  However, I finally realized that the denim needle might work better in that instance, and once I switched, things went much more smoothly.


The process for this pattern is sew a seam, finish it (on the serger) then press to one side and topstitch.  There's a lot of back and forth between machines, needles and threads - and for me, between floors of my house, as I sew downstairs but iron upstairs.

So I decided to sew as many little seams as I could with the denim needle and regular thread, then finish them, take them upstairs to press, and come back down, switch to the topstitching needle and topstitching thread and then do all my topstitching.  Because I was working on so many steps at once, I crossed out each instruction as I finished it.


Also, you can see that before I even started, I highlighted all the names of the pattern pieces and wrote their numbers next to them.  I did this because I noticed that the names on the pattern pieces themselves are sometimes different from the names used in the instructions, and I didn't want to have to stop working and figure out which piece I needed as I was sewing.

Here's a pile of pieces that have been seamed and finished, and are waiting to get pressed:


That pattern piece for the slanted pocket edge has some very fiddly angles to cut around.  I chose not to do it.  Instead, I cut a piece the same width, but about an inch longer.  I sewed it to the pocket and leg front, and then trimmed away the extra after it was all put together.  Much easier.


So, my next step is to put the legs together.  I'm planning on basting it all together with the seams on the outside, to make fitting adjustments on my asymmetrical body easier.  I probably won't be doing that until the weekend though.