Showing posts with label anouk. Show all posts

Saturday, March 2, 2013

I owe you one.

So while I was semi-gussied up the other day to take pictures of the coat and the new knit dress, I also put on the Anouk dress I finished over a month ago but never modeled.  I know some people were interested in seeing this, and because I abhor loose ends, I'm posting it now, although there's really not much more to say about it.


Except:  what's up with those wrinkles on the back at the bottom?  I sat down for like two seconds to put my shoes on and this chambray wrinkled!  And also:  the more I look at the color combo, especially with these shoes, the more I like it.

And about the shoes:


More Fryes.  These are the Gwen Woven T-Straps, which I was pretty proud of because I snagged them for something like $25 about 5 years ago at a discount shoe shop in St. Louis.  (Shoe Stop, for any of you in The Loo - I'm sure you know it!  And if you don't, Go.  Now.)  The original price would have been at least $158.  I was in a huge T-strap phase at the time.

Sadly, I can't walk in them.  That's a 4-inch heel which is exceedingly narrow at the base.  No wonder they were $25!  They sure are beautiful though.

So, the dress.  Will I wear it this spring?


I don't know.  It's awfully short.  And not very comfortable, honestly.  I really should have done the broad back adjustment I know I need but never do.  And the armholes are too high for me, which is interesting, because I think I have "high armholes" - almost all my RTW sleeveless tops have armholes that go down too low.  And then there's the armpit flab issue that was discussed ad nauseum.  On the other hand, it makes me look more hour-glassy than I really am, so that's a bonus.

Anyway, I said I'd show it, and I did.  Moving on!

Tuesday, January 29, 2013

The last of Anouk, for now.

Yesterday afternoon the sun came out for about a half hour, so I scrambled to get my Anouk fixed.  I'd been waiting for some light - necessary for making tiny pintucks on deep black fabric with black thread!  I'm pleased to say that my "fix" doesn't look too bad, and the dress fits much better now - no gaping.  I'm happy enough with it that I won't be removing the yoke and doing it again.  I did, however, transfer my needed change to my pattern piece:


I decided to make two pintucks on each side of the yoke and have them angle to between the tucks on the bodice.  Since the amount of fabric I needed to remove was pretty large, it was easy to break it in two.  I hand basted my tucks first, and then sewed each one at 1/8".  While I was at it, I switched to snazzier buttons:


A few of you suggested that having the black buttons was just too much black, and you were right.  Funnily, these are the buttons I originally wanted to use, but I thought they were too stark.  I tried to soften it a little by using magenta thread:


I'm much happier with the dress now, so I'm calling it finished and putting it in the closet to await spring.  At which time, she'll come back out so I can model it for you!

Thursday, January 24, 2013

Slightly Deflated

I did mostly finish my Anouk over the weekend, and it left me feeling slightly deflated.  Before I go into the details of why, here are some pictures of it on the hanger.

unbelted
belted

Don't get me wrong:  I don't hate it.  But I don't love it as much as I was hoping to.  Part of this is the color combination - in the end, I think the black of the yoke is just too stark.  My yoke fabric was an extremely thin voile.  Without interfacing and lining, it matched the black on the stripe fabric quite well.  But of course, I couldn't use it all on its own.  I'm counting this as a good lesson.

I 
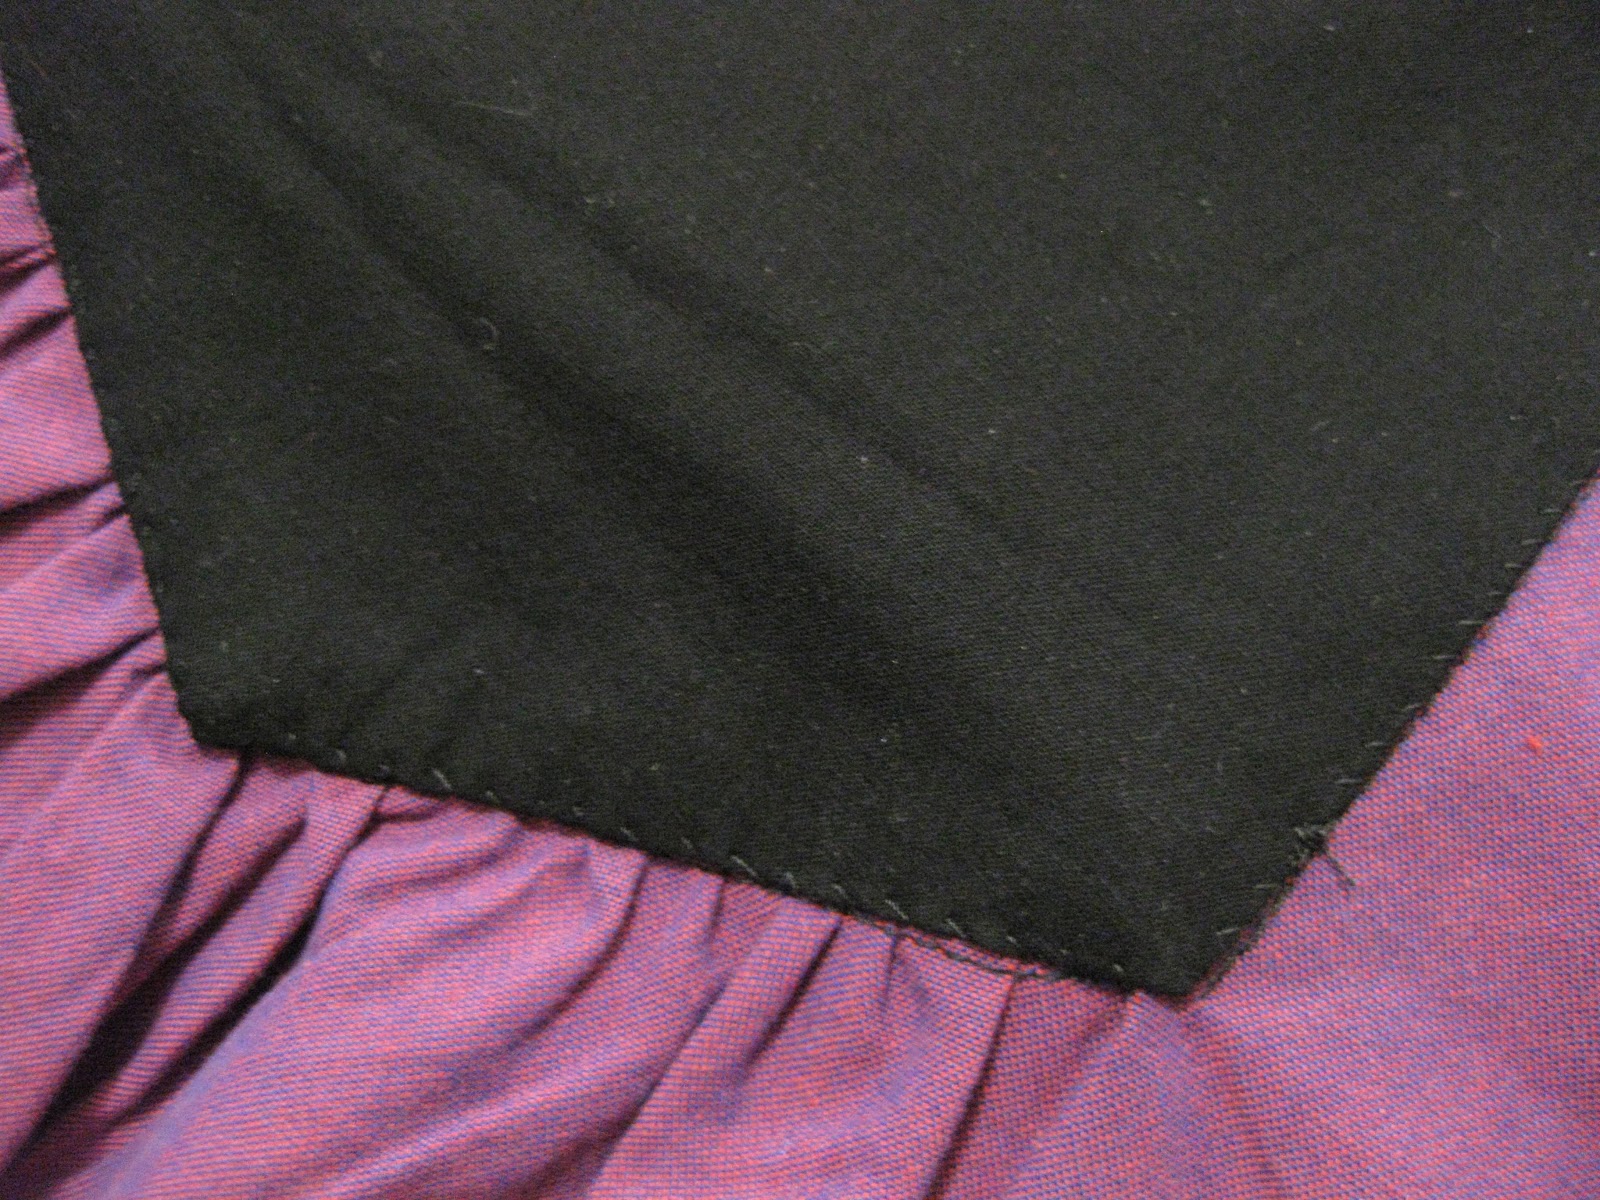
am happy with my workmanship on this dress.  As I said before, I really took my time and concentrated on doing each task well.  I stitched the yoke lining and placket facing down by hand, and finished the side seams (the only exposed seams on this garment, which I think is kind of neat) with my new red serger thread.


This fabric looks magenta, but it's really a "shot" chambray:  the weft threads are marine blue and the warp is a red very close to that serger thread.

I'd had an idea all along that I'd like to use four buttons on the yoke instead of two.  I haven't been able to find many examples of finished projects for this pattern online, but many of those I did find had the buttons off-center.  It just kind of bothered me.  Since I wasn't 100% sure how it would work, and because I didn't want any of the play that buttonholes would introduce, I skipped them and just sewed my buttons on through both layers of the tabs.


I think it looks really cute, but the reality is that the buttons are too heavy.  And that contributed to the major problem with this dress:

Oh noes!!

Holy Gapeage, Batman!!  The yoke stands out about 2 inches from my chest!

Now, I probably should have seen this coming:  I've known since reading Fit for Real People last year that I have a "hollow chest."  But because of the styles I've been sewing so far, it really hasn't come up as an issue, and I've gotten used to concentrating on my other "problem" areas, namely grading from a size 2 bust to 4 waist to 8 hip.  And since this pattern states that it is "free at waist and hips,"  I thought:  "Cool!  I don't have to do any adjustments!"

The fix for this is pretty easy, once you know you have to do it.  You just take a little tuck out at the neckline until it lays the way you want.

Before, with buttons removed.  Note how the tabs now overlap.
After, with a tuck taken out of each side.  Problem solved.  Almost.

I do think I would like to make this pattern again, so I'll be transferring this change to my pattern piece.  I had to take a tuck about 1/4 inch deep on each side (for a total fabric removal of 1/2 inch each side).


Sadly, the "clean finish" construction of this dress means that the only real way to fix it would be to remove the entire yoke and do it again.  I do have enough fabric to do this, but I don't have enough love for the finished product with these fabrics.  So I'm thinking of trying to take some mini pintucks in the yoke to match up with those in the bust.  I'm going to stew on this for a while - obviously I'm in no great hurry to finish this, as it will be many months before I can even contemplate wearing it!

And now I'm going to really get real - all for the benefit of sewer-kind, because there aren't many reviews of this pattern so I'm trying to record my experience with it.  I've read a few comments on Victory Patterns that said the armholes tend to be high.  My armpits are high, so I thought, "Great!  My bra and my armpit fat won't show!"  So, although I edited out all the cleavage shots, I am going to show you that the armholes are indeed high, but not high enough to hid my armpit fat.  Wahhhhh!  I really hate that fat, especially since I'm pretty slender in general.  Maybe it's due to age?  I've only really noticed it in the last few years.

So. Gross.

As I was taking all the pictures for this post, I kept tugging the dress into place to hide those nasty bulges.  It actually mostly looks worse than this, so you should be glad I spared you, relatively speaking.  If anybody knows how to get rid of this, please let me in on the secret!  Bench presses and chest flies are not doing the trick!

So all in all, a good learning experience - I don't regret one minute of the time I spent on this project.  I will wear the dress once it's fixed and the weather warms up.  That is, as much as I wear any of my makes, which is not that often!  And I would like to try out the blouse version - I'm hoping the sleeves will hide the fat.

Friday, January 18, 2013

Goal Bustin'

I've been slowly working toward accomplishing one of this year's goals*:  finally making my Anouk dress.

The weekend before last, I taped my trimmed copies together and traced out all my pattern pieces.  I had thought I would start the dress last weekend, but as we now know, Bag Frenzy took hold and I made a little detour.

On Wednesday I had some free time, so I used it to cut out, mark and interface all my pieces.  And today I finally started sewing.


Somehow, I'm happy to be working on this in bits and pieces, rather than try to finish the whole thing in a day or two.  I'm starting to suspect that this would be my preferred way of working, but I'm hindered by not having a sewing room.  (I know, I keep harping on that!)  Because I have to haul everything from the guest room upstairs to the dining room downstairs every time I want to sew, I always feel like I need big chunks of time and maximum output.  But with this project I'm happily taking my time.  That could also have to do with the fact that it will be months before I can wear this, as I'm doing the sleeveless version, so I don't feel any great urgency.


One of the factors that put me off starting this dress over and over is all the small bits:  the pieced bodice front, the pintucks, the gathering.  You know - all the details that make this design what it is!  I always had another project on tap that would be quicker or easier.  Lately though, and thanks to quilting I think,  I'm finding these details a lot of fun to execute.  I had never done pintucks before, and I really enjoyed them - I was a little sad when I finished them all!  And it was really fun moving my pattern pieces around on my printed fabric to find just the spot for making the chevron.  I'm really happy with how that turned out.


I looked back at my account on Fabric.com where I bought all the materials for this dress.  The print is Anna Maria Horner's Mixed Signals Striking voile from her Innocent Crush line.  I ordered it on February 6 of last year.  I ordered the magenta chambray and the black voile I'm using for the upper bodice a week later.  My plan is to get this done before this UFO becomes one year old - very doable, even at a slow pace.

*To keep my goals in front of me, I transfered them from the original post to a page up top.