
I realize most of you probably are still choosing yarn, but I want to be a little ahead of you so you can see the direction we're going. And there's no rush for you, but there's a little one for me: in a month, I'll be leaving the country for 2 weeks and won't have any internet during that time! So I want to get the project well underway before that.
Well, I just couldn't make myself knit another pink sweater so soon after the big one I just finished. Just in case you forgot, here's a picture of me wearing it in the park on Saturday, holding the MOST adorable little maltipoo I met there, Hank:

Isn't he the sweetest? He's just 8 weeks old and only weighs 3 pounds!
Anyway, what was I saying? Oh yeah, the yarn. So I went out yesterday and got something I'm much happier with, and as soon as I got home I made a new swatch:

This is Brown Sheep Cotton Fleece in Banana. I've used this yarn several times before and I really love it. It's 80% cotton and 20% wool. I'm getting a gauge of 5 stitches to the inch with this one as well, although on a US6 (4mm) needle, so I won't have to change any of my sizing calculations - yay!


One of the reasons I think this pattern is a good one for a beginner is that every line is written out. When you print the pattern it can look a little daunting, but as you work through it you'll see that having each line written for you will help you stay on track.
To make it even easier, I mark up my pattern a little before casting on. First, I highlighted all the places where it says "pm" or "sm" ("place marker" or "slip marker"). Doing this will help you keep each section of every row separate, so that if you make a mistake, you can go back section by section to see where the mistake is. Here's how mine looks:
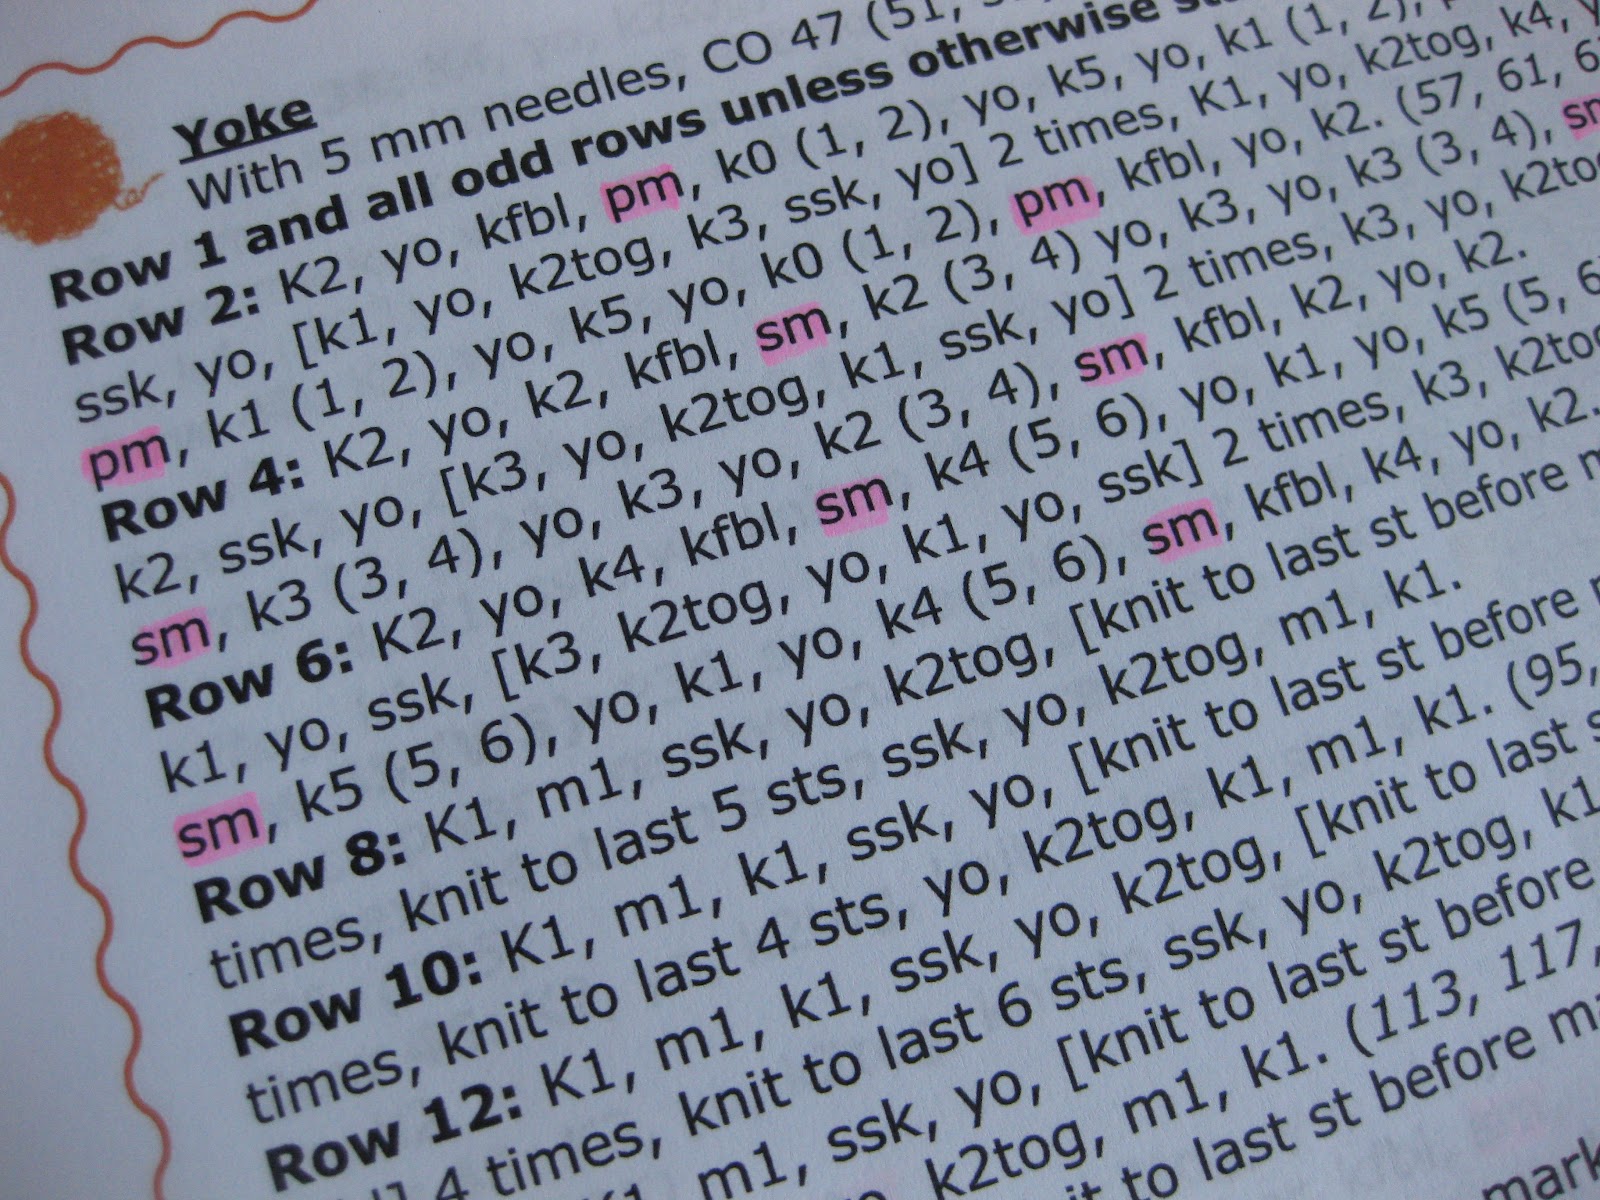
Now, with another color, go back and highlight all the numbers for the size you're doing.

I'm doing the medium size, so everywhere there are 3 numbers to choose from, I choose the middle one.
Now let's talk for a minute about how to read a pattern. I'll use one of the rows as an example.
Row 2: K2, yo, kfbl, pm, k0(1, 2), yo, k5, yo, k1(1, 2), pm, k0(1, 2), yo, k4, ssk, yo, [k1, yo, k2tog, k3, ssk, yo] 2 times, k1, yo, k2tog, k4, yo, k0(1, 2), pm, k1(1, 2), yo, k5, yo, k0(1, 2), pm, kfbl, yo, k2.
(57, 61, 67)
I've highlighted all the "pm" just like I did on my real pattern. Let's take it section by section. The first section says:
K2, yo, kfbl. I knit 2 stitches, do one yarn over, and then knit in the front and back of the next stitch. Then I place a marker on the needle after the stitch I've just made and go on to the second section:
k0(1, 2), yo, k5, yo, k1(1, 2). Now we start to see parentheses. In every place where there are parentheses, you will only be choosing one of the numbers: the first number for the Small, the second number for the Medium, and the third number for the Large. Place another marker after working this section.
k0(1, 2), yo, k4, ssk, yo, [k1, yo, k2tog, k3, ssk, yo] 2 times, k1, yo, k2tog, k4, yo, k0(1, 2). Here we have both parentheses and brackets. You will always treat parentheses as above. Sections within brackets are sequences that are repeated more than once. You work the stitches according to your size up to the bracket, then work the sequence inside the bracket twice: k1, yo, k2tog, k3, ssk, yo; k1, yo, k2tog, k3, ssk, yo. Then you continue and finish that section according to your size, then place a marker.
The fourth section is the mirror image of the second, and the last section is the mirror image of the first. You've placed 4 markers, which gives you five sections: two fronts, two sleeves and one back. Here's how my piece looks after this row:

At the end of this row are three numbers in parentheses: (57, 61, 67). These numbers tell you how many stitches you should have after working this row. In this row, all sizes have increased 10 stitches.
The pattern gives you end-of-row stitch counts every few rows, but for beginners, I think it's a good idea to keep track of how many stitches you have all the time: not only at the end of each row, but in each section too. So I've made you a present. I made a spreadsheet with stitch counts for every section and row. You can print this out and highlight the numbers for your size just like you did on your pattern. Keeping close track of your stitch counts will help you have a more successful result. Note that I only did counts for the right side rows: all wrong side rows are straight purl, and don't change the numbers at all.
I'm going to work a few more rows so I can show you the lace pattern next time. In the meantime, don't hesitate to leave comments with any questions you have, or if you don't want to do that, you can email me directly (see the Contact tab in the header). You're also welcome to join our Flickr group and start a discussion over there. I started an Introductions page yesterday, so chime in!
Gail, you're right on the spot with "to keep track of how many stitches you have all the time" is good advice for inexperienced knitters or when working "complex" patterning.
ReplyDeleteSure saves time ripping back when it's only between markers.
I'm kind of a compulsive "counter" I think! But it's saved me a bunch of times!
DeleteMan, I wish I'd had this to read when I was making my first 3 sweaters. Excellent tutorial.
ReplyDeleteThank you for that compliment!
DeleteWonderful tutorial Gail! I do like the yarn you are using, did you get it from your LYS?
ReplyDeleteThank you, Tracey! I did get it from a yarn shop here in Chicago, but I wouldn't call it local! It took me about 35 minutes to get there on the highway - about 9 miles from my house. There's a very nice yarn shop only a mile from me, but they don't carry this yarn.
DeleteI hope you know what a knitting goddess you are!!! While I think we may have been separated at birth, your organization and forward-thinking abilities outshine mine (and I'm known to be quite the organized maven!). I need to go back and re-read your posts for this KAL and start thinking about yarn. The one you've chosen looks great ... what needle size are you using to get your gauge?
ReplyDeleteI don't have any sisters, so I'd be happy if you'd adopt me as yours!
DeleteI used a size 6 (4mm) to get this gauge. Interestingly, I got the same stitch gauge with a size 7 (4.5mm) but a smaller row gauge (i.e. it took fewer rows to make an inch). I liked the fabric better with the smaller needle, and I know that I tend to knit more loosely as I go along, so I went with the 6.
I was surprised to get gauge with the size 6, because I'm a very loose knitter. The ball band states a gauge of 5 stitches to the inch with a size 6, and I was right on!
I love your yarn. That yellow will look so pretty!
ReplyDeleteThank you for your tips on highlighting and how to deal with the pattern. When I see lots of numbers my instinct is to freak out, but once you break it down it's not so bad.
I bet your spreadsheet will be so helpful to people! I suppose I won't be able use a lot of it though since you think I'll have to alter a chunk out of my pattern?
Oh, and I just noticed it's on circular needles, eep, a bit scary since I've never used them before! I guess I better buy some soon....
Thanks! Yellow is my favorite color!
DeleteYou're right - I hadn't thought about that! I'll come up with numbers for you too :-)
Don't be afraid of the circular needles - you may love them! They allow the weight of the work (which in this case will be more than what you're used to, being an entire sweater) to fall into your lap, rather than being supported by your elbows.
You're so smart and organized-- I hope that beginning knitters take your advice! I've certainly screwed up before by losing track of which size I was knitting and following instructions for the wrong size-- ack!!
ReplyDeleteI always mark up my patterns, because I'm usually watching Netflix while I knit, so it's really easy to lose track of what I'm doing!
DeleteI did it. I got to this point. Co and done with row 2. I'm a little confused though. When I look at your picture your cast on tail is on the opposite side of your work than mine. At this point my cast on tail is where my working yarn is. Did I do something wrong or did I use the wrong cast on method? I always do long tail cast on. I don't want to keep going if I'm doing something wrong.
ReplyDeleteOops! Sorry, Heidi! I also do long tail cast on. My picture shows the end of row 3 - I always do the purling back on autopilot! So you're right on track! Yay! Remember to keep track of your stitch counts each row, so you don't get off track - there's so much packed into each row of instructions, it's easy to get off track!
DeleteNo problem. I'm glad. Your chart helped so much. I counted all my stitches in between each marker and voila! I'm good to go! There is a lot per row. Hopefully I relax a little bit as I go...it was intense ;)
DeleteThanks so much!
Really glad to hear it, Heidi! Maybe you can post a picture or two to the flickr group so we can see what your yarn looks like?
DeleteOk. I will give that a try. I'm new to that too ;).
DeleteI think I love you.
ReplyDelete(I just saw your spreadsheet!!!! THANK YOU!)
Hahaha! I'm glad it helped you!
DeleteGail, I am only starting the knit along know and I am a real beginner...I may be able to knit and purl but the rest is all new to me. This is really helpful. I had some online tuition on this last night too. I really hope I will make it to the end of this project
ReplyDeleteI'm rooting for you, Silvia! Just let me know if you need any help :-)
DeleteOMG the spreadsheet is GENIOUS!!!!!!!!!!!!!
ReplyDeleteThank you! I lost my 3rd stitch marker after row 8 and was going to wing it to figure out where it goes. This is so helpful!!!
*genius :)
DeleteHehehe - didn't even notice til you corrected yourself!
DeleteI am a firm believer in spreadsheets - they make everything better! Glad this one was helpful for you!
Help! I'm new to knitting (but can crochet) and chose this pattern as recommended for beginners. I've now knit and unravelled row 2 3 times! I have worked the first line of row 2 and get to k4 on the second line but by this point I only have 3 stitches left and I'm only halfway through the instructions! I've done this 3 times now and just can't work out where I'm going wrong. I'm following instructions for a small and am starting with the correct number of 47 stitches. I have 49 stitches on my right needle and 3 on my left when I reach this point - any ideas where I could be going wrong? Thanks, Nicola
ReplyDeleteNicola, in the first three right side rows (rows 2, 4 and 6) you will be increasing the stitch count by 10 stitches each row. The increases are in the form of YOs that are not followed by K2togs like they normally would be.
DeleteI think the best way to keep track of where you're going wrong is to place markers separating out the sections of the sweater: 2 fronts, 2 sleeves and a back. Then use the Stitch Count Spreadsheet (there's a link on the page for Miette Knitalong Posts) to keep track of each section, as well as your final stitch count for each row.
Thanks for your quick reply Gail but I've fallen at the first hurdle! I've started again and am using the spreadsheet but I make the first part of Row 2 - K2, YO, KFBL as 6 stitches (a YO increase and a KFBL increase). This must be where I am going wrong as it should be 5 stitches. Any suggestions? Thanks so much for your help.
DeleteIt sounds like you're probably wrapping your working yarn over your needle somehow to create an extra stitch, as this should work out to 5 stitches in this section.
Delete