I spent some time today working on my project for Karen's Pajama Party! You may remember that my pajama-sewing time got usurped last weekend by the Hazel Dress :-)
I had originally planned to make pajama bottoms a la Noodlehead using this pretty paisley Anna Maria Horner voile, and use the Mission Maxi pattern to make an accompanying tank top. But when I got out my old pajama pattern (circa 1999) and took a look at the finished measurements, I started having second thoughts. I can still fit into that pattern, but I've become accustomed to wearing PJs made of knit, so I'm not really sure how comfortable those pants would be - I have expanded a little over the last 14 years! Meanwhile, my ability to get a good night's sleep has flown the coop - thank you, Menopause! I toss and turn a lot, and it's more comfortable to do that in a knit!
So I decided to try to replicate my very favorite pajamas:
My mother-in-law, who lives in Turkey, has a friend who owns a pajama factory (!). Many years ago - probably 10 - she took me to their showroom so I could get some PJs at wholesale price. I think I picked up about 4 different sets that time, but these are the ones that have been worn almost constantly every summer since. They came with a pair of long pants too, and the elastic is totally shot on those!
I'm planning on using my existing pajama bottom pattern to make long pants, but I've revised the pattern to look a little more like that Noodlehead tutorial. I took 2.5 inches off the top, and then drafted a separate waistband piece which I'll make with a coordinating fabric.
Actually, I hesitated to use the word "drafted." It's just a rectangle! But I did have to do a tiny bit of math and measuring.
Then I pinned out my PJ top and traced off pieces for the front, back and sleeves:
The raglan on my old PJs is interesting: the sleeve does not extend all the way down the raglan opening. Instead, the bottom of the armhole is finished off with binding. The effect is that the raglan ends at the edge of my shoulder, rather than making a cap sleeve. I'm planning on making mine the same way.
I'm going to use some modal blend jersey that I bought from Fabric.com last year when I first started sewing with knits and didn't know what was what. It is way too slinky for clothing, but I'm hoping it will be just right for PJs. The main fabric is a medium lavender, and for contrast I'm going to use the leftovers from my first Cation Designs dolman tee. I think the pale yellow and white burnout will coordinate nicely with the lavender.
And here's my pattern, referenced above:
I made the long-sleeved/long pants pajamas twice back in the day, both in flannel. Hubby hated them because they were so un-sexy. Hee hee hee. But they were warm and comfy, and I wore them until the fabric got so thin it started to tear. Depending on how my knit pants turn out, I may still consider using this pattern to make the voile PJs. I do quite like the robe. Here's a picture of the backs of the garments from the envelope:
I'm breaking this project down and stretching it out like I did with the Hazel dress. Today I just got my patterns ready. Tomorrow I'll cut out my fabric - and maybe start sewing, depending on what else I've got going on. I've got all week to get these done. And do consider whether or not I'll be posting pictures of myself in pajamas for the whole interwebs to see! Pretty sure the answer is no!
Who else is attending the Pajama Party? I wanted to do it last year but wasn't able to because of travel, so I was really glad Karen decided to do it again this year.
Saturday, June 15, 2013
Thursday, June 13, 2013
Hazel Construction Notes
I put the finishing touches on my Hazel dress this morning, but before I model it, I wanted to post some notes about the construction. I did a lot of things on this dress that were new to me, so I want to keep a record of it! And maybe it will be useful information for some of you as well!
I spent five days working on this dress - for me, that's a lot. The construction is not difficult, but I had decided in advance that I would only work on it a little each day, to try to avoid the mistakes and sloppiness that come with fatigue. I've got to say, I really enjoyed taking my time on this and just savoring the work!
On Sunday, I finished tracing the pattern and then cut out the pieces. Since I'd chosen an eyelet fabric, I needed to underline it - which meant cutting out all the pieces twice.
On Monday, I began the process of attaching the underlining to the outer fabric. My outer fabric is a cotton/poly blend that I bought at Hancock Fabrics a few months ago specifically for this dress, and specifically to make myself try underlining something! This was my first time, and just like everyone says, it really isn't difficult. I used a lightweight cotton/poly shirting from my stash in very pale yellow. I probably would have been better off using something lighter since my outer fabric is on the heavy side, but it was nice to get this piece out of the stash, and I think the colors go together nicely.
I was able to get all the pieces except the skirt back and one of the fronts attached to their underlinings before my bobbin thread ran out. I decided that was a good place to stop for the day, so I picked it up again on Tuesday. Once all my pieces were underlined, I continued with the construction and put together the skirt, bodice and straps. I had cut out pockets, but in the end I decided against them since the dress was already kind of bulky.
On Wednesday, my first task was to do the gathering of the skirt. I really hate gathering, but I had decided in advance that I would try out Colette's method (outlined in the instructions) of sewing rows of stitching at 3/8", 5/8" and 7/8" - which of course means that once the piece is gathered and sewn to the bodice, the bottom 2 rows of stitching must be taken out. I was curious if this would help me get a more even gather, and I feel that it did.
As an aside - do you see my pins? I've been trying to convert myself from being a Parallel Pinner to being a Perpendicular Pinner! It's hard to change a habit like that after so many years!
Another thing I've started doing is machine basting my gathered piece to my flat piece before doing a smaller stitch. You know, like you're supposed to! I always used to skip the basting, but I've really come to believe that basting is my friend.
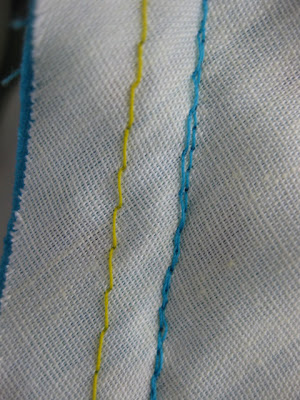
I was proud of myself that I did the gathering stitches in a contrasting color (red), which made them much easier to pick out afterwards. Here you can see the yellow I used to attach the underlining, the red gathering stitches, and the blue seam.
On Wednesday, I also attached the zipper. I used Sunni's method (from her Craftsy class) of basting in the zipper with fusible web - this method is really working well for me. I did find that the 22" zipper called for on the pattern envelope was way too long for the opening given on the actual pattern - next time I'll probably buy an 18" zipper. No problem though, I just sewed my own stop and cut off the rest.
As usual, I finished all the edges with my serger. I've been having a little trouble with Sergio lately, but I think it's sorted now, thank goodness! I can no longer imagine life without him!
Once I had the zipper in, I was able to try on the dress, and was surprised that the bodice was a tiny bit loose! I had been worried it would be a little tight because my fabrics were so bulky. I ended up shaving off 1/8" at the side seams, starting from the underarm and angling to nothing at the waist, since the bodice was already attached to the skirt and the zipper was in! I was a good girl and immediately noted the changes on my pattern as well, and made the same change to the facing pieces. Hard to believe that 1/8" at the side could make such a difference, but when you add it up, it's 1/2" overall - pretty significant!
I had the dickens of a time attaching the straps - I probably spent close to an hour yesterday positioning them with pins, trying the dress on, taking it off, basting the straps, trying it on again, picking out the stitches, repeating the process. Finally I decided to set it aside until today when I was fresh.
This morning, I had a brainstorm: part of the problem with trying to attach the straps was that I didn't have enough hands to hold the dress up while trying to position them! So I basted the straps onto the back, then put on the dress and pinned it right to my bra so it would stay up on its own. That left me free to pin the straps in place just where they needed to be. My right shoulder is about 1/2' lower than my left, so I really wanted to make sure I got them each the correct length.
I had also noticed when I was trying on my muslin that my bra straps lined up with the seam at the back of the bodice, so I attached them there rather than using the markings from the pattern. I think it's so great to have a strappy sundress like this that completely covers up my bra straps!
Placing those straps was probably the hardest part of making this dress! But once I had them basted on, I knew I was almost finished. I attached my facing with no trouble at all, and took Lisa's recommendation to use pick stitch to do the understitching. It really felt nice to do the final bits of work by hand - meditative! And I always have a hard time with understitching by machine, so this was easier for me.
When I had the dress on for placing the straps, I also checked the length. As written, this dress is shorter than I'd usually choose - and that's with the added length of a size 8 skirt attached to my size 2 bodice. Next time I will add a couple inches on so I can do a proper hem. Since I hadn't thought of it this time though, I sewed some cream cotton voile binding left over from my first quilt to the bottom edge, then folded that back and hand catch-stitched the hem to the underlining. This ended up being a good solution for this fabric: a double-folded hem would just have been too bulky with this embroidered fabric.
And here it is, inside and out:
It looks quite nice on, although I can't really say it's my most favorite thing I've ever made (my floral coat takes that prize!) I chose the eyelet in part because I wanted to be in on the trend, but I don't really think it's the best choice for showing off the style lines of this design. And while there are imperfections here and there, both in fit and in construction, I'm pretty proud of the work I did and the time and care I put into this dress. And I feel really good for having tried a couple of things that were intimidating me: the SBA and underlining. So now I feel like I can move forward and continue honing these new skills on Hazel Dress #2, for which I've already purchased fabric.
With any luck, I'll have time and light enough in the next couple days to take some pictures. I've already been thinking of outfits and shoes to go with this dress!
I spent five days working on this dress - for me, that's a lot. The construction is not difficult, but I had decided in advance that I would only work on it a little each day, to try to avoid the mistakes and sloppiness that come with fatigue. I've got to say, I really enjoyed taking my time on this and just savoring the work!
On Sunday, I finished tracing the pattern and then cut out the pieces. Since I'd chosen an eyelet fabric, I needed to underline it - which meant cutting out all the pieces twice.
On Monday, I began the process of attaching the underlining to the outer fabric. My outer fabric is a cotton/poly blend that I bought at Hancock Fabrics a few months ago specifically for this dress, and specifically to make myself try underlining something! This was my first time, and just like everyone says, it really isn't difficult. I used a lightweight cotton/poly shirting from my stash in very pale yellow. I probably would have been better off using something lighter since my outer fabric is on the heavy side, but it was nice to get this piece out of the stash, and I think the colors go together nicely.
I was able to get all the pieces except the skirt back and one of the fronts attached to their underlinings before my bobbin thread ran out. I decided that was a good place to stop for the day, so I picked it up again on Tuesday. Once all my pieces were underlined, I continued with the construction and put together the skirt, bodice and straps. I had cut out pockets, but in the end I decided against them since the dress was already kind of bulky.
On Wednesday, my first task was to do the gathering of the skirt. I really hate gathering, but I had decided in advance that I would try out Colette's method (outlined in the instructions) of sewing rows of stitching at 3/8", 5/8" and 7/8" - which of course means that once the piece is gathered and sewn to the bodice, the bottom 2 rows of stitching must be taken out. I was curious if this would help me get a more even gather, and I feel that it did.
As an aside - do you see my pins? I've been trying to convert myself from being a Parallel Pinner to being a Perpendicular Pinner! It's hard to change a habit like that after so many years!
Another thing I've started doing is machine basting my gathered piece to my flat piece before doing a smaller stitch. You know, like you're supposed to! I always used to skip the basting, but I've really come to believe that basting is my friend.
I was proud of myself that I did the gathering stitches in a contrasting color (red), which made them much easier to pick out afterwards. Here you can see the yellow I used to attach the underlining, the red gathering stitches, and the blue seam.
| Two lines of blue stitching: one basting, and one shorter stitch. |
On Wednesday, I also attached the zipper. I used Sunni's method (from her Craftsy class) of basting in the zipper with fusible web - this method is really working well for me. I did find that the 22" zipper called for on the pattern envelope was way too long for the opening given on the actual pattern - next time I'll probably buy an 18" zipper. No problem though, I just sewed my own stop and cut off the rest.
As usual, I finished all the edges with my serger. I've been having a little trouble with Sergio lately, but I think it's sorted now, thank goodness! I can no longer imagine life without him!
Once I had the zipper in, I was able to try on the dress, and was surprised that the bodice was a tiny bit loose! I had been worried it would be a little tight because my fabrics were so bulky. I ended up shaving off 1/8" at the side seams, starting from the underarm and angling to nothing at the waist, since the bodice was already attached to the skirt and the zipper was in! I was a good girl and immediately noted the changes on my pattern as well, and made the same change to the facing pieces. Hard to believe that 1/8" at the side could make such a difference, but when you add it up, it's 1/2" overall - pretty significant!
I had the dickens of a time attaching the straps - I probably spent close to an hour yesterday positioning them with pins, trying the dress on, taking it off, basting the straps, trying it on again, picking out the stitches, repeating the process. Finally I decided to set it aside until today when I was fresh.
This morning, I had a brainstorm: part of the problem with trying to attach the straps was that I didn't have enough hands to hold the dress up while trying to position them! So I basted the straps onto the back, then put on the dress and pinned it right to my bra so it would stay up on its own. That left me free to pin the straps in place just where they needed to be. My right shoulder is about 1/2' lower than my left, so I really wanted to make sure I got them each the correct length.
I had also noticed when I was trying on my muslin that my bra straps lined up with the seam at the back of the bodice, so I attached them there rather than using the markings from the pattern. I think it's so great to have a strappy sundress like this that completely covers up my bra straps!
Placing those straps was probably the hardest part of making this dress! But once I had them basted on, I knew I was almost finished. I attached my facing with no trouble at all, and took Lisa's recommendation to use pick stitch to do the understitching. It really felt nice to do the final bits of work by hand - meditative! And I always have a hard time with understitching by machine, so this was easier for me.
When I had the dress on for placing the straps, I also checked the length. As written, this dress is shorter than I'd usually choose - and that's with the added length of a size 8 skirt attached to my size 2 bodice. Next time I will add a couple inches on so I can do a proper hem. Since I hadn't thought of it this time though, I sewed some cream cotton voile binding left over from my first quilt to the bottom edge, then folded that back and hand catch-stitched the hem to the underlining. This ended up being a good solution for this fabric: a double-folded hem would just have been too bulky with this embroidered fabric.
And here it is, inside and out:
It looks quite nice on, although I can't really say it's my most favorite thing I've ever made (my floral coat takes that prize!) I chose the eyelet in part because I wanted to be in on the trend, but I don't really think it's the best choice for showing off the style lines of this design. And while there are imperfections here and there, both in fit and in construction, I'm pretty proud of the work I did and the time and care I put into this dress. And I feel really good for having tried a couple of things that were intimidating me: the SBA and underlining. So now I feel like I can move forward and continue honing these new skills on Hazel Dress #2, for which I've already purchased fabric.
With any luck, I'll have time and light enough in the next couple days to take some pictures. I've already been thinking of outfits and shoes to go with this dress!
Tuesday, June 11, 2013
Something new . . . something blue
I made a new pattern! Will wonders never cease?! Of course, there's a backstory. You know me: I have to over-explain. It's a compulsion, I tell you!
So for a long while I'd been thinking that I'd like to make a tee shirt dress based on a mash-up of the Renfrew top and the Hollyburn skirt. Of course, I never got around to it . . . and then I discovered that Dixie DIY had already made a pattern for just the dress I wanted!
As I read through the finished projects though, I realized that I'd have to do a fair bit of redrafting to get the look I wanted. Many people noted that the waistline was quite high, the skirt quite short, and the sleeves quite wide. Knowing I'd have to actually do some work made me procrastinate about buying the pattern. But then Dixie posted last week that she had revised the pattern to correct all those issues! Bingo! Into the cart it went!
And Dixie's Ballet Dress is a really great pattern. I took the time to do flat pattern measurements and they are spot on with the measurements listed in the instructions. The entire download is only 20 pages, two of which are instructions - so, less than a lot of PDF patterns. I found it quick and easy to put together. The only thing I felt was missing was yardage information on the sale page - I had a specific stash fabric I wanted to use, and would have appreciated knowing in advance whether it was enough. I read somewhere that if you purchase the pattern through Etsy, you get an instant download, whereas if you use one of the other options, you'll have the pattern emailed to you. Of course, I bought mine through Etsy - who wants to wait? And it was $4 well spent!
Dixie's instructions have you make up the bodice and then sew up the sleeve seams and set in the sleeves, but I decided to attach the sleeves flat like I'm used to doing with the Renfrew, and it worked just fine. One thing that surprised me was that the piece for the neck binding seemed quite short compared to what I've been used to, and I did have to really stretch it while attaching it to the neck opening. But it gave me a nice neckline that lays very flat - I didn't even topstitch it!
Another thing that was new for me was adding in clear elastic at the waist seam - unstretched, just to give some stability there. It felt awkward to me doing this on my serger, but I can see how the elastic will really help support the weight of the skirt.
So, the finished dress? Here it is from the front and back (and yes, I think I'm just about ready to admit that I need a small swayback adjustment):
Obviously, I shortened the sleeves. I had intended to do the 3/4 length sleeves as written, but as I was ironing my fabric, I found yet another little hole in a very inconvenient spot. Because of it, I really had to get tricky with my fabric layout - all the large pieces of this dress are on the fold, and my hole was about 2" in from the fold. So that only left me enough spare fabric for short sleeves, which in the end is a good thing I think. I'll certainly be wearing this over the summer. I cut my sleeves off 2" below the armhole, and then turned 1" back for the hem.
After I finished the dress, my first reaction was "meh." But that reaction has nothing to do with Dixie's pattern, which is fantastic! Rather, it stems from not being crazy about this cotton/lycra jersey and also from my inability to decide just what kind of fit I want. When I was choosing which size to do, I decided that I didn't want anything too tight or constricting, so I started with a S at the bust and graded out to a M at the waist (and used the M skirt). But then when I put on my finished dress, I felt like it was too loose, despite being exactly the size I thought I'd wanted only hours before. I'm a fickle creature, I tell you.
So I started playing around with different stylings of the dress, and the more I played with it, the more I liked it. First, I added a narrow silk scarf at the waist with matching (!) ballet flats from J. Crew:
Cute! Then I decided to go all nautical - times two! Here's the first nautical outfit - a red French terry hoodie from Anthropologie and metallic glazed linen espadrilles from J. Crew. I've turned around too so you can see the cute bow on the back of the hoodie:
And here's another red nautical-inspired sweater from Anthropologie, along with a red, white and blue ribbon hat from San Diego Hat Company (which I bought the first time I visited SF in 2003!) and those same navy Corsage Sandals from Boden that seem to go with everything:
I could have gone on and on - I didn't even get to making outfits with kelly green! But I took these photos on Friday afternoon, and started to run late for getting to the concert!
So I will definitely be making this again. I've already got some navy blue with white polka dots lined up for version 2. And this time I think I'll go a tiny bit smaller. One thing I forgot to mention is that the pattern includes 1/4" seam allowances, but I added on another 1/4" so I'd have plenty to cut away on the serger - I find it easier to stay even that way. So I'm considering using these same pattern pieces rather than retracing, and just taking a bigger seam allowance.
Have any of you guys made this pattern? Have you purchased it? Dixie says that if you bought the earlier version, you can email her to get a copy of the update.
Sunday, June 9, 2013
Maxed out yet?
I hope not! Because the next FO I have to show you is also a maxi, but a skirt this time!
A few months ago, I took a little excursion to a Hancock's Fabric store not too far away. One of the things that came home with me was a length of coral-colored cotton lawn. I thought I'd like to make a camp shirt out of it. But in SF, I saw so manyladies girls wearing floaty maxi skirts that I decided I needed one too, and coral would be just the thing. I vowed it would be the first thing I made when I got home, and it was!
But I spent an entire week puzzling it out before actually starting. I'd first thought that I'd use the Pattern Runway Very Gathered Skirt pattern and just lengthen it. But after thinking about it for a while, I decided that having only half the waistband in elastic wouldn't give me the close fit I wanted around my waist, so I decided to go with the same pattern I used for my green skirt, Simplicity 8550. Conveniently, a maxi skirt length was included, so I didn't even have to go to the trouble of lengthening the pattern.
But I did have to figure out how full I wanted the skirt to be. I had an idea that I wanted it to be fairly full, but not ball gown-ish. The pattern included the finished hem width, so I spent some time looking at RTW skirts and maxi skirt patterns online, trying to find hem widths similar to what I had in mind to see if they matched my pattern's measurement. And do you know, that information is nowhere to be found!
So in the end, I did a scientific experiment. My pattern gave a finished hem width of 62" in my size. I wanted to be able to walk with fairly long strides, but without having a lot of excess fabric in my way. So I took my 60" measuring tape and taped the two ends together to create a circle, then put my feet in to see what size step I could take:
That was a pretty normal stride for me, so I decided to add 4" overall to my pattern to get a finished measurement of 66" - one inch at each center back and one inch offset from the fold at the center front.
Once I had that figured out, I had to think about lining. I discovered I had just enough lining left over from my latest Cambie dress to do a short lining, and the color was appropriate too. I peeked into my Easy Guide to Sewing Linings and saw that the author suggested cutting the lining on the cross-grain and using the selvedge as the edge to avoid hemming the lining. Lady, I like the way you think!
You can see in the photo above how similar the two colors are. You can also see that I used French seams to keep everything neat inside. For the zipper, I used Jen's "Zipper with Free Hanging Overlay" tutorial, which worked really well for me, although for some reason I only had enough seam allowance to turn my narrow hem back once rather than twice. Also, having recently watched Sunni's (free!) zipper class on Craftsy, I tried out using fusible web to baste my zipper in, and that made installing the zipper in this slippery lining much easier. The only problem I had there was that my fabric store only had 3/8" web in stock; I should have cut it in half before using it, but I didn't know that yet. So I have a little bit of web overhang on the outside of my lining. Luckily, the fullness of the outer skirt covers it up - you really have to be looking for it to see it.
Because my fabric is so light and floaty, I used a very lightweight interfacing on the waistband - I didn't want anything too stiff. But I think it's a little too light; I really wish I'd used something a little heavier. I also added a little width to my waistband, since I've discovered that my waist is no longer 27" as I'd thought. But I really wish I'd stuck with the 27" of the pattern - it's just a teeny bit loose. Ah well, at least I can eat a nice big meal while wearing this skirt! I've also discovered that I prefer it with tops tucked in, so that takes up some of the room.
Because I knew I wanted a nice, deep hem, I didn't adjust the length on the pattern. This hem is about 3" deep; I like the way it "anchors" the floatiness of the skirt.
And how does it look? Pretty nice, I think! I did two "looks" - first is a slightly fancy look with a very old silk crepe top from Loft and some high heels (which you can't see):
And here it is from the back - you can see that Jen's zipper trick works like a charm:
And here's my more casual look, with a very old corset top from Anthopologie and flat sandals:
Coral is such a great color - I love it with black and navy, as I did here. But I'm thinking I can also do it with (metallic) gold. And I really need to get a denim or chambray shirt, which would look great with this!
Finally, all the while I was thinking about this make and working with the pattern, I kept feeling like it reminded me of something, and I finally figured out what it was:
Check it out! The photo on the left is from the inside front cover of the original Laurel's Kitchen. The outfit on the lady who is standing (who I believe is Laurel herself) is almost identical! This book was first published in 1976, so this photo was likely taken in the early '70s. I think that's really cool! Also, Laurel's Kitchen was the first cookbook I bought when I became a vegetarian in 1982, so I feel sort of sentimental about it!
OK, so who else has made a maxi skirt? I feel like it's a safe bet, because once the trend is over, I can reuse this fabric to make a shirt if I want!
A few months ago, I took a little excursion to a Hancock's Fabric store not too far away. One of the things that came home with me was a length of coral-colored cotton lawn. I thought I'd like to make a camp shirt out of it. But in SF, I saw so many
But I spent an entire week puzzling it out before actually starting. I'd first thought that I'd use the Pattern Runway Very Gathered Skirt pattern and just lengthen it. But after thinking about it for a while, I decided that having only half the waistband in elastic wouldn't give me the close fit I wanted around my waist, so I decided to go with the same pattern I used for my green skirt, Simplicity 8550. Conveniently, a maxi skirt length was included, so I didn't even have to go to the trouble of lengthening the pattern.
But I did have to figure out how full I wanted the skirt to be. I had an idea that I wanted it to be fairly full, but not ball gown-ish. The pattern included the finished hem width, so I spent some time looking at RTW skirts and maxi skirt patterns online, trying to find hem widths similar to what I had in mind to see if they matched my pattern's measurement. And do you know, that information is nowhere to be found!
So in the end, I did a scientific experiment. My pattern gave a finished hem width of 62" in my size. I wanted to be able to walk with fairly long strides, but without having a lot of excess fabric in my way. So I took my 60" measuring tape and taped the two ends together to create a circle, then put my feet in to see what size step I could take:
That was a pretty normal stride for me, so I decided to add 4" overall to my pattern to get a finished measurement of 66" - one inch at each center back and one inch offset from the fold at the center front.
Once I had that figured out, I had to think about lining. I discovered I had just enough lining left over from my latest Cambie dress to do a short lining, and the color was appropriate too. I peeked into my Easy Guide to Sewing Linings and saw that the author suggested cutting the lining on the cross-grain and using the selvedge as the edge to avoid hemming the lining. Lady, I like the way you think!
You can see in the photo above how similar the two colors are. You can also see that I used French seams to keep everything neat inside. For the zipper, I used Jen's "Zipper with Free Hanging Overlay" tutorial, which worked really well for me, although for some reason I only had enough seam allowance to turn my narrow hem back once rather than twice. Also, having recently watched Sunni's (free!) zipper class on Craftsy, I tried out using fusible web to baste my zipper in, and that made installing the zipper in this slippery lining much easier. The only problem I had there was that my fabric store only had 3/8" web in stock; I should have cut it in half before using it, but I didn't know that yet. So I have a little bit of web overhang on the outside of my lining. Luckily, the fullness of the outer skirt covers it up - you really have to be looking for it to see it.
Because my fabric is so light and floaty, I used a very lightweight interfacing on the waistband - I didn't want anything too stiff. But I think it's a little too light; I really wish I'd used something a little heavier. I also added a little width to my waistband, since I've discovered that my waist is no longer 27" as I'd thought. But I really wish I'd stuck with the 27" of the pattern - it's just a teeny bit loose. Ah well, at least I can eat a nice big meal while wearing this skirt! I've also discovered that I prefer it with tops tucked in, so that takes up some of the room.
Because I knew I wanted a nice, deep hem, I didn't adjust the length on the pattern. This hem is about 3" deep; I like the way it "anchors" the floatiness of the skirt.
And how does it look? Pretty nice, I think! I did two "looks" - first is a slightly fancy look with a very old silk crepe top from Loft and some high heels (which you can't see):
And here it is from the back - you can see that Jen's zipper trick works like a charm:
And here's my more casual look, with a very old corset top from Anthopologie and flat sandals:
Coral is such a great color - I love it with black and navy, as I did here. But I'm thinking I can also do it with (metallic) gold. And I really need to get a denim or chambray shirt, which would look great with this!
Finally, all the while I was thinking about this make and working with the pattern, I kept feeling like it reminded me of something, and I finally figured out what it was:
Check it out! The photo on the left is from the inside front cover of the original Laurel's Kitchen. The outfit on the lady who is standing (who I believe is Laurel herself) is almost identical! This book was first published in 1976, so this photo was likely taken in the early '70s. I think that's really cool! Also, Laurel's Kitchen was the first cookbook I bought when I became a vegetarian in 1982, so I feel sort of sentimental about it!
OK, so who else has made a maxi skirt? I feel like it's a safe bet, because once the trend is over, I can reuse this fabric to make a shirt if I want!
Saturday, June 8, 2013
Another Maxi
Here is the item I made just before going to SF - yet another Mission Maxi.
This one is made from a fake batik-print jersey I bought from Girl Charlee at the end of last summer. My original intention was to make a Kimono Dress with it, but something kept holding me back - it just never felt quite right. Finally I decided that I'd like it better as the maxi.
I've made this so many times, there's not much to say about it - except that I've decided from here on out, I'm going to do the bindings the way they're done on the Renfrew neckline. As drafted, these bindings are narrow, so you're instructed to sew them to the opening, then turn to the inside and topstitch down. I can never seem to get my topstitching to be stretchy enough though, and the armholes end up being constricting. This time I used the "lightning bolt" stitch in hopes that it would help, but it's just as constricting as all my other ones. So from now on, I'll make a wider binding piece, then fold it in half lengthwise before applying both layers to the neck and arm openings. I think it will be much more comfortable to wear, and it will also give me a little extra width to hide those bra straps.
I'm still using the pattern I traced out a year ago - my adjustment is a size 4 at the bust and down to the waist, grading out to size 8 at the hips, to give me a body-skimming silhouette.
I wore this out to dinner and then a jazz concert last night. When I met Hubby at the restaurant, the first thing he said was, "You look pretty." Awwww! He hadn't seen the dress yet, so I was glad to get a thumbs up.
It was chilly, so I added on this old, old blazer from Old Navy:
And then a very soft scarf my sister-in-law bought me in Turkey a few years ago:
And my new clogs!
Which I admit are hard to see because they're almost the same color as my skin!
Because I was wearing a longer blazer, and because we were going out for sushi, I made the bold decision not to wear any shapewear, but I am wearing a half slip. Made it much more comfortable to sit through the concert - those seats at the symphony hall are the worst!
I've got two more new things to show you in the next couple days - and one of them is a pattern I've never made before! Imagine that!
Friday, June 7, 2013
Over the Moon! (plus lots of name-dropping)
I made a muslin, y'all! A real, proper muslin of a bodice! And not only that: the muslin was made from a pattern I altered with a SBA (Small Bust Adjustment)! Wooot! Can you tell I'm proud of myself?! Baby's first SBA!
Let me back up a little. A few months ago I came across a lovely new blog via the Colette Patterns group on Flickr, Blanca Pate, written by the equally lovely Amanda. Let me just interject that not only do I love Amanda's style, I also love her attitude toward sewing - she seems to take her time and focus on creating a beautiful finished garment that is "just so" - inside and out. I should take a leaf from her book . . .
Anyway, Amanda had made a Hazel sundress, and it caught my eye. It was a pattern that I had loved from afar since its release, but had always assumed wouldn't work for me because of, you know, "the girls" (or rather, lack thereof). I clicked through to Amanda's post about her dress anyway, and: "Wait a minute! What?! She did a SBA?!?!?! You can do that with this pattern?!?" Seriously, it had never occurred to me! The following week found me at the Needle Shop, buying the pattern. And since I was there, I picked up Lily too.
And then . . . nothing. I wasn't really sure how to proceed. I consulted my books regarding the SBA; I googled and googled looking for information. But nowhere could I find instructions for doing bust adjustments on Dior darts (a.k.a side bust darts). Plain old darts, sure. Princess seams: easy. But put the two together and I was baffled! Amanda had very kindly directed me to this post by Symondezyn on doing a FBA for this pattern, but even after reading through it a few times, I still couldn't quite wrap my head around it.
I put the project on the back burner for a while, and then shortly before we left for SF, I decided to trace out the pattern and just give it a try. I'd read all the reviews I could find; some said the bodice fit was loose, others felt it was on the small side. Because I span several sizes in Colette, I decided to start at size 4, although my chest measurement puts me in a size 0 and my waist comes in at a size 6. Also, my limited experience with Colette patterns has lead me to believe that they're drafted for women whose "apex" is front and center. My "apices" kind of veer off to the side, so I wanted to give them some room.
Anyhow, I got as far as doing the SBA on the tracing and cutting out my fabric, and then it sat some more. But the other day, prompted by Miss Lulu's commitment to dealing with her UFO pile, I decided to get back to it. I sewed up my adjusted size 4 bodice muslin and was surprised that the fit wasn't really too bad. It was just a tad large overall, so I decided to make a second muslin one size down. Yep, you read that right: TWO muslins! I'm killin'!
This afternoon, after finishing all my chores, I sat down with it again. I retraced the pattern in a size 2, then made my markings and shifted the front piece for the SBA:
The overlap is about 3/16" - so I guess that's a SBA of 3/8" because you're taking that off twice? I still don't quite get that part!
Shifting the pieces takes the seam lines out of true (see upper left corner):
It was easier for me to retrace the whole thing with the seamlines trued before proceeding. Once I'd done that, I walked this and the adjoining piece together to figure out how much length I needed to remove:
Then I re-traced the whole thing one more time so I'd have a nice, neat pattern piece to work from.
I ended up not shaving any of the curve off the side bodice, because it wasn't that pronounced to begin with. It just looked right to me.
You can see that on all my pieces, I drew in the seam lines, which made it a lot easier to walk the seams and be accurate.
Once my pattern was adjusted I cut it out and sewed it up, then gave it a nice press. I really wasn't expecting it to fit well, mostly because I didn't make any adjustments for my larger waist. I figured I'd tackle one adjustment at a time, and the waist is much easier to deal with - I can do that at the side seams.
So imagine my surprise and elation when it fit PERFECTLY! Well, at least across the front, which is the problematic part. I'll have to get Hubby to pin the back closed for me over the weekend so I can get a true assessment of the fit. But hey - even if it's a little off, the major hurtle has been jumped.
And I was quite surprised to see when I held it together in the back that even the waist is a good fit. I'm a little long-waisted, so this hits about an inch and half above my waist - an area that I believe measures larger than my natural waist - so, go figure. I did try to take flat pattern measurements of the bodice at the bust (to no avail) but forgot to do it at the waist, so I was kind of flying blind. But it all worked out.
So what have I learned? Well, SBAs aren't really as difficult and tricky as I'd been imagining, and the small investment of time gives a big pay-off. Also, a muslin is a very useful thing. I may be changing my ways . . . at least for more fitted garments like this.
So now I have a small dilemma. I had planned to work on my PJs over the weekend for Karen's Pyjama Party - are you guys in? But now I'm feeling that I'd like to work up a first go of this dress! Meanwhile, I have three finished garments I need to photograph so I can show you guys: one I finished before the trip and two I've made since coming back. I'm planning on wearing the first one to a jazz concert tonight, so I may get a pic of it today. We're finally having some decent weather around here!
Let me back up a little. A few months ago I came across a lovely new blog via the Colette Patterns group on Flickr, Blanca Pate, written by the equally lovely Amanda. Let me just interject that not only do I love Amanda's style, I also love her attitude toward sewing - she seems to take her time and focus on creating a beautiful finished garment that is "just so" - inside and out. I should take a leaf from her book . . .
Anyway, Amanda had made a Hazel sundress, and it caught my eye. It was a pattern that I had loved from afar since its release, but had always assumed wouldn't work for me because of, you know, "the girls" (or rather, lack thereof). I clicked through to Amanda's post about her dress anyway, and: "Wait a minute! What?! She did a SBA?!?!?! You can do that with this pattern?!?" Seriously, it had never occurred to me! The following week found me at the Needle Shop, buying the pattern. And since I was there, I picked up Lily too.
And then . . . nothing. I wasn't really sure how to proceed. I consulted my books regarding the SBA; I googled and googled looking for information. But nowhere could I find instructions for doing bust adjustments on Dior darts (a.k.a side bust darts). Plain old darts, sure. Princess seams: easy. But put the two together and I was baffled! Amanda had very kindly directed me to this post by Symondezyn on doing a FBA for this pattern, but even after reading through it a few times, I still couldn't quite wrap my head around it.
I put the project on the back burner for a while, and then shortly before we left for SF, I decided to trace out the pattern and just give it a try. I'd read all the reviews I could find; some said the bodice fit was loose, others felt it was on the small side. Because I span several sizes in Colette, I decided to start at size 4, although my chest measurement puts me in a size 0 and my waist comes in at a size 6. Also, my limited experience with Colette patterns has lead me to believe that they're drafted for women whose "apex" is front and center. My "apices" kind of veer off to the side, so I wanted to give them some room.
Anyhow, I got as far as doing the SBA on the tracing and cutting out my fabric, and then it sat some more. But the other day, prompted by Miss Lulu's commitment to dealing with her UFO pile, I decided to get back to it. I sewed up my adjusted size 4 bodice muslin and was surprised that the fit wasn't really too bad. It was just a tad large overall, so I decided to make a second muslin one size down. Yep, you read that right: TWO muslins! I'm killin'!
This afternoon, after finishing all my chores, I sat down with it again. I retraced the pattern in a size 2, then made my markings and shifted the front piece for the SBA:
The overlap is about 3/16" - so I guess that's a SBA of 3/8" because you're taking that off twice? I still don't quite get that part!
Shifting the pieces takes the seam lines out of true (see upper left corner):
It was easier for me to retrace the whole thing with the seamlines trued before proceeding. Once I'd done that, I walked this and the adjoining piece together to figure out how much length I needed to remove:
Then I re-traced the whole thing one more time so I'd have a nice, neat pattern piece to work from.
I ended up not shaving any of the curve off the side bodice, because it wasn't that pronounced to begin with. It just looked right to me.
You can see that on all my pieces, I drew in the seam lines, which made it a lot easier to walk the seams and be accurate.
So imagine my surprise and elation when it fit PERFECTLY! Well, at least across the front, which is the problematic part. I'll have to get Hubby to pin the back closed for me over the weekend so I can get a true assessment of the fit. But hey - even if it's a little off, the major hurtle has been jumped.
And I was quite surprised to see when I held it together in the back that even the waist is a good fit. I'm a little long-waisted, so this hits about an inch and half above my waist - an area that I believe measures larger than my natural waist - so, go figure. I did try to take flat pattern measurements of the bodice at the bust (to no avail) but forgot to do it at the waist, so I was kind of flying blind. But it all worked out.
So what have I learned? Well, SBAs aren't really as difficult and tricky as I'd been imagining, and the small investment of time gives a big pay-off. Also, a muslin is a very useful thing. I may be changing my ways . . . at least for more fitted garments like this.
So now I have a small dilemma. I had planned to work on my PJs over the weekend for Karen's Pyjama Party - are you guys in? But now I'm feeling that I'd like to work up a first go of this dress! Meanwhile, I have three finished garments I need to photograph so I can show you guys: one I finished before the trip and two I've made since coming back. I'm planning on wearing the first one to a jazz concert tonight, so I may get a pic of it today. We're finally having some decent weather around here!
Subscribe to:
Posts (Atom)


