
I mentioned before that I mostly didn't read or follow Grainline's instructions when making this shirt. But I did make sure to read the parts about constructing the collar, mostly because I wanted to see how clear it would be to someone who hasn't made a collar before. And the instructions are pretty good! I actually enjoy making collars and they're not really that hard, especially if you know a couple little things going in. So here are my collar-making tips.
One thing I did differently throughout the whole shirt was to edge stitch rather than doing the 1/4" topstitching. In general, I prefer the look of edge stitching to topstitching - just a personal style preference. But I think edge stitching is also a little easier IF you use your blind hem foot or edge stitching foot - there's a fence that your fabric butts up to, so you always stay the same distance away from the edge!
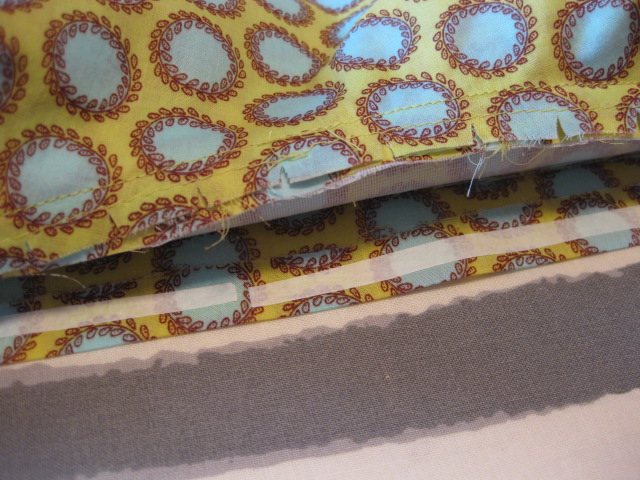
Once my collar was made and I'd attached the collar stand pieces to it, I trimmed very close to the curved edges, except at the very bottom. I've learned from experience that when I trim that bottom edge before turning my collar stand out, it's almost impossible for me to get those seam allowances to stay tucked inside. I didn't trim them off until after my collar stand was attached to the shirt body.

I agree with Lisa when she said that there's a little confusion in the instructions about which part of the collar stand (interfaced or un-interfaced) goes to the outside of the shirt. The interfaced collar stand should be on the outside. You'll want the un-interfaced collar stand to be inside because you'll be turning that under and stitching it down once the collar is attached to the body of the shirt.
To make the collar easier to attach, you should stay stitch around the entire neck edge, starting from center back to each front, at 3/8" - this bit is actually not in the instructions. Then clip into your seam allowance up to the stay stitching all the way around the neck. If you do this, you'll be able to pull your neck edge into an almost straight line and it will be so much easier to sew the collar stand to it. You won't have to do as much easing, so you'll run less of a risk of getting puckers.

The instructions have you attach the outer collar stand to the body, and then turn under the seam allowance of the inner collar stand and hand stitch it in place before topstitching around the entire collar stand. I know a lot of people are averse to hand stitching. I don't mind it, but I don't want to do it if it's redundant! So what I did was to stick some fusible web to my turned-under seam allowance, steam it in place, and then do my topstitching (edge stitching for me) from the outside. No need to worry that the unstitched collar stand inside will slip, because it's held in place with the fusible web!
Of course, 1/4" topstitching in this area won't be as neat as edge stitching. I'd say my stitching line here is about 3/32" from the edge.

On this shirt, I didn't take the steps needed to make a curved collar like I would on a man's shirt. But I still pressed it around my ham once I was done.

Are you afraid of collars? Have you sewn one before? They take a little practice, but I think they're kind of fun!
I love technical posts (and I need all the help I can get) so thank you for posting this! I haven't yet sewn a button down shirt, but it's on my short list. I have the Negroni pattern to sew a shirt for my husband. Would you recommend the Archer for someone who hasn't sewn a button down shirt or maybe another pattern?
ReplyDeleteOh good!
DeleteHmmm . . . I didn't read all the way through the instructions on the Archer, but it seemed to me that it assumes a certain level of knowledge and experience. I think it depends on what type instructions work best for you. If you prefer a lot of illustrations, the Archer doesn't have that. BUT Jen has a nice sew along on her blog, which gives visual help.
I think the instructions on Pattern Runway's Pussy Bow Blouse are really excellent and thorough, with very nice illustrations. I'm a visual learner, so I prefer these instructions. But of course, the style of the blouse is quite different. For me, it's worth having both patterns!
I looked up Pattern Runway's PBB on their Flickr pool and remembered your blouse when I saw it. I just downloaded the pattern (and maybe the Kimono dress too). I promised my husband a Strathcona T and I want to do a muslin on the Anna dress and then this will be next on my list.
DeleteMindreader! I've been thinking about making another Kimono Dress - LOVE that pattern! And today I ordered some fabric I'm planning to use for an Anna Dress! And when I showed my hubby the Thread Theory site, he really liked the Strathcona Henley too! So I've been planning to make it for him - last time I looked the pattern wasn't available yet, so I'm glad to know it is now!
DeleteI've been really happy with the 2 Pattern Runway patterns I've used. I also have the Shift Dress but haven't made it yet. And I'd like to get a couple of their newer patterns too. Need more hours in the day!
This post is so useful! Thank you! I'm in the middle of the epic taping and tracing nightmare that is the Archer. Fun times. But I have no doubts your tips will come in handy when I start sewing it this weekend :) Sara
ReplyDeleteI'm glad it was useful! It is epic, isn't it?! That's one reason I was really hoping this pattern would work out for me!
DeleteGreat tip to use the fusible web. I will try that next time instead of the hand stitching.
ReplyDeleteThank you! I was pretty proud of myself for thinking of it, LOL!
Deleteexcellent tips! i've been wanting to try out david coffin's "glue stick" method, but i can never track down a glue stick when i get to that part... the fusible is a good idea!
ReplyDeleteI totally forgot about the glue stick! I love the fusible web - I've gone through an entire 27 ft. roll in 3 months! And that's with often cutting it in half to get thinner strips!
DeleteI like how it's curved.
ReplyDeleteHehehe - thanks, Stef!
Delete