Showing posts with label fitting. Show all posts

Friday, March 25, 2016

My Slightly DIfferent Forward Shoulder Sleeve Head Adjustment

This time:  picture heavy, word light!!  I apologize in advance for the shadows in some of the pictures - it was cloudy when I took these.  But I think they're clear enough for you to get the idea.

I had a few questions about how I adjusted my sleeve head on the Inari dress for the forward shoulder adjustment I did, and I figured it warranted its own blog post.  Please keep in mind that this may not be 100% legit - I'm not a professional, and while I've done a fair amount of research on fitting, almost all of that research is geared toward solving my own fitting problems.  I've tried a few different things to adjust the sleeve heads after a forward shoulder adjustment, and this one is the one that usually works well for me on my body.

I also want to give credit where credit is due.  I first learned of this type of adjustment from Heather B's blog - you can find her tutorial here.  This one is pretty much the same, except at the end.

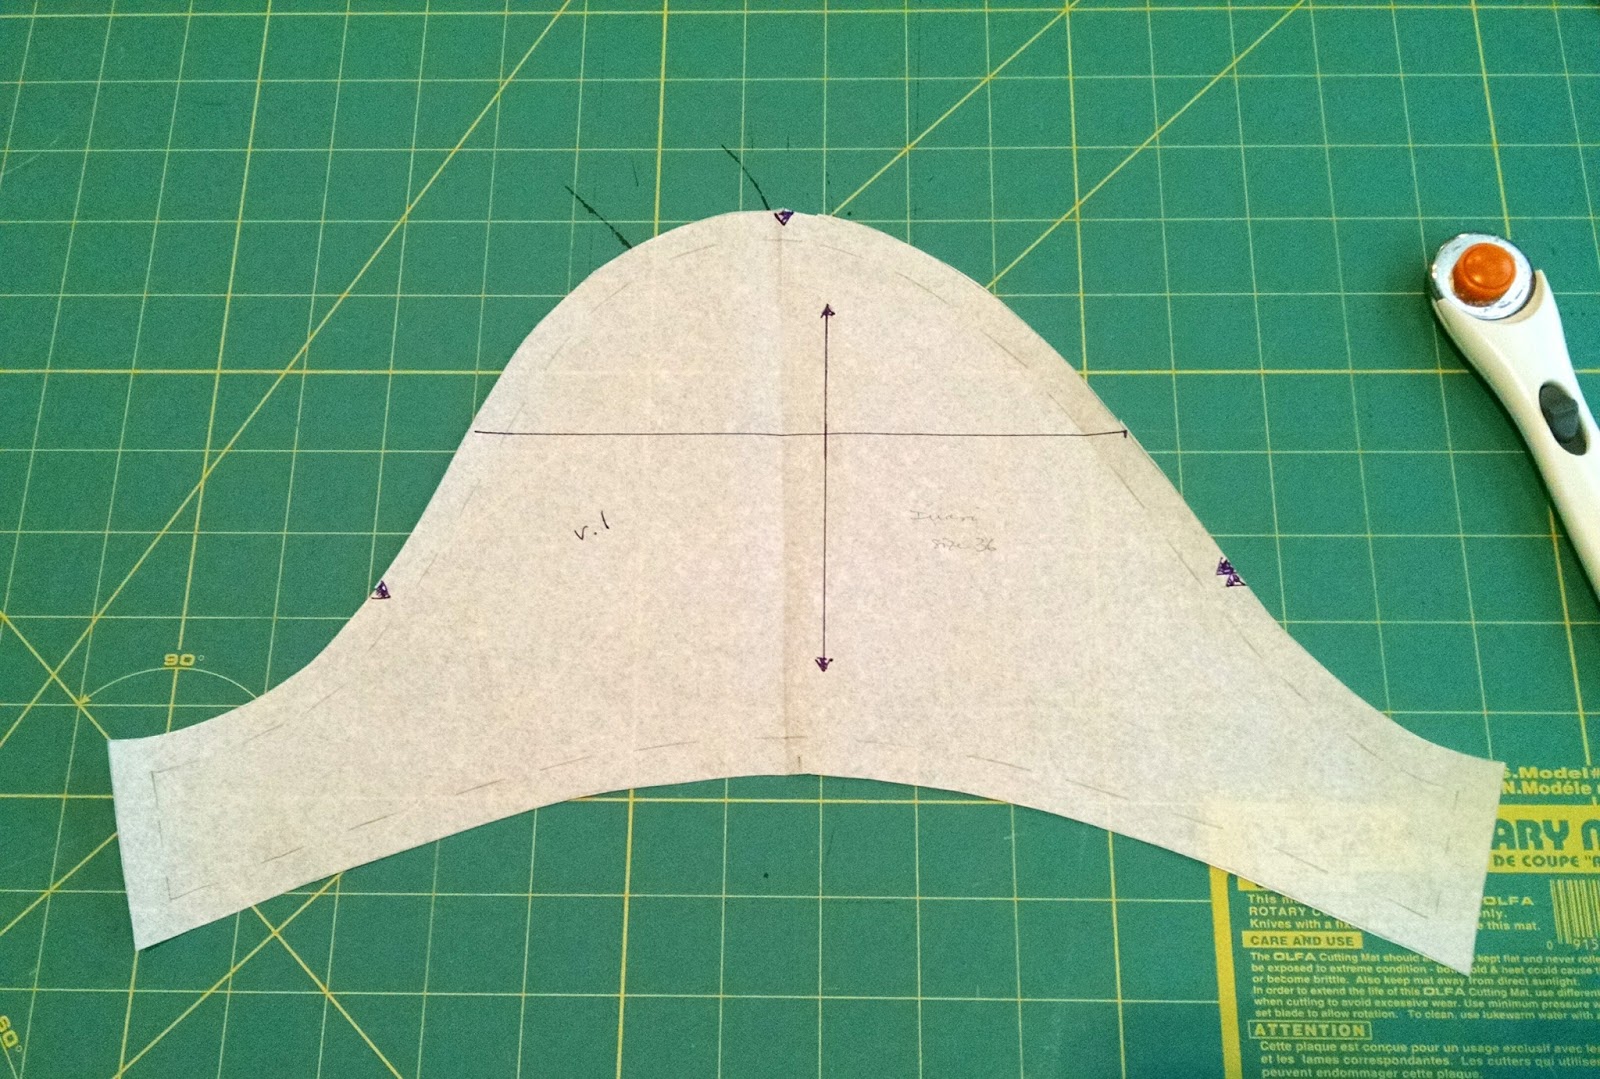
So, let's get started with the sleeve as it is, unaltered and with the seam allowances marked:


The first thing I've done is to draw a line perpendicular to the grain line, about half way between the front/back notches and the tip of the shoulder.  The exact position isn't important, so you can just eyeball it.

Next, make a tick mark along that horizontal line, the same distance from the grain line as you adjusted your shoulder seam, toward the front of the sleeve.  My forward shoulder adjustment was 1/2", so my mark is 1/2" to the left of the grain line.  (note that the front is on the left side on this pattern)


Then extend that mark, perfectly parallel to the grain line, about an inch above and below the horizontal line.


Cut along the horizontal line - I use a straight edge and my rotary cutter for speed.


Slide the upper piece 1/2" (or whatever your forward shoulder measurement is) toward the front of the sleeve.  Line up the upper portion of the grain line with the mark you made before.


Align everything neatly, then tape it together along the cut edge.


Now we need to fix the sticky-outy and poky-inny bits.  This is where my method begins to differ from Heather's.  First, tape or glue some extra paper to the back of the pattern piece at the front and back of the sleeve.  Then take your hip/armhole curve ruler and find the section that most closely resembles the curve of your sleeve head at the seam line on the top section of the sleeve cap.


Now shift that curve in a bit, so that it's positioned in the middle of the difference between the seamlines of the top and bottom sections of the sleeve.  Make sure the curve blends nicely with the notch and the top of the sleeve cap.


Use this position to draw in your new seam line.


Do the same steps to the other side.


Now add the seam allowances.  Because the new seam line is nicely blended at the shoulder and notch, those seam allowances will still be true; you'll gradually be going out onto the extra paper behind.  I just use a ruler and make closely-spaced tick marks all the way up the line, then connect them with a solid line.


Now you can cut along this new edge, trimming away the filler paper.


Notice that instead of trimming away the entire front "sticky-outy bit" and adding to the back "pokey-inny bit", you're actually trimming a bit from each, since your new line is in between.


Here is what you end up with:  notice how the sleeve cap now looks like it's leaning forward.  I'll put the original just below so you can compare.


I've given it a lot of thought, and I think that the reason this method gives me a better fit than Heather's original method is that I need some extra room in the shoulder joint.  Since Heather's adjustment cuts away all the excess (otherwise known as sticky-outy bit) at the front, I don't get quite as good a fit with it as I do with this variation.  I also don't need as much extra at the back of the sleeve as her method adds; this way, I'm only adding half that amount.

So I suggest you give Heather's original adjustment a try if you need to do this adjustment - it's somewhat less work than the way I do it.  And then if you feel like you need to refine it a bit more, give this a try.  And if you find something else that works for you, please let me know!

Sunday, March 20, 2016

Thinking Out Loud About Fitting

WARNING:  Picture light, and word heavy!  This is for my fellow fitting nerds . . .

Before I get started on this post, I want to mention that this morning I realized I'd left out some information from my first Inari post that I think is pretty important. I've gone back and edited that post, but I thought I'd add it here too:

You may be wondering why I went to all the trouble of cutting along the seam line for the front and slashing and spreading for the back, rather than just adding some extra to the outside of each cutting line.  Sometimes adding to the edge of the pattern works, especially on straighter edges and for smaller additions, and where two adjoining pieces will add the same amount. But in my experiments with fitting over the last few years, I've found that I often make things easier for myself by maintaining the length of the original seam line.  In both the adjustments above, the length of the seam line remained unchanged, and therefore everything matched up like the original when I went to sew the pieces together.  So more and more, I tend to adjust along the seam line when possible.

To illustrate this point, imagine 2 concentric semi-circles, let's say 1/2" apart.  If you could straighten those two lines out, you'd find that the inside line is shorter than the outside line.  Now imagine that those two semi-circles are pattern pieces with the inside line being the seam line and the outside line being the cutting line, and you need to add more room.  If you just add, say another 1/4" to the outside, your new seam line moves out to correspond - but it is now longer than it was originally!  If you did not make a corresponding adjustment to the piece it will be sewn to, they won't fit together.

So, seam line adjustments seem like more work - and they are a little - but they often save me a bunch of frustration.  And I get to feel like I really know what I'm doing ;-)

OK, so now today's post begins :-)

I think about fitting All. The. Time.  It's one of those things where I didn't know that I didn't know, but now that I do know . . .  I was perfectly happy for a long time buying and sewing clothes that fit OK, but not great.  But once I started to learn how to fix some of the areas that weren't fitting well, I became kind of obsessed with it.

Add to that the fact that I'm a "Princess and the Pea" kind of girl - seriously, the other day my foot was bothering me and I finally discovered that there was a flax seed in my shoe.  A flax seed!!  I'm very sensitive to sound and touch - I hate getting my hair cut because it hurts when the hairdresser washes, combs and styles it!  So when my clothes are too tight, or dig in certain areas, or shift so that I have to keep yanking them back into place . . . I'm not a happy camper.  And that is the main reason that I do all the fitting I do.

So for quite a while, I've been trying to pay attention to how my clothes feel when I'm wearing them, and apply that to changes I might make when sewing.  Scooping that bit out of the front armhole on the Inari is a good example:  that feeling had been bugging me for a while on many garments, and it finally filtered through to my brain how to fix it.

I received a few comments both here and on Instagram to the effect of "Oy - if I have to make that many adjustments, I'm just not going to make that thing!!"  I get that, I really do!  The thing is, from an aesthetic point of view, a lot of the adjusting I do isn't strictly necessary.  It's just what I do to make myself feel more comfortable in my clothes.

I'm going to give some examples of that in a bit, but first I think it might be helpful for you guys to know my starting point.  In addition to having 3 different sizes for bust, waist and hips (not at all uncommon) I also have a LOT of asymmetries in my body - more than most, I believe.  For instance, one of my legs is longer than the other (which creates a tilted pelvis, which creates differing hip curves right and left) and the shorter leg has a longer foot to compensate!  I have a prominent shoulder blade on the right side only, so if I were going to REALLY make a perfectly fitting garment, I'd have to create different patterns for the right and left sides of my body.  I could go on . . .

To illustrate, here are the adjustments I do - I think you'll be shocked by the sheer number!

I almost always have to do:
1.  Forward shoulder adjustment (and corresponding sleeve head adjustment)
2.  Broad back adjustment
3.  Sway back adjustment
4.  Larger hip adjustment
5.  Shorten sleeves
6.  Shorten length for skirts, dresses and pants

I often also have to do:
7.  Low round back adjustment (a.k.a. dowager's hump - oy!)
8.  Outwardly rotating elbows adjustment
9.  Shallow upper chest adjustment
10.  Prominent thighs/full seat adjustment for skirts or pants
11.  Knock knees adjustment for pants
12.  Narrow upper chest adjustment

Yeah, it's a lot.  I don't have to do all of these all the time, but I always have in the back of my mind that this is a menu of changes I might have to choose from.

I've noticed that how much fitting I have to do depends not only on the style of the garment, but also on the brand of pattern I'm using.  I'm sure that comes as no surprise to most of you.  While I do enjoy the challenge of fitting, I'm not a glutton for punishment.  So for instance, I mostly avoid Colette patterns these days because they just take too much re-inventing of the wheel to work for me. I've found that patterns by Burda and Named are often really good starting points for me, i.e. need less adjusting.  I'm having a love/hate relationship with Style Arc at the moment because I love the designs, but have had mixed results with the fit.

Most of the time when I'm trying out a new pattern for a woven, I'll do a tissue fitting first.  The tissue fitting doesn't always diagnose all the issues, but it's a good start for me.  For knits and stretch wovens, obviously that won't work, since paper doesn't stretch. So I generally make up a garment using a similar, less expensive fabric.

In both cases, after I've made my first garment, I wear it a bit and then go back and tweak the fit.  My problem is that when I make something I like, I usually want to make five more Right Now!!  After I made my Inari dress the other day, I really had to stop myself from immediately cutting out another.

Now, like I said, a lot of the adjusting I do isn't really necessary for appearance. Once I started to learn to fit, I found that I look at people on the street and assess the fit of their garments AND my reactions to their garments.  I often can see where they'd need adjustments, but you know what?  It's mostly no big deal - they look fine.  And I know that I do too, in a garment that doesn't have optimal fit.

Here are some examples pulled from things I've made over the last few months. Last week I bought the Grainline Lark pattern.  The very first thing I did was to trace out the pieces in size 2, grading to 4 at the hip and removing 2" from the bottom.  I also did a small forward shoulder adjustment, 3/8" I think.  Here's that top:


Pretty nice, huh?  It's still a little long, but that's because I used a very drapey rayon jersey.  The next day I made another one, also navy blue, in cotton/lycra and the fit was much closer and shorter.  (I couldn't get a picture because it was too cloudy that day.)

Then I got curious:  what would this pattern look like on me completely unadjusted?  So I decided to find out.  I made the third one with no adjustments except for the body length - I'm only 5'4" after all! This one is made from rayon/lycra jersey.  And it looks fine!  It was also comfortable enough for me to wear it for 2 days.


Here's another example.  I'm exploring French jackets lately.  I made my first one in January, all by machine, to see if I liked the style on me before going whole hog with the handmade kind.  I used a Burda magazine pattern (03/2012 #109) and did a quick tissue fit, after which I only did a small forward shoulder adjustment. Here's jacket #1:


Looks great, IMO!  And feels good.  But after wearing it a couple times, I decided to refine the fit.  For version 2, I narrowed the shoulders 1/2" (unusual for me), took a 1/4" tuck out of the upper chest and added 1" overall to the hem width. Very slight adjustments that produced an even better fit.  Good enough that I also used this pattern for the leather jacket I made earlier this month:


These are to illustrate my point:  do I really NEED all the adjustments?  Not necessarily.  But do they make the garment look and feel better?  Definitely.  And I truly enjoy the challenge of figuring out what each new pattern needs.  But if I didn't enjoy it, I could totally skip it and it would be fine.

So for those of you that don't enjoy going to these lengths with fitting - don't! Unless a garment is uncomfortable or doesn't fit at all, don't worry about it!  I'm perfectly happy wearing RTW pants and jeans that have wrinkles at the back of the legs.  But if I'm making pants or jeans, I do what I can to remove those wrinkles. It's an interesting pastime for me.

I'll end with another picture of my Inari dress, version one.  I like it; it's comfortable enough.  I will certainly wear it even though the fit isn't spot on, because the fabric is so pretty.


Are you a fitting nerd too?  I'd love to hear your thoughts on these matters.

Saturday, March 19, 2016

Fitting Inari, part 2

I decided not to wait til tomorrow - I don't want to forget what I did!

OK, so those deep armholes . . . I spent some time looking at the pattern and deciding on an approach.  I finally realized that I could just fold out some excess, right across the middle of the armhole both front and back, like this:


Because I have high armpits, I needed to take it up a lot - I folded out 1" right across the middle of the armhole.  The original was pretty straight at that point, so I didn't even have to true up the edges!

Taking an inch out of the front and back meant I had to do that to the sleeve cap as well.   You can see above that I did this in two 1/2" folds rather than one 1" fold.  I did it that way so that the truing up was easier.  Take a look at the two photos below to see what I mean:


Much nicer to do it in stages!  At this point, I traced a new sleeve, truing up the line.

The great thing about doing the adjustments this way is that all the notches remained the same and I didn't have to completely redraw the sleeve.  I took measurements of the armscye and the sleeve cap seam both before and after doing these adjustments; in the original, the sleeve cap is 3/4" longer than the armscye.  In my new version, it is 1" longer.  I've found that adding 1/4" doesn't affect the ease too much - these sleeves set in as easily as the original.

To check this out, I made a quick muslin just of the shoulder and sleeve, extending a couple inches below the bust.  No need to make a complete dress to check the fit of the sleeves!

Version 2 fit pretty well - better than the original.  I didn't take any photos because I'm way too old (and smart) to share my exposed midriff on the interwebz. I did notice though that it was pulling toward the back - this is true on the original dress as well, although the weight of the extra fabric helps mitigate this a bit. Shifting toward the back is a sign of forward shoulders, so I went ahead and corrected that as well with a 3/8" forward shoulder adjustment across the entire shoulder seam.  Forward shoulder adjustments are standard for me - I really don't know why I didn't do one from the get-go!

To adjust the sleeve cap for the forward shoulder, I did a slash and slide in the same amount.  I cut across the sleeve cap about half way up, then shifted the top toward the front 3/8" like this:


(I cut this from the lay plan of the pattern, and didn't realize until after I'd taken the picture and thrown away the pieces that I shifted it toward the back, as the drawing didn't have a double notch for the back.  Just imagine that it's shifted toward the front.)

Time to true up the seam line again - I use my hip and armhole curve to do this. Now take a look at my new sleeve (which now has a reduced cap and forward shoulder adjustment) compared to the original:


The sleeve seams and notches remain the same as the original, but the shape of the cap above the notches is completely different.  Notice how the slope is longer and more horizontal at the back (right side) and shorter and more vertical at the front (left side).  This shape gives me a really good fit.

There was just one more adjustment I wanted to make.  It's something I've been thinking about a lot lately and this was the perfect place to try it.  On a lot of tops, I often feel like there's too much fabric right at the front of the armhole on the bodice.  In other words, my upper chest is narrower than most patterns are drafted for.  So this time, I scooped out a little bit of the front armhole - just 3/16".  That small amount meant I wouldn't have to worry about the sleeve cap fitting, but it was just the right amount to remove the excess fabric that digs into my arm/shoulder joint.  In the photo below, I'm pointing at the amount I scooped out and you can see it in comparison to the original seam line.  The original is the purple dashed line, and I've already trimmed the seam allowance to match my new line.


Here's a look at my new front, compared to the original, where you can also see the amount I scooped out:


Finally, I added 1" of length in the body to both the front and the back.  I'll feel more comfortable with a little more coverage, especially with that vented hem at the front.  The pattern gives 2 lengthen/shorten lines:  one just below the armhole and another a few inches above the vent.  I chose to lengthen at the lower line; if I'd lengthened at the upper line, my width placement for the hip adjustment I showed in the previous post would then be an inch too low!

By that time, my pattern pieces were a cobbled-together mess!  So I retraced everything and drew new pieces for the facings, and it's all set to go for tomorrow (I hope) so I can sew together Version Two.  I have a piece of linen I bought last year for culottes that never got made; I think it will be just right for this dress. And if it fits as well as I think it will, I'm hoping that I have enough of a piece of Nani Iro in my stash for version 3!  The Nani Iro is a narrower fabric, so I'm not sure it will all fit on the 2 yards I have.  Fingers crossed!

Fitting Inari, part 1

Yesterday I made an Inari Dress.  I've been wanting to make this dress for a long time - I love pretty much every version I see, and it seems to look great on every body type.  But I had to spend a while figuring out how to fit it.  I couldn't find a lot of fitting information online for this pattern, so I thought I'd share what I did in case it's helpful to some of you.

In Named patterns, I take a size EU 36 at the bust, EU 38 at the waist and EU 42 at the hip.  Not usually a problem to grade among these sizes, and Named patterns are a better starting point for my body than some other companies' blocks.  The problem here is the unusual shape of this dress:  not only does the side seam wrap from the back to the front, but it's a cocoon shape as well!  I wanted to preserve that cocoon shape, but didn't have much experience with it, so I had to ponder for a few days.

I started out by determining how much extra width I'd need for the bottom half, and exactly where.  I looked at the finished garment measurements on the pattern and took flat pattern measurements.  I also did a tissue fitting and made a mark at the place where I needed to expand.  According to all of these, I needed to add a total of about 3" to get the right amount of ease around my hips.

After looking through all my fitting books, I settled on using two different types of adjustments.  For the front, I did a seam line adjustment and for the back I did a slash and spread.  Here's what I did:


Using my rotary cutter, I sliced up the entire side seam line from the hem fold to the underarm seam.  At those two places I clipped in little hinges, then clipped little hinges all along that seam allowance every couple inches so that I could curve the seam allowance out.  At the mark I'd made where I needed the most room, I pulled the seam allowance out about 1/2", then curved the rest of the seam allowance as similarly as possible to the original shape.  I taped all of this to my cutting mat to keep it in place.


Then I put new paper over it and retraced my pattern.

For the back, since it already had a slight A-line shape, I thought a slash and spread would be a good fix.  This adjustment makes an A-line even more so: compare this shape below to the original, which you can see in the two photos above.  It's not too dissimilar.


For this adjustment, I drew a line from the armpit straight down to the hem, parallel to the grain line.  I slashed up this line with my rotary cutter, stopping at the under arm seam allowance, then clipped a hinge into that seam allowance.  I swung the whole thing out until I had 1" extra at the place I'd marked, then filled it all in with extra paper.  Again, I taped it down and traced a new pattern.

******

EDITED TO ADD:  You may be wondering why I went to all the trouble of cutting along the seam line for the front and slashing and spreading for the back, rather than just adding some extra to the outside of each cutting line.  Sometimes adding to the edge of the pattern works, especially on straighter edges and for smaller additions, and where two adjoining pieces will add the same amount. But in my experiments with fitting over the last few years, I've found that I often make things easier for myself by maintaining the length of the original seam line.  In both the adjustments above, the length of the seam line remained unchanged, and therefore everything matched up like the original when I went to sew the pieces together.  So more and more, I tend to adjust along the seam line when possible.

To illustrate this point, imagine 2 concentric semi-circles, let's say 1/2" apart.  If you could straighten those two lines out, you'd find that the inside line is shorter than the outside line.  Now imagine that those two semi-circles are pattern pieces with the inside line being the seam line and the outside line being the cutting line, and you need to add more room.  If you just add, say another 1/4" to the outside, your new seam line moves out to correspond - but it is now longer than it was originally!  If you did not make a corresponding adjustment to the piece it will be sewn to, they won't fit together.

*******

How did it work?  Really well!  Here's my dress:


I got exactly the amount of ease I wanted through the hips - loose enough to move, but not so loose that you can't see the shape.

I'm happy with this first version of the dress - I have to say I was shocked that this shape works for me!   This pattern produces a magic dress I think - as I said above, it seems to look good on everybody!

That said, there were a couple things I wanted to change.  The most important is that the armholes on this dress are low.  I've seen some other reviews saying the same thing.  I'm not surprised that I need to bring them up - it's an adjustment I sometimes have to do.  I also think this length is a smidge short for me.  This dress is totally wearable, but knowing I could make it better, I started hacking this afternoon.  I did a bunch of adjustments to the armhole, sleeve and shoulder and got it to a place where I think it's just about perfect for me.  Those adjustments are a lot more involved, so I'll write those up for tomorrow.  Stay tuned!

Saturday, December 5, 2015

Arcane Adjustment

Readers, do you ever think about how your elbows might be affecting the fit of your sleeves?  I never did, until a problem I've had for a long time finally led me to look, page by page, through Fitting and Pattern Alteration to find a solution.  And the answer turned out to be that I have Outwardly Rotated Elbows!  Who knew such a thing even existed?!

Here's the problem I've had with long sleeves:  most of the time, the portion of the sleeve from the elbow to the wrist twists towards the back.  I've noticed that it doesn't happen as severely with two-piece sleeves, and on knits it usually doesn't bother me because I often end up pushing those sleeves up.  But on shirts and blouses, it really irks me.  Here are some examples.


The fix is actually easier than figuring out what the problem is.  All you have to do is cut up the entire length of the front and back seam lines, and also make a small clip in the sleeve cap seam line to make a hinge.  Then swing the back seam out by however much you need and fill in the empty space with some extra paper.  Swing the front seam line in so that it overlaps the sleeve by that same amount and attach it.  You may have to trim away some of the sleeve if it extends beyond the seam allowance.  Doing the alteration this way instead of just adding a bit to the back and taking away from the front at the cutting edge ensures that the seam line remains unchanged and everything will match up nicely.  I did a quick little model of the adjustment for you:


I did this alteration on my second Dotty Blouse, and it really made a difference in the fit of the sleeve - it actually hangs straight from my shoulder now!  What a revelation.  Since it was my first time doing this adjustment, I was conservative and only moved my seam lines by 1/2".  But I think I can go up to as much as 3/4" in the future.   It makes such a difference that you can even see it in this picture where my elbow is bent.  No twisting!


Now what I haven't experimented with yet is how this works on a shirt like the Archer, where there are plackets and pleats to deal with.  But I will figure it out, because up to this time I've mostly been wearing my Archers with the sleeves rolled up to the elbows because it bugs me so much how they twist!

And there is a sister adjustment for those of you with Inwardly Rotated Elbows.  If you find that your sleeve twists below the elbow toward the front, just do the opposite of what I described above.

Do any of you have either of these issues with your sleeves?  Have you ever considered the rotation of your elbows?  I was convinced that my sleeve problems were caused by my forward shoulders, but the forward shoulder adjustment, while it improved the set of the sleeves, never completely remedied the situation.  I'm so glad I've finally figured out this piece of the fitting puzzle!

Sunday, October 26, 2014

Bourbon and Blazers

As I said earlier in the month, October is all about blazers Chez Agenda.  Alongside my other projects, I've been slowly working on a pattern for a tailored blazer - an item which I'd love to own but which I rarely find to fit well in RTW.  You'll see why later in the post.

My friend Shar and I had been talking about doing a blazer sew-along in the fall, and so "Bourbon and Blazers" was born.  The name came from the title of an email I sent her referencing our plans and thanking her for the recipe for Salty Bourbon Squares she'd sent me.  Since we knew we'd be sharing a lot of our progress on Instagram, we decided to use it as our hashtag.  To our delight, a couple of our sewing friends have decided to join us:  Lisa and Andrea for sure, and maybe even a couple others are thinking about it.  We are all going at our own pace - there are really no rules or structure.  We're just having fun exploring the making of a tailored blazer together.  Please join us if you care to!  #bourbonandblazers

I had several blazer patterns in my stash from which to choose, and in the end I settled on McCall's 6172.  This is a Palmer/Pletsch pattern, which means it has lots of fitting advice, and fitting alteration lines are already included on the pattern.  Since I'm familiar with the Palmer/Pletsch method and fit is one of my biggest concerns in this project, I thought it would be a good place to start.  It turns out that all my sewing buddies have chosen this pattern as well!  I think it's great, because we will be able to compare apples to apples.

I started this project at the very beginning of October and just yesterday was able to trace off my final version of the pattern.  Between tracing, tissue-fitting and re-tracing, I've got about 10 hours into this project already!  I'm hoping all this work will pay off in a big way.

First I started by tracing my four main pieces:  the two fronts and the two backs.  I started with only these four because I wasn't sure if I should use the size 8 or size 10.  A quick tissue-fit of these main pieces verified that the 8 is the right size for me to start from.  It's interesting to me that my Palmer/Pletsch instructor also put me in a size 8, and all the adjustments I needed for this blazer were the ones I needed on the sheath dress we did in our class!

Once I had the correct size, I traced off all the other size 8 pieces, and then got started with my tissue-fitting.  I wish I hadn't done that though - I forgot that the shapes of the linings and facings would change to correspond with the new shapes of the front and back pieces.  So in the end, I ended up re-tracing those as well.

For my tissue-fitting, I was a little over-zealous at first, and had to back some of my adjustments out.  Once everything was done though (over the course of several fittings) I had made TEN adjustments!  No wonder the RTW blazers don't fit me well!  Here's my list as I kept track:


And here's what it says, but in the order of the adjustments:

* broad back adjustment of +1/4"
* shallow upper chest tuck of -1/4" 
* dart remains as it is - I shortened it a bit at first but decided I liked the original better
* forward shoulder adjustment -1/4"
* sway back adjustment -3/4"
* low round back adjustment +1/2"
* increase side seam from waist down +9/16"
* increase back side seam (between center back and side back) from waist down +3/16"
* make tuck corresponding to shallow upper chest tuck (-1/4") the length of the upper sleeve piece parallel to grain line, so that sleeve cap fits into new, smaller armscye
* full upper arm adjustment +1/2"
* shorten sleeve -3/4"

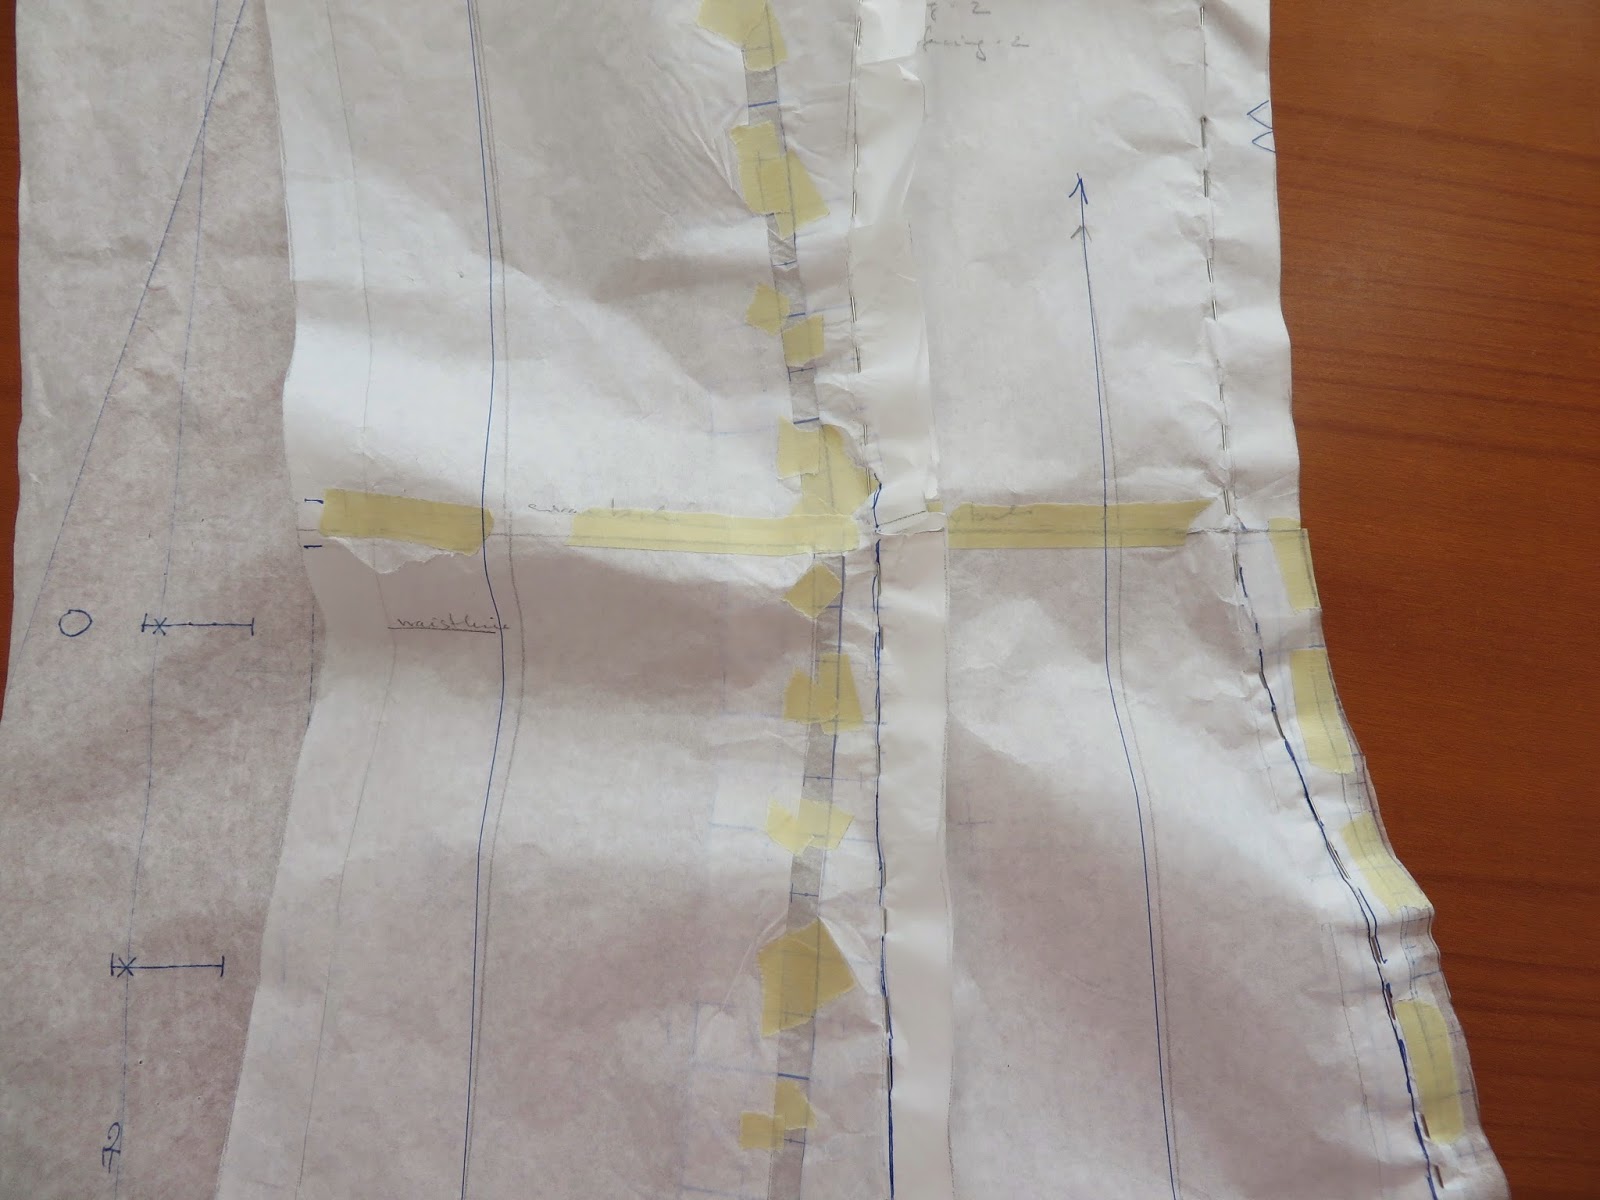
WHEW!  With all that tape, you can see why I wanted to re-trace my pattern pieces.  I have a bad habit of forgetting that I have tape on my pieces and then ironing over it and gunking up my iron!

Here are some pictures of my pieces in progress, in no particular order.

re-traced upper sleeve on left, adjusted sleeve on right

Paper Blazer, front

Paper Blazer, back

shallow upper chest tuck - extends all the way across the lapel; forward shoulder seam line

broad back adjustment and low round back adjustment

sway back adjustment


increased seams at hip area

final fit

I'm very happy with the fit I've achieved.  I only look unhappy in the photo because I've been suffering from sinusitis and a cold for the last several days and I had a massive headache!  Also, a pin was sticking me right in the armpit :-)

At this point, I was ready to re-trace my taped-up pieces and adjust my lining and facing pieces to match - the work of another couple hours.  But VOILA:


My pile of beautiful, fresh pattern pieces is ready to go!  I'm hoping to start on cutting out my fabric today!

Monday, June 2, 2014

Emery Dress: Fit

Yesterday evening we had a date for dinner with an old friend, so I put on my new dress and snapped a few pictures before we headed out the door.  It looked like rain though, so at the last minute I changed out of these shoes and into a less precious pair.  So here I'm wearing my dress with the Cameo cardigan I made last summer, my pink leather clutch (Boden) and my old Frye Wanda T-Straps.  Plus my (prescription) sunglasses - these are Ray-Ban Retro Wayfarer.  I don't think they make this style any more.


I liked this outfit - I felt very retro :-)

Now let's talk about the fit.  Here are some pictures from the front and back:


I realize the fit might be a little hard to see - the overall tone of the dress is pretty close to my skin color!

My fit is close, but not too close.  I wish I were one of those girls who can wear skin-tight dresses and be comfortable, but alas, I am not.  I need plenty of room to breathe and move, especially across the back.  So while I could stand to take the bodice in probably an inch and a half in total, I just wouldn't be comfortable in it.  I think I've made a pretty good compromise on this first run - it looks trim but not fitted.  I might take it in just an 1/8" on the side seams next time, which will be a total reduction of 1/2" in circumference.

Waist
Having said all that, I adjusted the pattern so that I actually have less ease at the waist than the pattern calls for.  For my bodice, I used a size 4 at the bust and 6 at the waist.  However, my body measurement would have put me in a size 8 at the waist.  So that's a good thing to know for those of you who are thinking of making this pattern - there is a fair bit of ease given, and more at the waist than at the bust.

Bust
Another good thing to know is this - although I couldn't find any reference to it, I do believe this bodice was probably drafted for a C-cup.   I say that because I made my muslins to the size that matches my bust size (size 4), and fit them to my most padded bra, which brings me up to a C.  If I had wanted to fit the bodice to any of my other bras, I would have had to do a small bust adjustment.  I tried the muslins and dress on with those bras, and there was a lot of excess fabric there :-)


My Alterations
So here's a list of the alterations I typically do, and how they applied to this bodice:

* Blending from a smaller size at the bust to a bigger size at the waist - Yes:  size 4 at bust and size 6 at waist.  Bust and back neck darts used the size 4 markings; front and back waist darts used the size 6 markings, and the length of the bodice is the size 6 length.

* Forward shoulder adjustment of 3/8 - 5/8" - Yes:  here I did a forward shoulder adjustment of 1/2", and transferred that to the sleeve piece as well for future.

* Broad back adjustment - No!  This really surprised me!  There's plenty of room here for my broad back, which makes me think that those of you who have narrower backs might need to size down, or do a narrow back adjustment.

* Swayback adjustment - Yes:  I took in 3/8" on either side of my horizontal line, for a total intake of 3/4" - not too bad for me!

* Rounded upper back/prominent shoulder blades - Yes:  I made each leg of the neck darts 1/8" wider, for a total extra intake of 1/4" on each dart.

Style Changes:
*  Not exactly a style change, but I used the size 6 skirt pattern, to correspond to the size 6 waist.  Because of the gathers though, it really doesn't matter what size skirt you use - I just wanted to see how the skirt looked as written.

*  To make the dress sleeveless, I extended the side seams up 1/2" to make the armhole shallower.  Because I knew I'd be wanting to make this dress in both sleeved and sleeveless versions, I made separate pattern pieces for each so they'll be on hand.

Lengthened the skirt by 2".  One thing that really surprised me is that the skirt is the same length for all the sizes.   In addition, there is no lengthen/shorten line on the skirt.  For me, a 22" skirt is too short - my preferred length for a dress like this is just below the knee.  I could have made it that length if I sacrificed a wide hem, but I didn't want to do that.  So I drew myself a lengthen/shorten line 13" down from the waist, added 2" and then blended the side seam.  When I was ready to hem, I first turned my hem back 1/2" and pressed.  Then I tried on the dress and pinned it to the length I wanted - I ended up turning the hem back 1 5/8".  So my total hem turnback is 2 1/4" - just 1/4" more than the pattern recommends.  So be aware:  this skirt is a bit on the short side!  I'm on the short side too, at only 5'4" - so it's something to keep in mind for you taller ladies if you prefer your skirts a little longer.


In her sew-along, Christine Haynes has a post about making this dress sleeveless.  She talks about differences in drafting between sleeved and sleeveless dresses, and changes that might have to be made to the neckline, shoulders and upper bust.  I didn't make any of these changes - I really like how the armhole extends over to my arm.  It covers up those lumpy underarm bits that drive me crazy!

Well, I think I've said everything I wanted to say about this dress.  I hope these notes will be helpful to some of you!  I really loved making this pattern, and I'm looking forward to making many more versions.  This is my favorite type of dress - very simple, darted bodice and gathered skirt.  Comfortable to wear, easy to sew, and lots of room for creativity!

pockets!