
I had a few questions about how I adjusted my sleeve head on the Inari dress for the forward shoulder adjustment I did, and I figured it warranted its own blog post. Please keep in mind that this may not be 100% legit - I'm not a professional, and while I've done a fair amount of research on fitting, almost all of that research is geared toward solving my own fitting problems. I've tried a few different things to adjust the sleeve heads after a forward shoulder adjustment, and this one is the one that usually works well for me on my body.
I also want to give credit where credit is due. I first learned of this type of adjustment from Heather B's blog - you can find her tutorial here. This one is pretty much the same, except at the end.
So, let's get started with the sleeve as it is, unaltered and with the seam allowances marked:
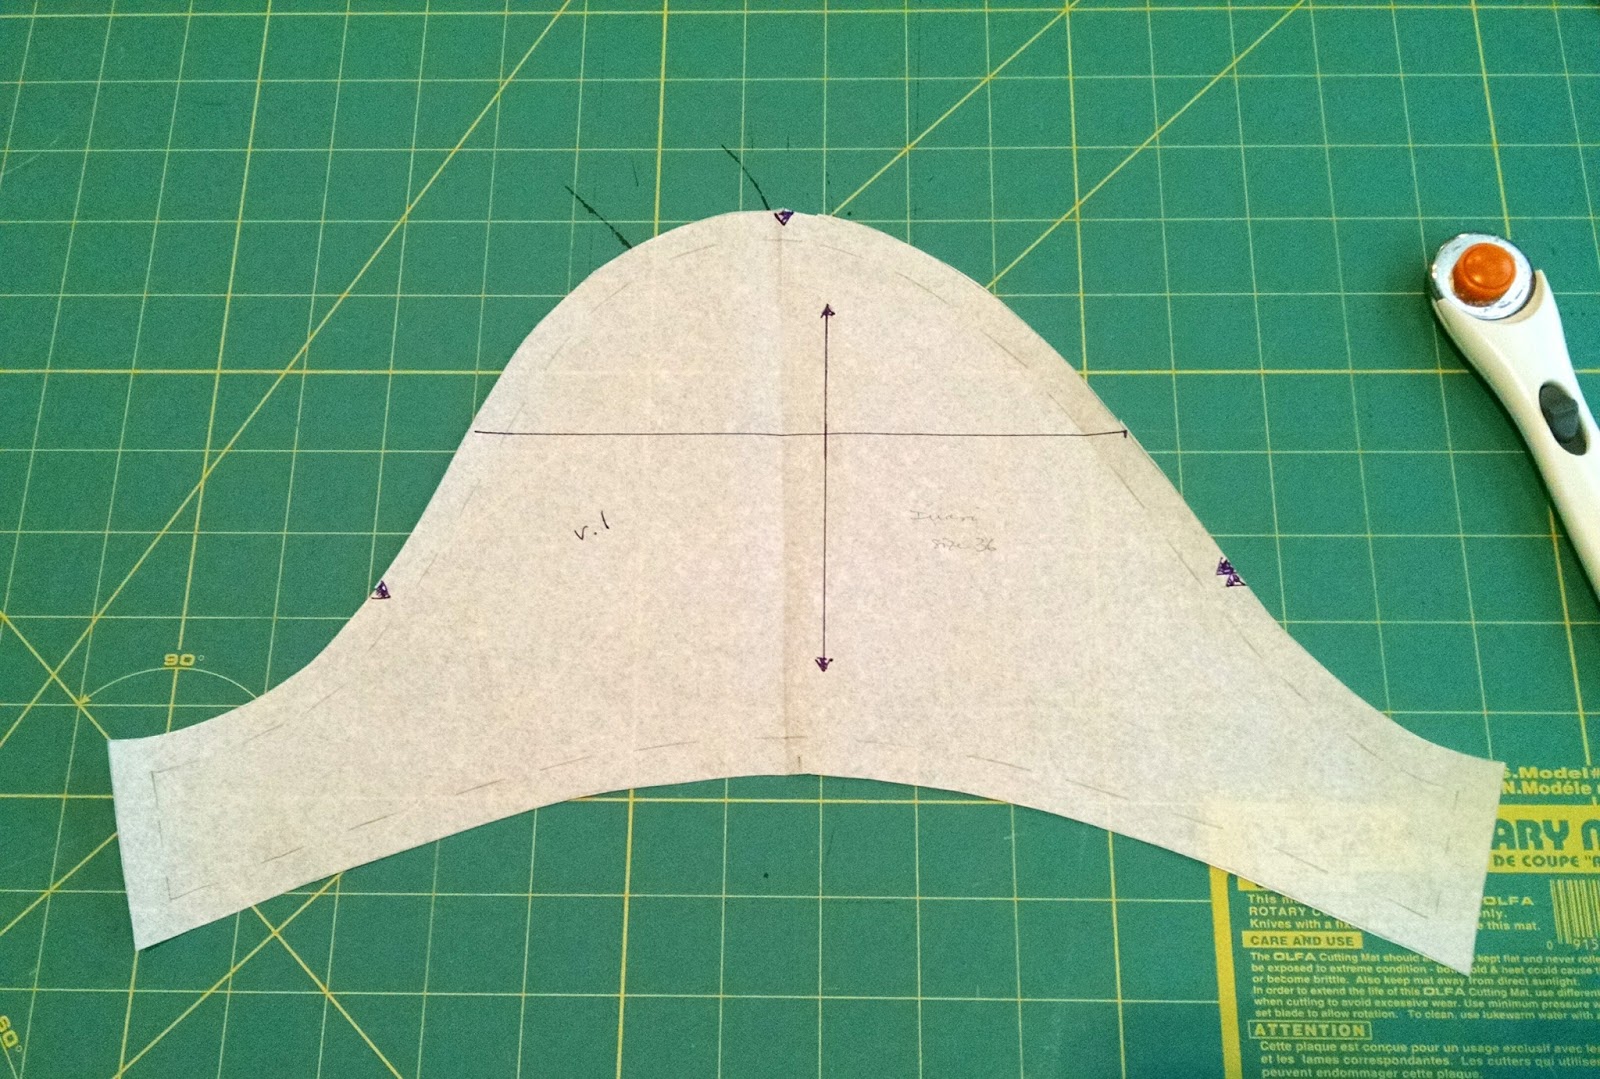
The first thing I've done is to draw a line perpendicular to the grain line, about half way between the front/back notches and the tip of the shoulder. The exact position isn't important, so you can just eyeball it.
Next, make a tick mark along that horizontal line, the same distance from the grain line as you adjusted your shoulder seam, toward the front of the sleeve. My forward shoulder adjustment was 1/2", so my mark is 1/2" to the left of the grain line. (note that the front is on the left side on this pattern)

Then extend that mark, perfectly parallel to the grain line, about an inch above and below the horizontal line.

Cut along the horizontal line - I use a straight edge and my rotary cutter for speed.

Slide the upper piece 1/2" (or whatever your forward shoulder measurement is) toward the front of the sleeve. Line up the upper portion of the grain line with the mark you made before.

Align everything neatly, then tape it together along the cut edge.

Now we need to fix the sticky-outy and poky-inny bits. This is where my method begins to differ from Heather's. First, tape or glue some extra paper to the back of the pattern piece at the front and back of the sleeve. Then take your hip/armhole curve ruler and find the section that most closely resembles the curve of your sleeve head at the seam line on the top section of the sleeve cap.

Now shift that curve in a bit, so that it's positioned in the middle of the difference between the seamlines of the top and bottom sections of the sleeve. Make sure the curve blends nicely with the notch and the top of the sleeve cap.

Use this position to draw in your new seam line.

Do the same steps to the other side.


Now add the seam allowances. Because the new seam line is nicely blended at the shoulder and notch, those seam allowances will still be true; you'll gradually be going out onto the extra paper behind. I just use a ruler and make closely-spaced tick marks all the way up the line, then connect them with a solid line.


Now you can cut along this new edge, trimming away the filler paper.

Notice that instead of trimming away the entire front "sticky-outy bit" and adding to the back "pokey-inny bit", you're actually trimming a bit from each, since your new line is in between.


I've given it a lot of thought, and I think that the reason this method gives me a better fit than Heather's original method is that I need some extra room in the shoulder joint. Since Heather's adjustment cuts away all the excess (otherwise known as sticky-outy bit) at the front, I don't get quite as good a fit with it as I do with this variation. I also don't need as much extra at the back of the sleeve as her method adds; this way, I'm only adding half that amount.
So I suggest you give Heather's original adjustment a try if you need to do this adjustment - it's somewhat less work than the way I do it. And then if you feel like you need to refine it a bit more, give this a try. And if you find something else that works for you, please let me know!
Thanks, Gail! I'm going to try your method on my next sleeves!
ReplyDeleteThanks, Marianne! Hope it gives you good results!
DeleteThanks so much Gail. I'll be first in line for the release of the Todays Agenda Fabulous Fit Tips and Tricks book - you're a clever lady! ;)
ReplyDeleteThanks, Sarah! Hahaha - my target audience is small though: forward-shouldered, high-round-backed, sway-backed, outward-elbowed, large-hipped ladies!
DeleteGail, I am loving these fitting posts! Keep them coming :)
ReplyDeleteI do a forward shoulder adjustment and assumed I was following Heather's method to the tee but now I realise I do it more like you. The final shape I cut is also quite dependent on the sleeve cap ease - sometimes I find this method creates too much or an uneven amount of ease so I trim back and reshape as necessary, until there is about 1cm ease either side.
Thank you, Siobhan! Excellent point - I have noticed this too, and hadn't really yet been able to define it for myself. There have been a few times when, even with this adjustment, I've had to shift the shoulder notch forward or back to even out the ease. (I generally measure the whole seamline to make sure the total ease is an amount I'm comfortable with for any given design.) Thank you for putting it so succinctly!
DeleteThis is very interesting, I have tried Heather's version and it did make a lot of difference but now I think I need to try your way to as it sounds like it will take into account more of the forward shoulder joint that I have.
ReplyDeleteHope it's helpful for you, Sharon!
DeleteWow! I have got to try this! I have very forward shoulders and I adjust for that most of the time but never adjusted the sleeve :) Thanks Gail!
ReplyDeleteI think you will really like it - I've found that adjusting the sleeve makes a lot of difference.
DeleteCan I ask what kind of trace paper are you using? thanks.
ReplyDeleteThis is medical table paper which I purchased from Amazon.
DeleteHi Gail,
ReplyDeleteNot sure how to contact you. Would love to make my own Tailors Ham and found your blog post on it. Wondering if you have the Tailors Ham pdf as the link in your blog to the pattern no longer exists.
Thanks,
Linda
elefsie@gmail.com
thank you for sharing this tutorial, <3
ReplyDeleteThis comment has been removed by a blog administrator.
ReplyDeleteHello Gail,
ReplyDeleteI was wondering how you determine how much of a forward shoulder adjustment you need. Is there a measurement you can take, or is it a matter of muslining?
Many thanks for all your excellent fitting and adjustment articles.
Hello: I start with an estimate based on tissue-fitting, and after the first time I make a pattern, adjust it if necessary. Hope that is helpful!
Delete