When I went shopping for skirt fabric last week, all I knew was that I wanted corduroy. I really didn't have a particular color in mind, and when I came across this shade I thought it wouldn't really go with much. But I loved the color so much I couldn't leave the store without it.
Happily, it turns out I was wrong! When I got home, I realized it went with my new Renfrew, and I was pretty excited. But yesterday after I finished the skirt, I went digging in my closet and came up with about ten different sweaters and tops that look great with this color! So now I'm even more excited! This morning I did a little outfit roundup of my favorites from the pile.
You'll notice that I left this skirt pretty long. The first time I made this pattern I took quite a bit off the bottom, but for winter I'm kind of digging mid-calf skirts and dresses over tall boots. Of course, not one of these looks incorporates tall boots, LOL!
First up, the full-sleeved Renfrew, along with my beloved Frye Carson Oxfords (SO comfy) and winter white legs:
Next, with the "Betty" sweater I made two years ago and have worn . . . never! Such a pity because I love this sweater! But I never had a skirt I felt looked good with it - until now! It's such a cropped style that it requires a skirt (or pants) with a higher waistline like this one. These Cuban-heeled Seychelles "Scene of the Crime" pumps are from 3 years ago. They were sold at Anthropologie under the style name "Ancient Woods Heels."
I'm pretty excited about the next one - look how great this color goes with my latest Archer shirt!! It's like they were made for each other! Also, I'm wearing this sequinned leather belt I bought from Loft years ago and haven't been able to wear much, because it's waist-sized and most of my jeans and pants hit me at the hip. Glad to have a use for it, as I think it's a very pretty belt.
And finally, here's my very favorite look. This is a sweater I bought probably ten years ago from Anthropologie. It's always been one of my favorite pieces, and I used to wear it quite often when I was still teaching. I haven't worn it for a couple years though because it's a little small on me now, and so has to be worn as a top rather than as a cardigan. The colors in the print are just perfect with this corduroy - I'm so excited to be able to make an outfit with this sweater again! The shoes are Kensington Suede Loafers from J. Crew probably 5 or 6 years ago. I think they are so amazing - I bought them in three colors (black, aubergine and the vicuna shown here) and I'm so glad I did. I wear them all more frequently than I do a lot of my fabulous shoes, because they are actually quite comfortable.
By this time, I was getting tired of changing clothes, but here's a little peek at another old sweater that looks great with this skirt. This one is probably about ten years old too, a floral printed lambswool/angora cardigan from Boden that I used to wear all the time.
So, what a happy accident! Probably it wasn't an accident at all - I guess all these items were tucked away in some deep corner of my memory, which nudged me on to pick up this fabric. Does this ever happen to any of you? You're drawn to a fabric and can't figure out why, and later you discover it fills in a hole in your closet?
Friday, November 8, 2013
Wednesday, November 6, 2013
Zippity Doo Dah!
I decided to take a "sewing day" today - i.e. ignore the housework I ought to be doing and work on a skirt instead. It seems like it's been forever since I sewed, even though I made a dress last week and a t-shirt the week before that. I think that's because both those garments were made with the serger (except for the hem of the dress), so it has been quite a while since I've used my sewing machine.
The skirt started out as a "Murphy's Law" skirt. I bought some really pretty curry-colored cotton corduroy last week at JoAnn's with the intent of making a Hollyburn. I was so excited about it that I washed and dried it the very next day, but when I ironed it, I discovered that there was a half-inch wide faded stripe running down the center of two of my three yards!
It doesn't look super noticeable in this picture, but trust me - it really is in real life. And not only that! There was a "bald spot" in the middle of the fabric:
Grrrrr. I guess this $4.49/yard fabric wasn't such a bargain after all. I considered taking it back, but then decided that I'd use it to make a different skirt because I love the color, and it goes perfectly with that full-sleeved Renfrew I made:
So today I got out my McCall's 6409 (1962), cut everything out and got started. I'm making the same view I made this spring, the least full one. Because of that faded spot, I had to shift the zipper from the side seam to the back so I wouldn't have to cut the back on the fold. I added my 5/8" seam allowance with the help of my quilter's ruler:
Despite its flaws, the fabric is really quite nice - soft and drapey. I didn't want to add extra bulk at the seam allowances, so instead of serging them like I usually do, I did a stitch-n-pink, which is more in line with the vintage of the pattern anyway:
I wanted to do an invisible zipper like I usually do - it's my favorite kind because of the clean look. But I didn't have one on hand, and it was raining cats and dogs so I didn't feel like running out to get one. But I did have a regular zipper, so I settled on doing Sunni's lapped zipper technique from her Craftsy class. And boy, am I glad I did!
I've been avoiding lapped zippers for years because they always end up looking kind of funky. But Sunni's technique provides a very clean, professional look. Check it out:
Have you guys tried this yet? This is not the way I learned to do it back in the day - it is SO much better. I never thought I would say this, but I think I might be a Lapped Zipper Convert!
Also, can I just say: I'm very proud of myself that I thought things through and made it so the opening is toward my right. Usually I just dive in without thinking and end up getting things backwards.
I'm going to turn my attention to knitting for the rest of the afternoon, but with any luck, I'll finish this in the next couple days.
The skirt started out as a "Murphy's Law" skirt. I bought some really pretty curry-colored cotton corduroy last week at JoAnn's with the intent of making a Hollyburn. I was so excited about it that I washed and dried it the very next day, but when I ironed it, I discovered that there was a half-inch wide faded stripe running down the center of two of my three yards!
It doesn't look super noticeable in this picture, but trust me - it really is in real life. And not only that! There was a "bald spot" in the middle of the fabric:
Grrrrr. I guess this $4.49/yard fabric wasn't such a bargain after all. I considered taking it back, but then decided that I'd use it to make a different skirt because I love the color, and it goes perfectly with that full-sleeved Renfrew I made:
So today I got out my McCall's 6409 (1962), cut everything out and got started. I'm making the same view I made this spring, the least full one. Because of that faded spot, I had to shift the zipper from the side seam to the back so I wouldn't have to cut the back on the fold. I added my 5/8" seam allowance with the help of my quilter's ruler:
Despite its flaws, the fabric is really quite nice - soft and drapey. I didn't want to add extra bulk at the seam allowances, so instead of serging them like I usually do, I did a stitch-n-pink, which is more in line with the vintage of the pattern anyway:
I wanted to do an invisible zipper like I usually do - it's my favorite kind because of the clean look. But I didn't have one on hand, and it was raining cats and dogs so I didn't feel like running out to get one. But I did have a regular zipper, so I settled on doing Sunni's lapped zipper technique from her Craftsy class. And boy, am I glad I did!
I've been avoiding lapped zippers for years because they always end up looking kind of funky. But Sunni's technique provides a very clean, professional look. Check it out:
Have you guys tried this yet? This is not the way I learned to do it back in the day - it is SO much better. I never thought I would say this, but I think I might be a Lapped Zipper Convert!
Also, can I just say: I'm very proud of myself that I thought things through and made it so the opening is toward my right. Usually I just dive in without thinking and end up getting things backwards.
I'm going to turn my attention to knitting for the rest of the afternoon, but with any luck, I'll finish this in the next couple days.
Tuesday, November 5, 2013
Fair Isle Knitting, Part 2
Here is the second video I made yesterday, after I got cut off by the first one. The mistake I made in this one is right at the beginning - I talk about catching in the grey yarn with the red; it's really the other way around! The red yarn is the long float and the grey is the working yarn in this case, so I'm catching in the red float to keep it from being too long. Sorry! I've said it before and I'll say it again: Low Budget!
Monday, November 4, 2013
Fair Isle Knitting, part 1
I had a little bit of time yesterday, so I made a couple of Fair Isle videos. I'm finding that it's much easier to post these one at a time, so I'll do it that way. And fair warning: they're long! The first is 9 minutes and the second is 8. I guess I have a fair bit to say on this topic!
I was waiting for a contractor to come over when I made the videos, so I was a teeny bit distracted :-) And I made an error in each one. In this one, at about 4:15, I say "3 grey" but I really meant "3 color" stitches. Oops!
Sunday, November 3, 2013
Starmore Progress
I didn't work on my Starmore sweater much over the summer - it's now a huge mass of wool fabric and it gets a little hot having it pooled up on my lap! But once the temperatures cooled down a little I picked it back up, and on Oct. 1 I finished the body. A few days later, I cut open the first sleeve steek and got started on the sleeve.
I've managed to be fairly consistent for the last month. I try to do 4 rows a day; some days I don't have time to pick it up, other days I work 8 rows. Starting immediately from the top of the sleeve, there are 2 stitches decreased every 4th row, so it gets quicker as I go along. I'd say I'm about half way done with the first sleeve now.
This morning it was nice and sunny, so I took some update pictures.
Now that this piece is looking more sweater-like, I'm getting excited to finish and wear it. I really want to have it done for this winter, so I'm trying to keep up my momentum.
I'm thinking about doing a video on 2-color stranded knitting. Anybody interested in seeing that? I'll warn you that my method is to hold one color in each hand, so it works best for those who are comfortable with both English and Continental knitting.
I've managed to be fairly consistent for the last month. I try to do 4 rows a day; some days I don't have time to pick it up, other days I work 8 rows. Starting immediately from the top of the sleeve, there are 2 stitches decreased every 4th row, so it gets quicker as I go along. I'd say I'm about half way done with the first sleeve now.
This morning it was nice and sunny, so I took some update pictures.
![]() |
| Body + sleeve from the back |
![]() |
| Sleeve; the entire body has been steamed, but the sleeve has not. |
| Uncut steek on the other side |
| Cut steek from the inside |
| Close-up of cut steek: because Shetland yarn is "sticky" it doesn't unravel. |
![]() |
| Body fabric from the wrong side - still very pretty! |
| Close-up of floats. I (almost) never float across more than 3 stitches. |
| Front neck steek |
| Body + sleeve from the front |
Now that this piece is looking more sweater-like, I'm getting excited to finish and wear it. I really want to have it done for this winter, so I'm trying to keep up my momentum.
I'm thinking about doing a video on 2-color stranded knitting. Anybody interested in seeing that? I'll warn you that my method is to hold one color in each hand, so it works best for those who are comfortable with both English and Continental knitting.
Saturday, November 2, 2013
Merci, Michelle!
A couple weeks ago, local gal Michelle posted a brioche stitch infinity scarf she'd made. I was immediately obsessed; I had to have my own Right Away. At the earliest possible moment, I made my way to my LYS, intending to buy the very same yarn she'd used. But alas, they didn't have any colors I liked. I briefly considered ordering some, but in the end my impatience led me to shop my stash, where I found 3 balls of the discontinued RYC Soft Lux. Not the color I had in mind, but it was at least on hand. I cast on as soon as I dug it out of my stash box.
The pattern is a free one, really more of a recipe. The designer recommends using a larger-than-usual needle for working the brioche stitch to make the scarf more cushy, and with that as a guideline you could use lots of different yarns to create this scarf. For this worsted weight yarn I used a size 10 (6.0mm) needle, as I knit loosely. My yardage ended up being about 30 yards short of the recommendation; however, my scarf is 46" long and I am short, so it's a good length for me. The 40 stitches I cast on gave me a width of about 12" when relaxed.
I haven't blocked this scarf, and I don't think I will. I don't want to lose any of the loft of the stitch, and this yarn is rather delicate, being basically a singles with a metallic strand wrapped around it.
The pattern says you can seam or graft your stitches together. I started with a long-tail cast-on, so I chose to seam with mattress stitch at the end, giving the scarf one twist beforehand. It's not a big deal for me to keep the seam at the back, and it's not very visible anyway.
Apart from the squishiness of the brioche stitch and the softness of the yarn, what I really love about this is that it can be worn a few different ways:
Even though this scarf isn't a very versatile color (I really wanted off white) I just love how it turned out. I'm pretty sure I'll be making more of these. It took me about a week to make; I was working on other projects during that time but I'd say about 60% of my efforts went to this one. So, a pretty quick make, and very enjoyable - the brioche stitch was so fun to do.
The only thing I might add to the recipe is instruction on how to do the cast-off row if you're going to seam (or the final row if you're going to graft): in every row, you do *yo, s1 purlwise, k2tog* - where the yo from the previous row counts as a stitch. In the final row, omit the yarn overs and instead of slipping one purlwise, purl that stitch, then knit the next 2 together.
Are any of you inspired to try out this pattern? I think it's a great one for gifts and also for travel knitting. For me, this was early-morning coffee-drinking knitting, waiting room knitting and coffee date knitting! So thanks for the inspiration, Michelle!
| RYC Soft Lux in Sable |
| unfocused, to better show the metallic highlights |
The pattern is a free one, really more of a recipe. The designer recommends using a larger-than-usual needle for working the brioche stitch to make the scarf more cushy, and with that as a guideline you could use lots of different yarns to create this scarf. For this worsted weight yarn I used a size 10 (6.0mm) needle, as I knit loosely. My yardage ended up being about 30 yards short of the recommendation; however, my scarf is 46" long and I am short, so it's a good length for me. The 40 stitches I cast on gave me a width of about 12" when relaxed.
I haven't blocked this scarf, and I don't think I will. I don't want to lose any of the loft of the stitch, and this yarn is rather delicate, being basically a singles with a metallic strand wrapped around it.
The pattern says you can seam or graft your stitches together. I started with a long-tail cast-on, so I chose to seam with mattress stitch at the end, giving the scarf one twist beforehand. It's not a big deal for me to keep the seam at the back, and it's not very visible anyway.
Apart from the squishiness of the brioche stitch and the softness of the yarn, what I really love about this is that it can be worn a few different ways:
![]() |
| hanging |
| draped around the shoulders |
![]() |
| doubled around the neck |
Even though this scarf isn't a very versatile color (I really wanted off white) I just love how it turned out. I'm pretty sure I'll be making more of these. It took me about a week to make; I was working on other projects during that time but I'd say about 60% of my efforts went to this one. So, a pretty quick make, and very enjoyable - the brioche stitch was so fun to do.
The only thing I might add to the recipe is instruction on how to do the cast-off row if you're going to seam (or the final row if you're going to graft): in every row, you do *yo, s1 purlwise, k2tog* - where the yo from the previous row counts as a stitch. In the final row, omit the yarn overs and instead of slipping one purlwise, purl that stitch, then knit the next 2 together.
Are any of you inspired to try out this pattern? I think it's a great one for gifts and also for travel knitting. For me, this was early-morning coffee-drinking knitting, waiting room knitting and coffee date knitting! So thanks for the inspiration, Michelle!
Friday, November 1, 2013
A Plain Dress
I haven't had much time or inclination lately to do a lot of sewing. But on Wednesday I got the bug, and I had a free day. So I made up a dress I've been thinking about for a long time: a lengthened version of the Dixie DIY Ballet Dress I've made 3 times already (one of which I never even blogged).
When I made my last Girl Charlee order over the summer, I bought 3 yards of Olive Green Solid cotton/spandex. My aim was to make a dress similar to one I had about 20 years ago (yikes!) and wore to death - just a simple, olive green, mid-calf length t-shirt dress. This fabric was billed on the GC site as midweight, but of course it's not that heavy. Can you tell I'm getting discouraged with their offerings? So many times the fabrics I've received have not been what I thought I would be getting. But I digress . . .
I read a lot of reviews before buying the Ballet Dress pattern that said the sleeves were quite wide. I know that Dixie updated the pattern a while ago and slimmed them down. But I decided to use the 3/4 sleeve pattern from the Renfrew tee, mostly because I had never bothered to trace the longer sleeve from the Ballet Dress pattern and the Renfrew sleeve was sitting there, ready to go. I did walk the sleeve cap around the armscye before cutting, to make sure the two would go together, and it's a perfect fit!
To lengthen the skirt, I extended the center front and side seam lines by a lot - 14 inches, because I wasn't really sure how much longer I wanted it to be. After the dress was put together, I ended up chopping off three inches, then turning the hem back by 1.25". I fused Fine Fusible Knit Stay Tape to the hemline before turning it back, just to see how I liked it. And it did give me a nice, firm yet flexible edge for hemming. I chose to do a zigzag hem rather than coverstitch because I had a little bit of thread left from another project that was almost the same color.
The rest of the dress was constructed entirely on the serger. The only other change I made was to lengthen the neckline binding like I did before, to 19.5". I see in my notes from that dress that I ought to have increased my swayback adjustment, but didn't remember until after the dress was done!
The shape of the dress is just what I had in mind. I only wish the fabric were a little heavier; it clings to all my lumpy bits and is more revealing than I'm comfortable with. I chose the least revealing photo, and I'm wearing tights and a slip underneath:
Still, it's a good dress for layering with my knitwear, like this:
Outfit details: Sweater: Evie by Kim Hargreaves; belt: Loft, old; boots: Born Tatiana, old; scarf: Vera Neumann, super old!
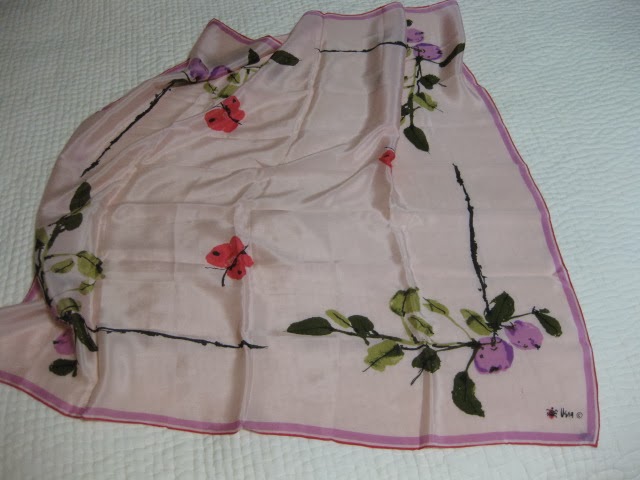
This is one of my collection of vintage Vera scarves. I've probably got about 45 of them at this point. I just love her artwork. This one is quite large, and all silk.
Lately it seems all I want to do is knit, and I've succumbed to a bout of Start-it-itis. But I did manage to finish something, and took photos today while I had this dress on, so I'll be sharing that one tomorrow.
Do you guys ever try to recreate garments you had years ago? I usually shy away from any of the styles I wore in the '90s, but the original dress (from Tweeds mail-order catalog - anybody else remember that?) was such a simple shape, it's really pretty timeless. I'd like to do this dress in other colors, if I can find some heavier knits to work with.
When I made my last Girl Charlee order over the summer, I bought 3 yards of Olive Green Solid cotton/spandex. My aim was to make a dress similar to one I had about 20 years ago (yikes!) and wore to death - just a simple, olive green, mid-calf length t-shirt dress. This fabric was billed on the GC site as midweight, but of course it's not that heavy. Can you tell I'm getting discouraged with their offerings? So many times the fabrics I've received have not been what I thought I would be getting. But I digress . . .
I read a lot of reviews before buying the Ballet Dress pattern that said the sleeves were quite wide. I know that Dixie updated the pattern a while ago and slimmed them down. But I decided to use the 3/4 sleeve pattern from the Renfrew tee, mostly because I had never bothered to trace the longer sleeve from the Ballet Dress pattern and the Renfrew sleeve was sitting there, ready to go. I did walk the sleeve cap around the armscye before cutting, to make sure the two would go together, and it's a perfect fit!
To lengthen the skirt, I extended the center front and side seam lines by a lot - 14 inches, because I wasn't really sure how much longer I wanted it to be. After the dress was put together, I ended up chopping off three inches, then turning the hem back by 1.25". I fused Fine Fusible Knit Stay Tape to the hemline before turning it back, just to see how I liked it. And it did give me a nice, firm yet flexible edge for hemming. I chose to do a zigzag hem rather than coverstitch because I had a little bit of thread left from another project that was almost the same color.
The rest of the dress was constructed entirely on the serger. The only other change I made was to lengthen the neckline binding like I did before, to 19.5". I see in my notes from that dress that I ought to have increased my swayback adjustment, but didn't remember until after the dress was done!
The shape of the dress is just what I had in mind. I only wish the fabric were a little heavier; it clings to all my lumpy bits and is more revealing than I'm comfortable with. I chose the least revealing photo, and I'm wearing tights and a slip underneath:
Still, it's a good dress for layering with my knitwear, like this:
Outfit details: Sweater: Evie by Kim Hargreaves; belt: Loft, old; boots: Born Tatiana, old; scarf: Vera Neumann, super old!
This is one of my collection of vintage Vera scarves. I've probably got about 45 of them at this point. I just love her artwork. This one is quite large, and all silk.
Lately it seems all I want to do is knit, and I've succumbed to a bout of Start-it-itis. But I did manage to finish something, and took photos today while I had this dress on, so I'll be sharing that one tomorrow.
Do you guys ever try to recreate garments you had years ago? I usually shy away from any of the styles I wore in the '90s, but the original dress (from Tweeds mail-order catalog - anybody else remember that?) was such a simple shape, it's really pretty timeless. I'd like to do this dress in other colors, if I can find some heavier knits to work with.
Subscribe to:
Posts (Atom)