Here's the little tip I mentioned yesterday. This is a method to figure out how much yarn you need to save for the end shaping of something like a hat worked in the round. It works especially well with a pattern like the Mock Rib Watch Cap, which has the decreases worked in rapid succession right at the very end.
Knit your piece until you are close to working the decrease. Work to one stitch beyond the end of round marker, so you don't have to worry about the marker falling out.
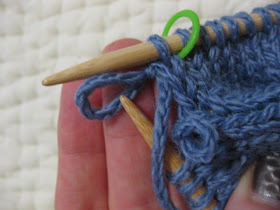
Now, make a slip knot in your working yarn, right up next to the stitch you just worked.
Loop that little noose over your right hand needle so it doesn't work itself out, then work all the way around to one stitch past the marker again. Put a second slip knot in your yarn. Make sure not to work that slip knot from the beginning of the row as a stitch! Here you can see that I took it off the needle after working the last stitch.
Place a removable stitch marker, safety pin or loop of yarn through your second slip knot to keep it from coming undone, and pull it tight.
OK - don't hate me now! You're going to unknit (tink) that entire row, all the way back to the first slip knot. The amount of yarn you have between the first and second slip knots is the amount you need to work one round. Measure it with a measuring tape and make a note of the number.
Don't hate me again: we have to do a little math here! For this pattern all the decreasing happens in the last 7 rows. There are 4 decrease rows which reduce the number of stitches by half, alternated with plain rows. So you're going to work 7 rows, but you don't need 7 full rows worth of yarn. It's not too hard to figure out how much you need. I'll use the numbers from this pattern as an example.
Hat starts with 88 stitches.
1st decrease row reduces to 44 stitches; one row plain at 44 stitches = one full row (88 st. total)
2nd decrease row reduces to 22 stitches; one row plain at 22 stitches = one half row (44 st. total)
3rd decrease row reduces to 11 stitches; one row plain at 11 stitches = one quarter row (22 st. total)
4th decrease row reduces to 6 stitches; remaining yarn is threaded through to close = approx. one quarter row
Add them up:
1 + 1/2 + 1/4 + 1/4 = 2
So we only need to save enough yarn to work 2 full rows. Measure off that amount from the end of the ball, being very careful not to stretch the yarn out as you do so. Place another slip knot to mark, and then wind or twist that into a ball if you want to.
Then just keep working your hat til you get to that marker! Once you're there - or close enough that you can't work a full row - begin your decreases to finish your hat.
I don't always do this, but it's a great trick for those times when I have a luscious yarn like this and I want to use up every last bit and make my hat a tiny bit slouchier. I was able to get about 3 extra rows by doing this - just over a half inch of length!
This method can also be used for knitting flat, however, a general rule of thumb with stockinette knit flat is that the width of the work x 3 gives you the amount of yarn needed to work one row. Notice I said stockinette though - a very textured stitch will produce different results, sometimes wider and sometimes narrower. In those cases, this is a great method to have in your bag of tricks!


This is a fab tip, thank you. That yarn looks totally yummy too.
ReplyDeleteOooh, it is! 70% merino and 30% alpaca - SO soft!
DeleteThis is a neat trick! Thanks for sharing.
ReplyDeleteGlad it was helpful, Stef!
DeleteBrilliant!
ReplyDelete-- stashdragon
Thanks, Gretchen!
DeleteThis is a great tip! I recently almost finished a baby hat when I found out I was just a couple feet short. On a baby hat. It didn't take too long to fix, but it was sure frustrating!
ReplyDeleteEither way, you'll end up tinking, LOL! But this way, you do it on purpose. It just feels better that way!
DeleteOh this is very clever, and way less time consuming than knitting to the end and having to pull it all out again when you find out there isn't enough yarn! Thanks for sharing this tip!
ReplyDeleteGlad you liked it, Ivy!
DeleteLove it! Am I odd in that I kinda like math when it comes to knitting?
ReplyDeleteYes. That is odd. LOL! I hemmed and hawed about figuring this out at first, but it really wasn't as difficult as I was trying to make it. Will have to keep that in mind for next time!
DeleteI'm definitely bookmarking this post!
DeleteGenius! Thanks so much for sharing.
ReplyDeleteThanks, Evie!
Delete